Ever wanted to habe a Code Sandbox to run a script in Flow? I had this issue to calculate an SHA1 hash value which is not possible with builtin flow functions. Obvious solution would be to put it in an Azure Function. There is a solution by Valentin Gasenko to create a custom connector and utilize the Code feature.
You may create a custom connector that connects to nowhere😉 with a fake method and place C# code there. It has some limitations to an Azure Function e.g. you can’t install packages etc. but it might help for many other issues.
OpenAPI Definiton
Create a new OpenAPI Definition Swagger file that defines a method you would like to use in your flow. Here is an example for an API with a method called executeScript that takes a string as input and returns a string as output.
{
  "openapi": "3.0.0",
  "info": {
    "title": "Script Execution Service",
    "version": "1.0.0",
    "description": "A simple REST API that executes a script and returns text output."
  },
  "paths": {
    "/ExecuteScript": {
      "get": {
        "summary": "Executes a script and returns text output",
        "operationId": "executeScript",
        "parameters": [
          {
            "name": "input",
            "in": "query",
            "description": "The script input as a string",
            "required": true,
            "schema": {
              "type": "string"
            }
          }
        ],
        "responses": {
          "200": {
            "description": "Successful execution",
            "content": {
              "application/json": {
                "schema": {
                  "type": "object",
                  "properties": {
                    "output": {
                      "type": "string",
                      "description": "The output of the executed script"
                    }
                  }
                }
              }
            }
          },
          "400": {
            "description": "Invalid input provided"
          }
        }
      }
    }
  }
}
Create a custom connector in PowerAutomate
In PowerAutomate create a new custom connector. You may have to lookup the custom connector link by clicking on “… More” on the left pane.
Create a new custom connector by importing the OpenAPI definition file. Provide name and description if you like. Make sure to set the Host to valid URL. It doesn’t matter if there is no real host with this name. I use fakeapi.local in my example.
Place C# code
Go to the Code section and enable code by selection the slider. Choose the method you want to use. In my example it’s the executeScript Method. Copy the C# code you want to execute in the code editor window below. This is an example code that reads the input parameter from the request and returns it in a Hello statement.
public class Script : ScriptBase
{
  public override async Task ExecuteAsync()
  {
    HttpResponseMessage response = new HttpResponseMessage(HttpStatusCode.OK);
    string url = this.Context.Request.RequestUri.PathAndQuery;
    string parsedUrl = url.Split('?')[1];

    var paramsCollection = HttpUtility.ParseQueryString(parsedUrl);
    string value = paramsCollection["input"];

    response.Content = CreateJsonContent("{\"message\": \"Hello "+value+"\"}");
    return response;
  }
}
Save and Test
You have to select “Create Connector” before testing. If your code is not working you will get an error here. If the creation was successful you can test your connector.
Use C# Sandbox in your Flow
Simply create a new flow or use an existing one. You we’ll find the connector under the custom connectors. In my example it has a single action to execute the code to which I pass the value of the variable Name.
Like in the connector test scenario, it executes the C# script and returns Hello and the provided value.
Modern cloud-based ERP systems are complex distributed software applications. These systems became more powerful over the last decades and provide more features to satisfy user needs than previous generations of ERP systems. Furthermore, they are integrated with other cloud-based systems. [Question/problem] The resulting increase in complexity leads to a higher probability of failures within this integrated system. This makes it difficult for users to fully understand these systems and even qualified key users don’t have an overview of possible system issues anymore. As a result, the number of support calls and diffuse support ticket requests have increased in the last years. Moreover, ERP partner organizations such as insideAx experience that users lose trust in their systems. [Principal idea/results] The goal of our work is to foster the trust of ERP users in cloud-based ERP systems and to reduce the number of unnecessary support requests, by enhancing existing user feedback and monitoring mechanisms and provide a visualization of system health indicators to users. Overall, these visualizations and explanations of the system health status need to be easy to understand by users. [Contribution] In this workshop paper, we provide insights from industry on how to foster user trust in complex software systems and depict a conceptual solution which makes use of system monitoring data to communicate the system status to users in a simple and understandable way. Our conceptual solution, for which we also provide a first implementation architecture proposal, foresees that simple modifications to the software and ambient light devices allow to build such visualizations.
Dynamics 365 Customer Voice is a great tool to create surveys. It also comes with a set of integration templates for other Dynamics 365 products like Customer Service and Field Service. The service order template is using a flow in Power Automate to send a satisfaction survey to the primary contact after a work order in Dynamics 365 Field Service has been completed. This video shows how to setup the template and what it looks like in practice:
Power BI goes hand in hand with Dynamics 365 Finance and Supply Chain Management. By default Power BI can be used within workspaces and Dynamics 365 comes with a data warehouse and a large set of reports and dashboards. But wouldn’t it be nice to show Power BI visuals in common forms and filter on the active record? This can be done without coding by using Power Apps:
D365 Parameter to Power BI filter
Dynamics 365 Finance is capable to load Power Apps and pass parameters to the App, while Power Apps can load PowerBI reports and pass a filter to Power BI.
Create a Power BI report
Create a report that can be drilled down to the granularity you want to display in Dynamics 365 Finance. For example if you want to show customer specific information, your report should support filtering on a customer account.
For example I’m using the SalesInvoiceV2Lines and ReleasedProductsV2 entities. The SalesInvoiceV2Lines comes with a table reference to the SalesInvoiceHeaders where the invoice account is stored. The ReleasedProductsV2 can be linked to the lines via the product number.
Dynamics 365 Finance SalesInvoiceV2Lines entity in Power Query editor
Next create the desired visuals. For example a column chart for the revenue by Year and a donut chart for the revenue by product group. Add a filter and inspect the different results you would expect for differnt customers.
Revenue by Year and Product Group
Save and Publish the report. Open the report in Power BI Online and pin the two visuals on a new dashboard. Make sure to give the visuals on the dashboard a useful title and subtitle.
Power BI tiles on a dashboard
Power Apps
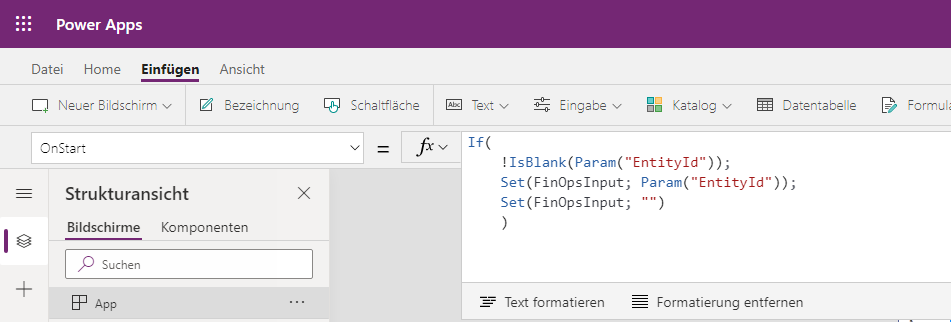
Everything comes together in Power Apps. Here the parameter from Dynamics 365 Finance is stored in a variable and passed as filter to Power BI. Open Power Apps via https://make.powerapps.com and create a new canvas app. I’d suggest to use the smart phone layout. According to the documentation add the following code to the OnLoad in Power Apps. This will store the parameter value from Dynamics to a Power Apps variable called FinOpsInput. (Depending on your local settings you may need to replace , with ; in PowerApps)
Read parameter from Dynamics 365 Finance in Power Apps
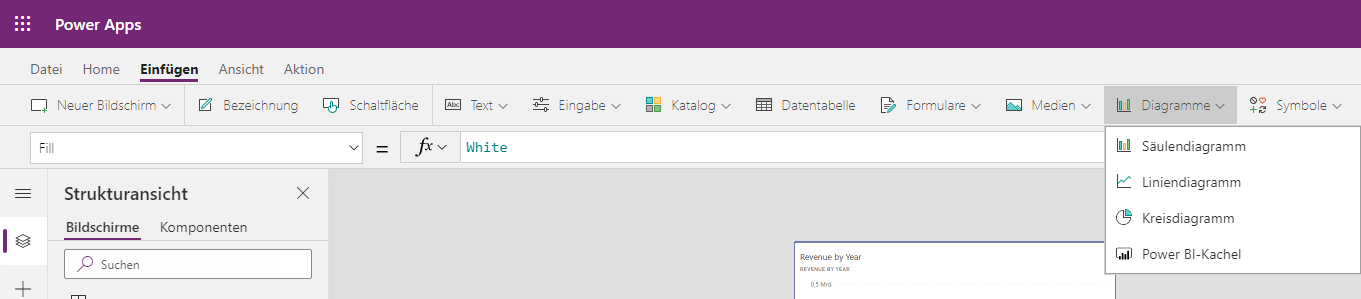
Next, add the Power BI tiles. From the ribbon go to Insert > Diagram > Power BI. Insert a Power BI tile to the empty screen. Choose your workspace, next the dashboard and finally the tile.
Insert a Power BI tile in Power Apps
The Power BI tile is referenced via an URL. This can be edited by selecting the Power BI tile and switch to Advanced. The syntax is:
&filter=TableName/FieldName eq 'YourValue'
Add a filter on the customer account with the values from the FinOpsInput variable as value. Make sure that the filter matches the field in your Power BI report. For example this would look like the following URL in my example:
Save and publish your App. From the list of your Apps, open the details page of your app and copy the App ID.
Power App DetailsCopy the App-ID from the details page
Add the Power App in Dynamics 365 Finance and Supply Chain
Logon to Dynamics 365 Finance and navigate to the screen where you want to display the Power BI tiles. In my example I’d choose Module Accounts Receivable > All Customers. In the upper right at the ribbon click on the Power App button and select add an App.
Add a Power App to Dynamics 365 Finance and Supply Chain Management
In the Add an app dialog provide a useful name. Paste the App-ID in the second field. From the context dropdown select the field to pass as parameter to Power Apps. In my case this would be the AccountNum. Finish by clicking on Insert.
Dynamics 365 Finance requires a reload of the page (F5). Test your Power App by selecting a record and the from the Power Apps button open the Power App. It will load the Power App and present the filtered Power BI tiles.
The first lock-down in spring was a game changer. Home office has become normal. But also in non-lock-down times the usage of Microsoft Teams now is on a high volume. For us it has become the collaboration backbone.
Teams usage is stable no matter if lock-down
Webcast Marathon
Last week on 26th November we held a webcast marathon. We presented 6 talks for Dynamics 365 Finance and Power Platform. The webcasts were organized using Microsoft Teams Live Events. The registration pages were quickly built using Microsoft Forms and automated using Power Automate. When a new participant registered for a webcast, PA read the registration from Form, picked the corresponding .ics calendar, sent a mail to the participant with the calendar .ics as attachment and created a new record in Azure table storage.
Webcast Registration via Power Automate
It turned out that the combination of Office 365, Power Platform and Teams work great together and allows to manage a complex distributed scenario like a webcast with different speakers exclusivly in the cloud.
Lock-down results
In contrast to the very strict first lock-down in spring, the actual “hard” lock-down allows more exceptions.
Monday morning: Some stay at home but many (have to) go to work (30th November)Monday morning : First week of first lock-down in spring (16th March)
In theory we have a curfew all day. Schools and Universities are closed, many retail stores are closed, home depots are closed for B2C customers and gastronomy is limited to delivery. But since going to work, sport and shopping is allowed we don’t really feel the pressure like in spring. However, it seems to work and the numbers are dropping.
Power Automate (aka. Microsoft Flow) is a great cloud-based tool to automate all possible tasks. There is a Ethereum connector (Beta) that can be used to deploy a Smart Contract to an Ethereum Blockchain network and execute functions.
Ethereum Network
You need to connect to an Ethereum network. There is a fully managed Blockchain Service in Azure. I’m running my private network with Proof-of-Authority. At the Azure management portal, go to the transaction node to get the required information to connect.
Blockchain-as-a-Service in Azure
Smart Contract
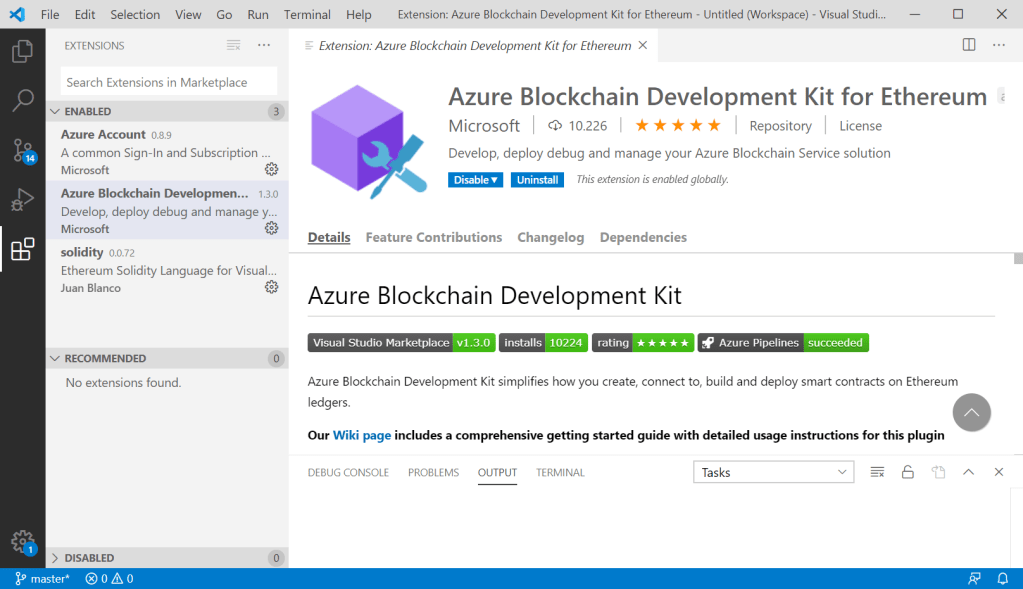
I’m using Visual Studio Code with the Ethereum Blockchain Development SDK to implement a Smart Contract in Solidity. You can find the link to the SDK at the Azure Blockchain Service portal.
VS Code with Azure Blockchain SDK
The SDK requires a lot of other software products to download and install. I found that the solidity compiler installed was newer than expected. As result the demo smart contract you get from the SDK did not compile. The simplest solution was to change the pragma of the contract
pragma solidity >= 0.5.16 <= 0.7.0;
ABI and Bytecode
In order to automate the deployment of a Smart Contract via Power Automate you need to provide the ABI and Bytecode. Both can be found in VS Code, at the build directory in the context menu.
Copy ABI and Bytecode directly from VS Code
Power Automate
You can directly provide the ABI and Bytecode in the Deploy Smart Contract action. However, I decided to place both in an Azure Table Storage and fetch it from there. To do so, I create a table with a column for the Bytecode, a column for the ABI and a name.
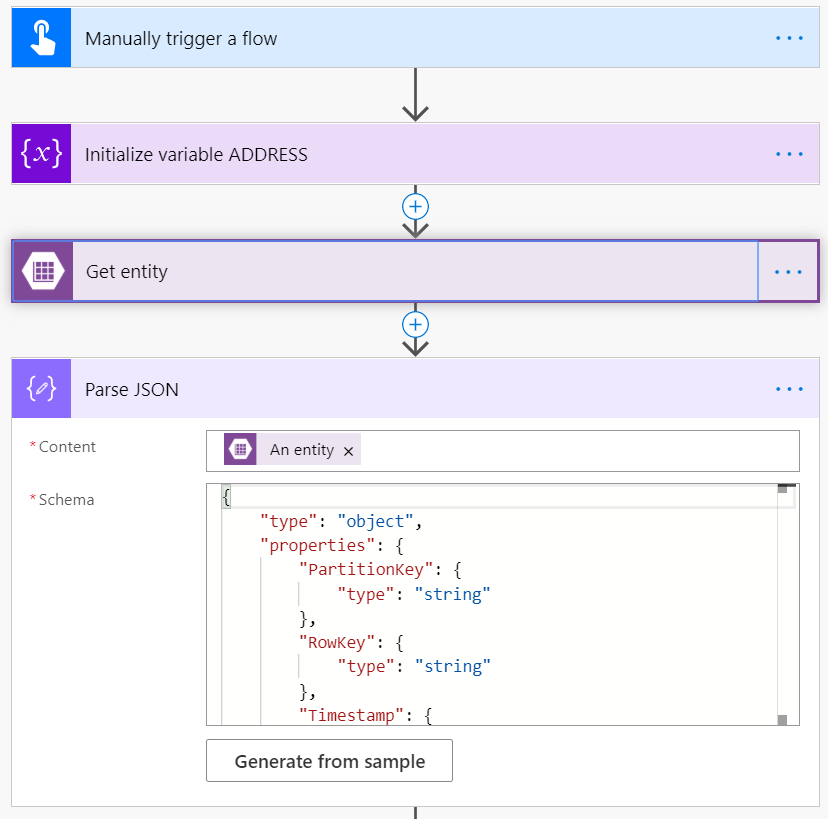
The first step in my flow is to connect to the Azure Storage account and get the smart contract I need. The result from the storage is a JSON string which is parsed so the ABI and Bytecode is available for the next steps
Fetch the smart contract binaries from the storage account
Next the Deploy Smart Contract action is used to deploy the contract. There you need to provide the connection to your Ethereum network. In my example there are two parameters for the constructor and for testing purpose these values are hardcoded. In real life you would provide values from the calling sources. The third parameter for the connector action requires the Bytecode which is taken from the storage account. The result from the deployment is the smart contracts address which is stored in a flow variable.
Deploy a smart contract
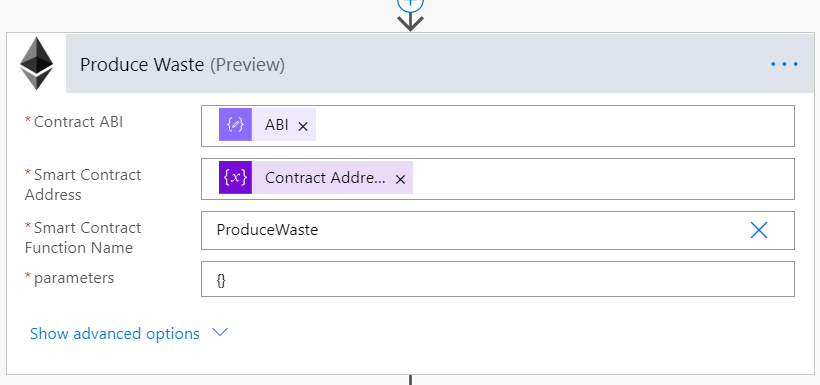
Interacting with the smart contract
After the Smart Contract has been deployed to the Ethereum Blockchain Network, use the Execute Smart Contract Function action in the flow. For each step you have to provide the address, the ABI, the name of function and the parameter as JSON string. A function without parameters has to be called with {} because the parameter property is mandatory.
Execute a Smart Contract function via Power Automate / Flow
Here is an example for a function with some parameters. These parameters have to be provided as JSON string in Flow.
function SetupMachine(int sawLength,
                      int waterTemp,
                      int rpm,
                      int speed) public
    {
        if (State != StateType.Assigned)
        {
            revert('Assign to a machine first');
        }

        SawLengthMM = sawLength;
        WaterTempDgrC = waterTemp;
        ExtruderRPM = rpm;
        ExtruderSpeed = speed;

        State = StateType.Setup;
        Worker = msg.sender;
    }
UI Flows are new features from power platform april 2020 wave, and allow you to integrate local installed applications and web sites. I’ve made a video with UI Flow for web sites. In this demo I’ve create a flow that reads the Bitcoin / Euro rate from a web sites and sends it per Email.
Azure Functions are simple way to pack and provide business logic as web service without worrying about hosting a web server. Azure Functions can be implemented in different programming languages like C#, JavaScript, PHP, Java, etc. and can be hosted on Linux and Windows with different runtime environments that feed your need.
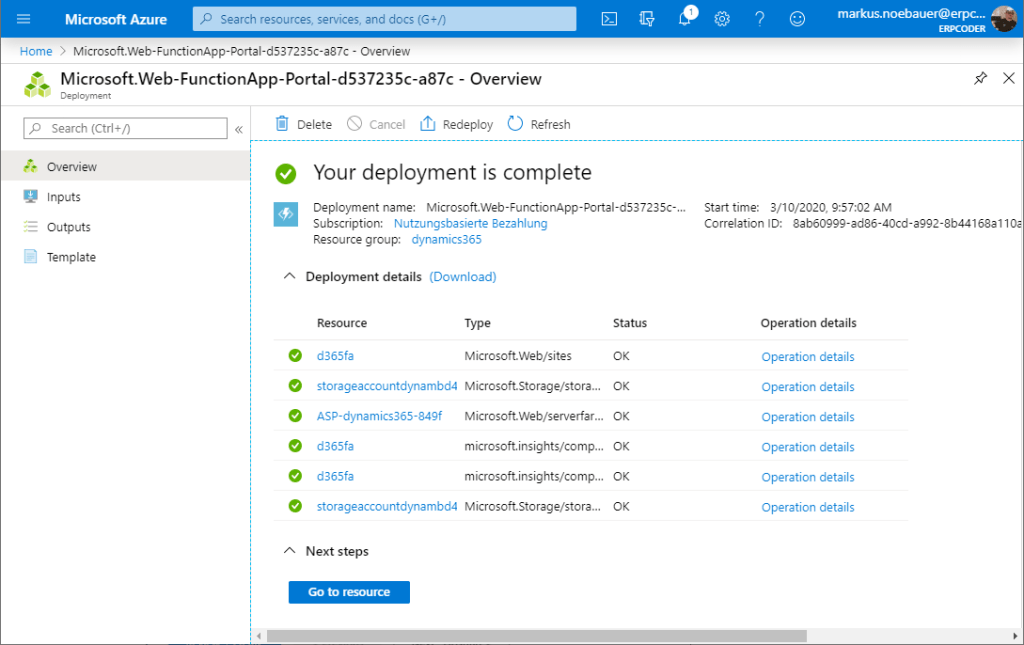
In the Azure Portal click + Create a resource and search for Function App:
In the next screen choose a subscription and create a resource group (or use an existing one if you like). Provide a useful name and choose code as Publish method. Select .NET Core 3.1 as runtime stack and a region that is near your location:
Click Review + Create to create the Azure Function. It takes a view minutes to provision all the required elements:
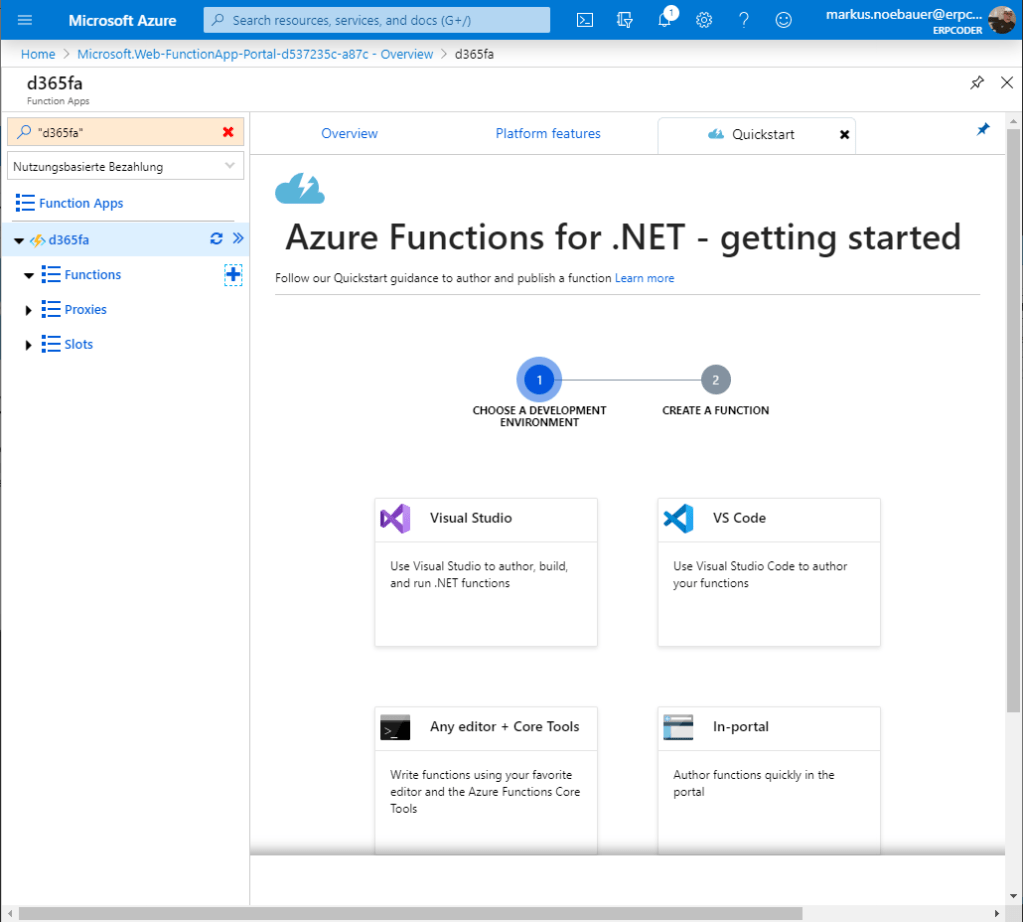
Click on Go to Resource. Next to the Functions group click + to create a new function and select In-Portal to edit the function code direct in the browser:
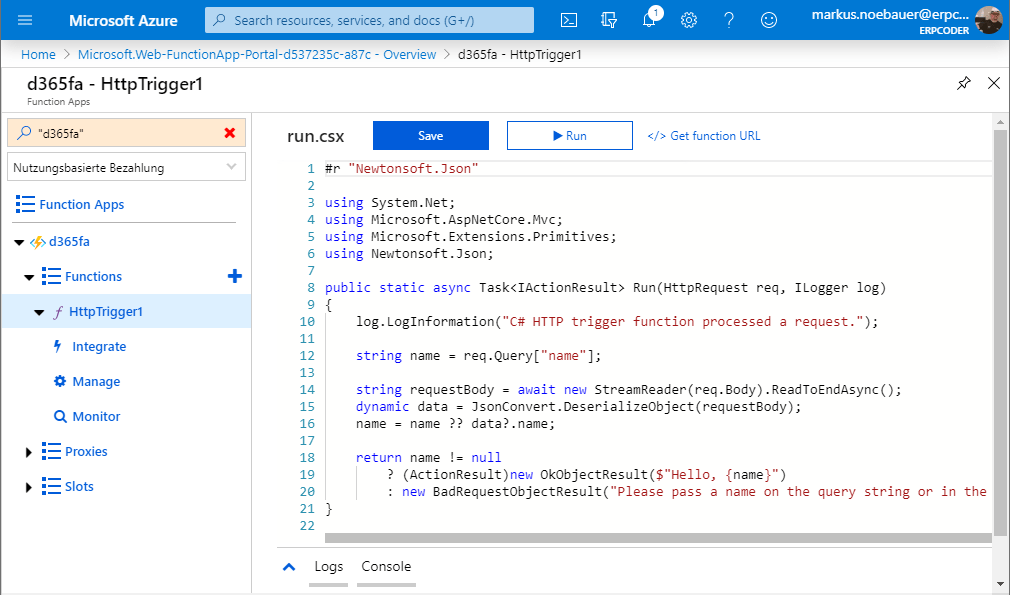
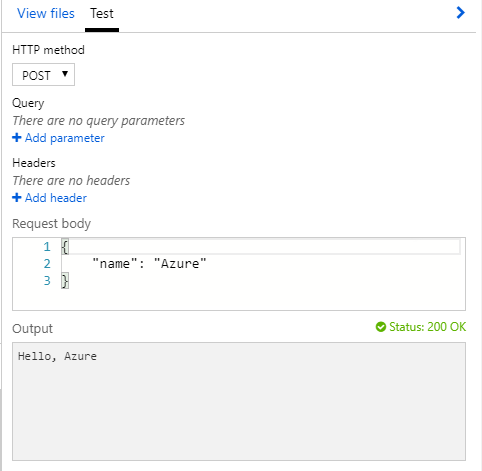
Choose the webhook + API to create a demo function that can be called via HTTP POST.
This will create a function that takes a name as parameter and returns “Hello ” + the parameter name.
You can test the function by using Test tab on the right. The function takes a JSON string with a name parameter and returns a simple string.
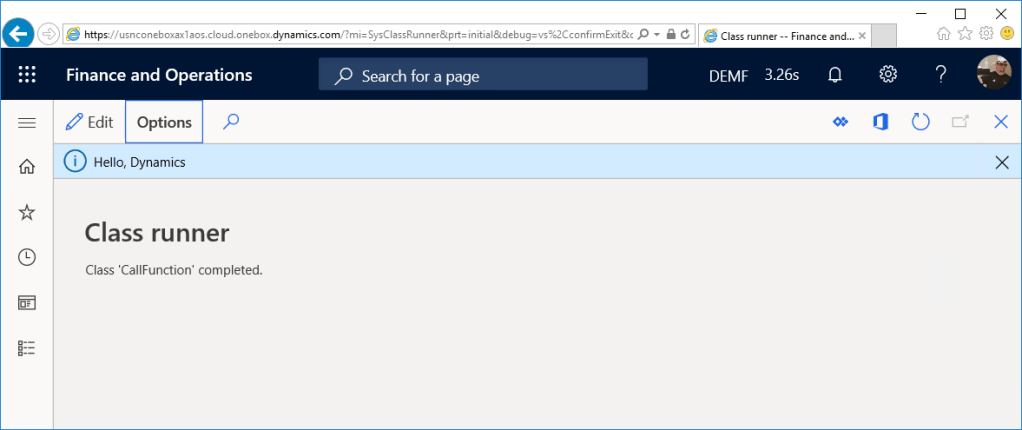
Call the function from X++
In the azure portal get the function URL with a function key. Copy the URL with the key:
In Visual Studio create an X++ class with a main method for testing. Use the System.Net.Http.HttpClient class to call the service. The content is a JSON string encoded in UTF-8 with a name parameter and value. In this example the name is Dynamics:
System.Net.Http.HttpClient httpClient = new System.Net.Http.HttpClient();
System.Net.Http.HttpContent content = new System.Net.Http.StringContent(
        "{\"name\":\"Dynamics\"}",
        System.Text.Encoding::UTF8,
        "application/json");
At the moment X++ does not support the await keyword for asynchronouse calls. The workaround is to use the Task.Wait() method. Call the service with your function URL async and get the content of the call:
var task = httpClient.PostAsync("https://<YOUR_FUNCTION_URL>",content);
task.Wait();
System.Net.Http.HttpResponseMessage msg = task.Result;

System.Net.Http.HttpContent ct = msg.Content;
var result = ct.ReadAsStringAsync();
result.Wait();
System.String s = result.Result;

info(s);
Start the class from Visual Studio. The result should look like this:
PowerBI and Cognitive Services are a powerful combination. A nice example is a tag cloud based on the key phrases in your daily emails. This example requires the following cloud components:
PowerBI (of course)
Cognitive Services for Key Phrase extraction
Exchange Online
Flow and Table Storage in Azure
Cloud Infrastructure
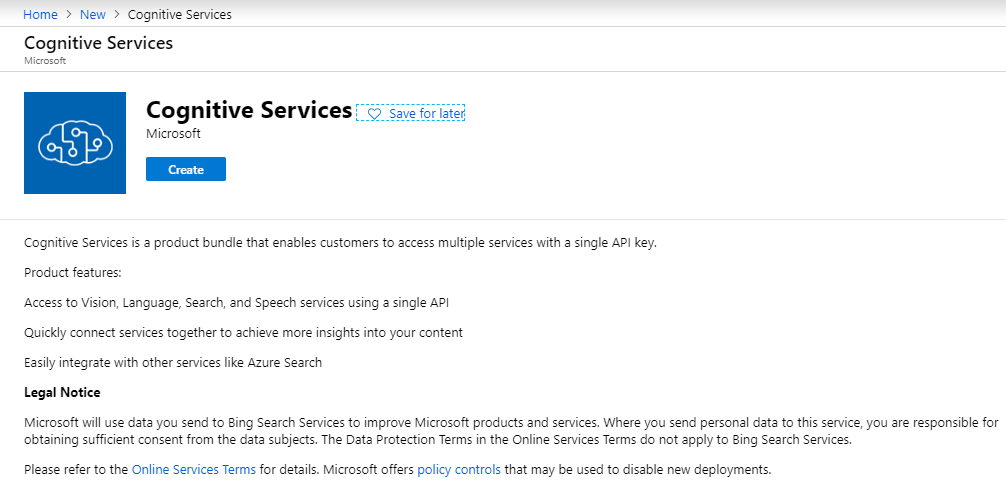
First, go to your Azure portal and create a new Cognitive Services Resource. In the creation wizard place the cognitive services to a data center near your Office subscription. I’d also recomend to creata a seperate resource group where you place all the services.
Cognitive Services in Azure
At the Cognitive Services Overview tab, copy the Endpoint URL. From the Cognitive Services > Key tab also copy the Key1. You need both to connecto to the cognitive services.
Azure Storage Account
Next create a new stroage account. Like in the Cognitive services place it in the same resource group and same data center. After the storage account has been created successfuly go to the overview tab.
Azure Table Storage
Select “Tables” and create a new table. Give it a useful name e.g. keystorage. A table storage can be used to place structured data, which require at least to fields a RowKey and a PartitionKey. It is up to you to provide meaningful values to theses fields when inserting data.
Copy the storage account name and from the Access Keys tab the Key1 value. You will need both to connect to the storage account.
Implement transformation pipeline in Flow (first naive approach)
Now, lets create the extraction logic using Flow. There are some limitations with this approach that will result in errors. A more stable version of the flow is discussed at the end. Go to https://flow.microsoft.com and create a new triggered flow from blank.
Automated Flow from Blank
The trigger for the flow is Outlook > When a new email arrives.
Because almost all my mails are HTML formated, I need to add the Content Conversion > HTML to Text step to remove the HTML code from the email body.
The third step in the flow is the key phrase extraction. Therefore add the Text Analysis > Key Phrase extraction step. There you need to provide the Cognitive Services Account Key and Endpoint. The text to analyze is the output from the HTML to Text step.
The last step writes the key phrases to the Azure Table Storage. Like in the Cognitive Services step, you have to provide the name and a key. From the Table dropdown select the table you have create earlier in the Azure portal. The entity has to be a JSON string. In my example the Partition is always 1 and the Row key is a Guid. Because, one mail will have more than one key phrase, the insert is encapsulated in an Apply-to-each block
Test your flow by sending an Email to your account. All the steps should succeed
Keyword Extraction Flow Test
You can use the Azure Storage Explorer in the Azure portal to lookup the phrases extracted from the email. In this example I sent an email from my company account, to my private mail account. The flow extracted the key words from the mail (Signature).
Azure Storage Explorer
Tag Cloud in PowerBI
In PowerBI add a new data source from the Azure Table storage. Again you need to provide the storage name and one of the keys. After connecting successfuly to the table, open the transformation window an take a look at the retrieved keys. You can remove the PartitionKey, RowKey and Timestamp from the data set.
Azure Table Storage in PowerBI
In the PowerBI report window, from the Visuals, klick on the Elipsis (…) and search for the Word Cloud in the marketplace. Add the Word Cloud Visual to PowerBI
Word Cloud Visual for PowerBI
Add the visual to the PowerBI report window. Set the Key Phrases as category in the visual.
Word Cloud in PowerBI Desktop
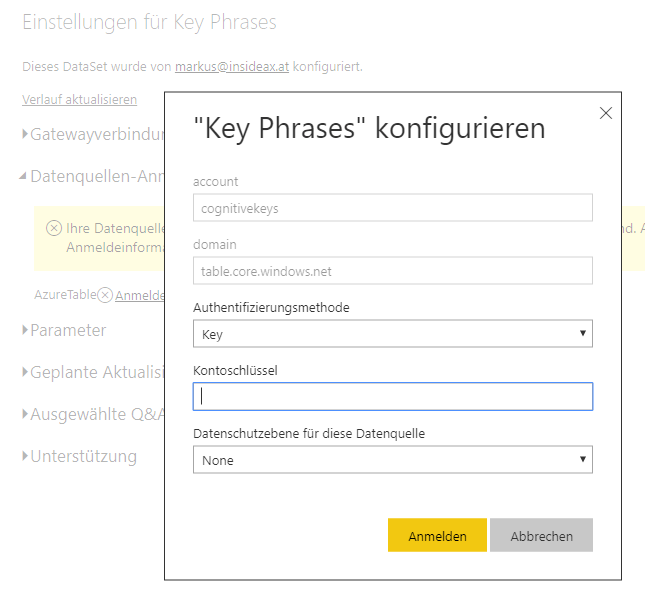
PowerBI Online Service and automated Refresh
Publish the PowerBI report to your workspace. Within PowerBI Online, go to your workspace and navigate to the dataset. From the Elipsis (…) open the settings page. Provide the Key for Azure Table storage.
Azure Table Storage Connection
Now you can also schedule the automatic refresh
Automatic Refresh from Azure Table Storage in PowerBI Online Services
Implement transformation pipline with a more stable Flow
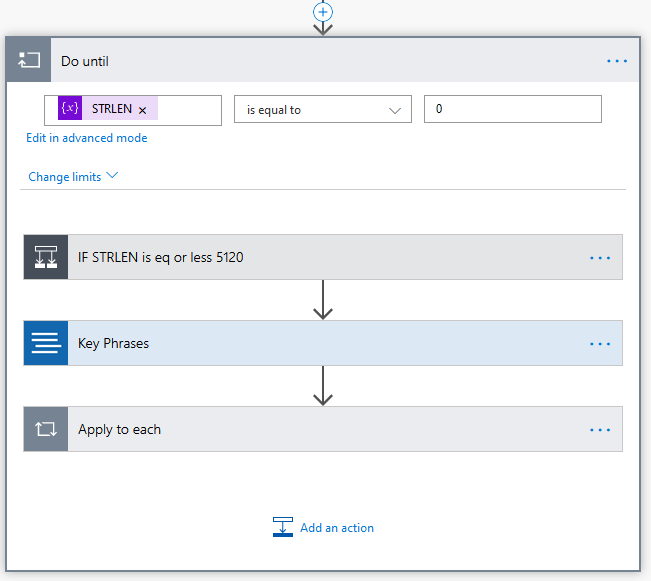
Unfortunatelly, the text processing in Cognitive Services is limited to 5120 characters. In many cases, Emails contain more characters than this and the flow will fail with an error from the Cognitive Services. One way to address this issue, is to implement a loop that cuts the Email body into pieces of 5120 characters or less before feeding it to Cognitive Services. However, Flow is not very developer focused and requires some workarounds for simple tasks like assigning function calls with a variable to itself e.g substring()
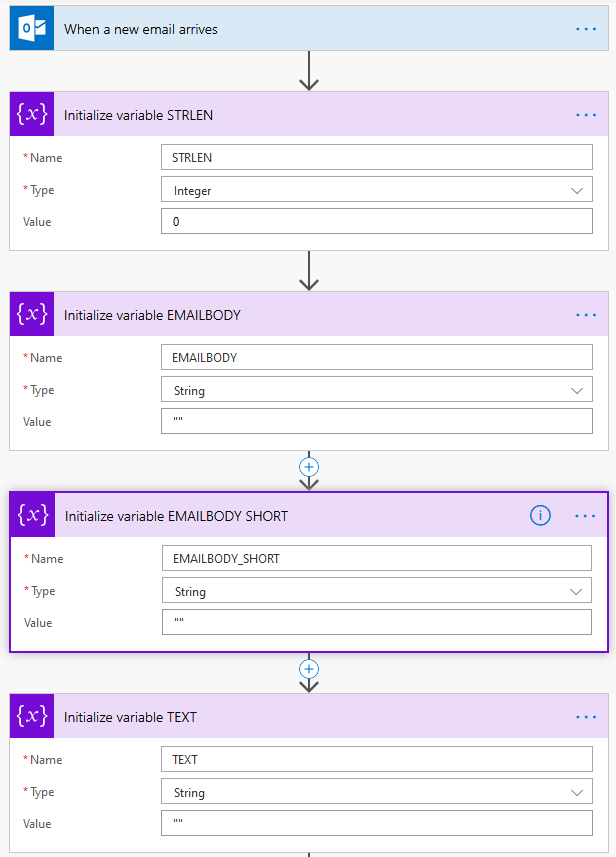
In the first place, delcare 4 variables
Some required variables in Flow
Next execute the HTML to Text block. An optimization is to use the Builtin Data-Operations action Compose to trim() the result to remove blanks from the start and end, and populate the STRLEN and EMAILBODY. Whereas the STRLEN requires a function: length(outputs(‘Trim_Text’))
Set the variables in Flow
Next, create a Do-While Loop from the Control elements in Flow. The condition for the Loop is STRLEN <= 0 because we are cutting the Email into pieces until nothing is left
A loop to cut the Email into pieces of 5120 characters (or less)
Within the Loop, create a IF decision depending on the STRLEN. If the STRLEN variable is less then 5120, the STRLEN is set to 0 to end the Loop. The variable TEXT is set to the EMAILBODY.
Email body is shorter than 5120
If the Emailbody is longer than 5120 characters, the first 5120 characters are copied to the TEXT variable: substring(variables(‘EMAILBODY’),0,5120)
Next the variable STRLEN is reduced by 5120: sub(length(variables(‘EMAILBODY’)),5120)
In the third step, the variable EMAILBODY_SHORT is set to the substring starting at 5121 till the end of the original EMAILBODY. Is is done, because Flow does not support variable asignment by a function that contains the variable itself: substring(variables(‘EMAILBODY’),5121,sub(variables(‘STRLEN’),1))
In the last step the orignial EMAILBODY variable is set to be the EMAILBODY_SHORT. It contains now the body without the first 5120 characters.
Email body is larger than 5120
Within the loop, after the IF condition, Cognitive Services are called with the TEXT variable and the results are written to the Azure Table Storage like in the first naive implementation.
Save Cognitive Services Results to Azure Table Storage
More Optimization
There are three additional ways to optimize this solution.
One may argue, that cutting the text into pieces might cut a releveant word for the Word Cloud into pieces and therefore cannot be recognized by Cognitive Services, e.g. Micros … oft. One way to address this is to modify the substring function, by checking the last index of “_” (Blank) and cut there.
Another issue is that Cognitive Services are not aware of all stop words. Especially if using Non-English Key Phrases you may end up with a messy cloud. However, there are public available lists of stopwords in certain languages out there, that can be loaded into PowerBI and used to exclude certain findings from Cognitive Services. The Word Cloud visual provides an Exclude property where you can provide stop words to exclude.
In the example from above, the language for Cognitive Services is set to DE (german). Howerver, this might not be optimal if you receive Emails in different languages. An optimzation could be to use Cognitive Service to detect the language, and switch the Key Phrase Detection Call for the most common languages in your Email inbox, in my case German and English.
Flow Download (package)
Please find the Flow Package in the Sources Onedrive Folder. Import the .zip File in your Flow Tenant. You need to map Outlook, Cognitive Services, Azure Table Storage, etc. to your configurations.
Power Apps recently got the capability to create some computer vision AI models. One of the IMHO most popular ones is called object detection, which is used to detect (predefined) objects on images. For getting started you may use the free edtion of power apps.
Environment and CDM Entity
AI Builder is bound to a Power Apps environment and the Common Data Model. If you don’t have already created an environment, logon to https://web.powerapps.com and create a new environment.
Create new environment
To use the CDM entities you need a new database. In my case, I created a new one with USD and English as preferred language.
Create new database
It may take a while, and you may need to refersh your browser screen, but the AI Builder (Preview) option will appear on the left menu bar.
Create new Power Apps AI Builder Object Detection model
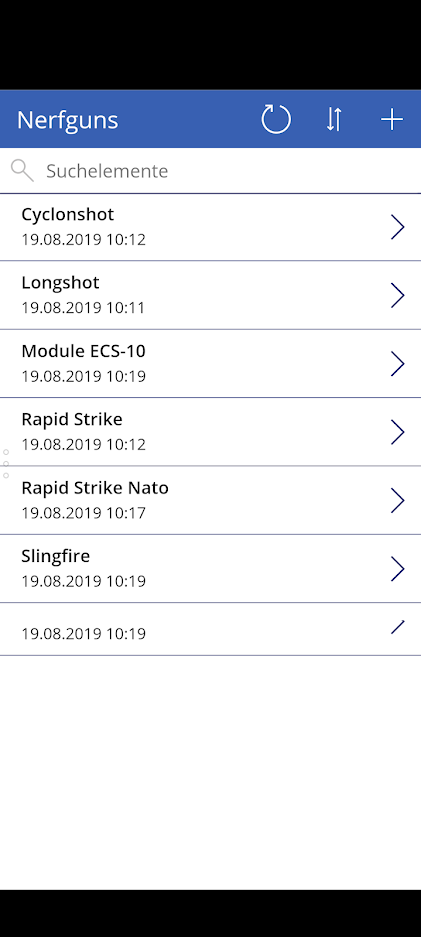
Next, go to Data > Entites and create a new entity for the type of objects you want to identify. In my case, I’m playing around with Nerf guns, therefore I created a new Nerfgun entity. It requires at least a useful name. Feel free to add more fields.
Select entity from Common Data Model
Provide entity data
In a next step you have to provide information about the different elements that shall be identified. In my cases, which Nerfs guns will be on fotos e.g. Rapidstrike, Slingfire, Cyclonshot, etc.
Entity in Common Data Model
There is an option to edit the entity via Excel. However, in my case the Excel addin is not working, and failing to authenticated 😦 If this happens to you, a workaround is to create a simple Power App and edit the entity via Power App.
Fill CDM entity with data using Power Apps
Create and train AI model
In Power Apps go to AI Builder and create a new model for object detection.
Create new AI model for object detection
Provide a name for the model and select the created entity for detection. From the records in the entity select those records that are relevant for detection.
Select object to detect using AI builder
Next comes the time consuming part, take pictures of your objects in different locations, lighting, quality, day time, etc. upload it to the power apps model. You need at least 15 pictures for each element you want to detect.
Upload images to Power Apps AI Builder
Tag each of the pictures with the corresponding object on the picture.
Tag object on images in Power App AI Builder
After uploading and tagging each picture, train the model. This may take a while and will result in a (not very usefull) quality estimation. Right now I didn’t see recall, precision, AUC, or any other more detailed information. If you are satisfied with the models estimated power, publish it so it can be used in your apps.
Train AI model for object detection
Use AI model in Power Apps
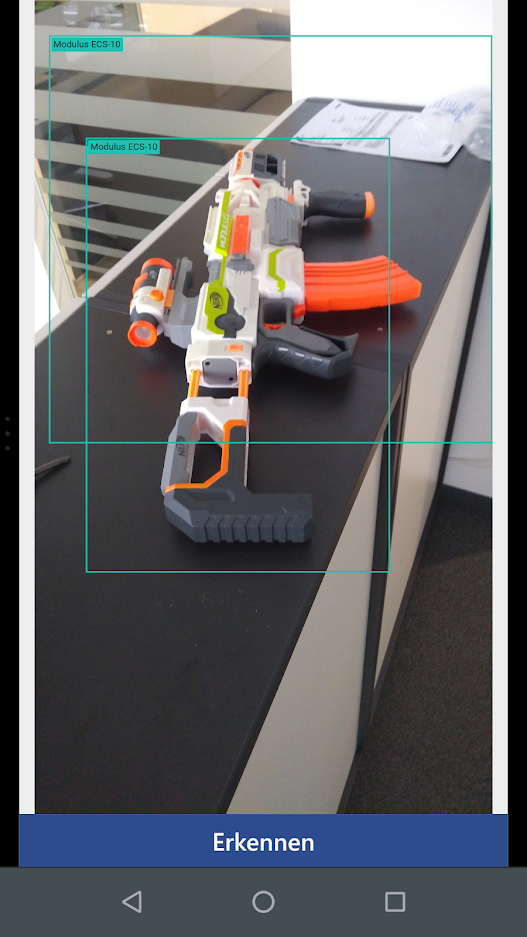
It’s easy to use the trained model in a Power Apps application e.g. on the smart phone. Create a new power app with empty layout. From the menu insert the object detection component.
Create a new PowerApps app with AI Builder
Select your object detection model for the component. Save and publish your app, load it on your phone and test it.