Pivot Financial Dimensions into a single Record

At work we had the requirement to provide a SQL view of PurchLine Records including their financial dimensions. However, since Dynamics AX the financial dimension data model has been enhanced to be more flexible. In contrast to older versions where Dynamics AX 2009 supported by default 3 dimensions, you are now free to configure as much as you want.

Financial Dimensions in Dynamics AX 2012

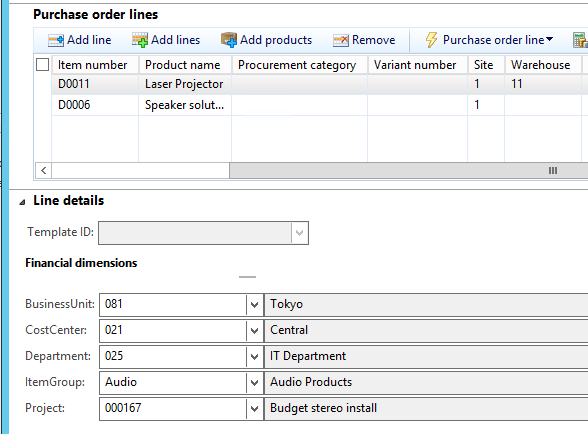
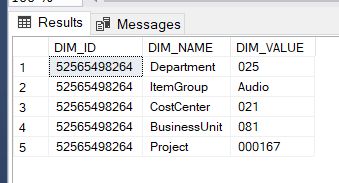
The tables involved are the DimensionAttributeValueSet, DimensionAttributeValueSetItem, DimensionAttributeValue and the DimensionAttribute. The following statement collects the financial dimension values from the image above (RecID for the set is 52565498264).

select
DIMENSIONATTRIBUTEVALUESET.RECID as DIM_ID,
DIMENSIONATTRIBUTE.NAME as DIM_NAME,
DIMENSIONATTRIBUTEVALUESETITEM.DISPLAYVALUE as DIM_VALUE
from DIMENSIONATTRIBUTEVALUESET
join DIMENSIONATTRIBUTEVALUESETITEM
on DIMENSIONATTRIBUTEVALUESET.RecId = DIMENSIONATTRIBUTEVALUESETITEM.DIMENSIONATTRIBUTEVALUESET
join DIMENSIONATTRIBUTEVALUE
on DIMENSIONATTRIBUTEVALUESETITEM.DIMENSIONATTRIBUTEVALUE = DIMENSIONATTRIBUTEVALUE.RECID
join DIMENSIONATTRIBUTE
on DIMENSIONATTRIBUTEVALUE.DIMENSIONATTRIBUTE = DIMENSIONATTRIBUTE.RECID
where DIMENSIONATTRIBUTEVALUESET.RECID = 52565498264

The result looks like this:

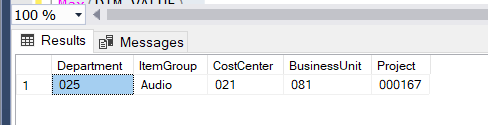
The PIVOT is used to switch row values into columns. The following statement creates a single record with columns for the dimensions:

SELECT * FROM
(
select
DIMENSIONATTRIBUTE.NAME as DIM_NAME,
DIMENSIONATTRIBUTEVALUESETITEM.DISPLAYVALUE as DIM_VALUE
from 
DIMENSIONATTRIBUTEVALUESET
join DIMENSIONATTRIBUTEVALUESETITEM
on DIMENSIONATTRIBUTEVALUESET.RecId = DIMENSIONATTRIBUTEVALUESETITEM.DIMENSIONATTRIBUTEVALUESET
join DIMENSIONATTRIBUTEVALUE
on DIMENSIONATTRIBUTEVALUESETITEM.DIMENSIONATTRIBUTEVALUE = DIMENSIONATTRIBUTEVALUE.RECID
join DIMENSIONATTRIBUTE
on DIMENSIONATTRIBUTEVALUE.DIMENSIONATTRIBUTE = DIMENSIONATTRIBUTE.RECID
where DIMENSIONATTRIBUTEVALUESET.RECID = 52565498264
) AS SourceTable
PIVOT
(
Max(DIM_VALUE)
FOR DIM_NAME IN 
([Department], 
[ItemGroup], 
[CostCenter], 
[BusinessUnit], 
[Project])
)
 AS PivotTable

The result looks like this:

If some dimensions do not hold values it will be NULL in the SQL but the statement will not fail

In order to join the financial dimension pivot record with the transaction like (e.g. PurchLine) add the RecId from the FinancialDimensionAttributeValueSet and join it on the Dimension reference field from the transaction table. Here is an example:

select
PurchId, ItemId, PURCHQTY, PURCHPRICE,
FinDim.Department, FinDim.ItemGroup, FinDim.CostCenter, FinDim.BusinessUnit, FinDim.Project
from PURCHLINE
left join
(
SELECT * FROM
(
select
DIMENSIONATTRIBUTEVALUESET.RECID as RECID,
DIMENSIONATTRIBUTE.NAME as DIM_NAME,
DIMENSIONATTRIBUTEVALUESETITEM.DISPLAYVALUE as DIM_VALUE
from DIMENSIONATTRIBUTEVALUESET
join DIMENSIONATTRIBUTEVALUESETITEM
on DIMENSIONATTRIBUTEVALUESET.RecId = DIMENSIONATTRIBUTEVALUESETITEM.DIMENSIONATTRIBUTEVALUESET
join DIMENSIONATTRIBUTEVALUE
on DIMENSIONATTRIBUTEVALUESETITEM.DIMENSIONATTRIBUTEVALUE = DIMENSIONATTRIBUTEVALUE.RECID
join DIMENSIONATTRIBUTE
on DIMENSIONATTRIBUTEVALUE.DIMENSIONATTRIBUTE = DIMENSIONATTRIBUTE.RECID
) AS SourceTable
PIVOT
(
Max(DIM_VALUE)
FOR DIM_NAME IN ([Department], [ItemGroup], [CostCenter], [BusinessUnit], [Project])
) AS PivotTable
) as FinDim
on PurchLine.DefaultDimension = FinDim.RecId
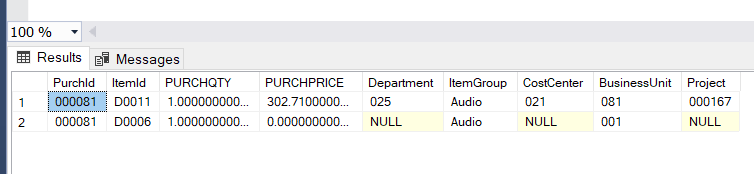
where PURCHID = '000081' and DATAAREAID = 'USMF'

The result set are two records, one for each PurchLine, and the corresponding financial dimension values:

Start and open a specific record in Dynamics Ax 2012

At work we recently discussed ways to startup Dynamics AX 2012 and navigate to a specific record. The requirement was to open Dynamics AX from a DMS client that manages invoices and other documents.

There are different approaches to achieve this goal. One way is to use the Startup Command framework which is used to instruct Dynamics to execute several functionalities during startup e.g. compile, synchronize or navigate to a menu item. In order to startup a menu item, you provide an XML file which contains the menu item name and point to this file from the .axc Dynamics AX configuration file.

Startup Dynamics AX 2012 with an XML configuration file

Reference the record in the startup XML file

For many forms in Dynamics AX it is sufficient to call the corresponding menu item with an Args object that holds the record. To specify a record in Dynamics AX you need to provide at least the TableId and the RecId. For example the Customer “Adventure Works” can be defined by using TableId 77 (CustTable) and the RecId 22565422070. Add two additional attributes RecId and TableId to the XML file which is used to open the CustTable form. The XML file looks like this:

<?xml version="1.0" encoding="utf-8"?>
<AxaptaAutoRun 
 exitWhenDone="false"
 version="4.0"
 logFile="$HOME\axEXProd.log">
<Run 
 type="displayMenuItem" 
 name="CustTable" 
 RecId="22565422070" 
 TableId="77"/>
</AxaptaAutoRun>

Modify the SysAutoRun.execRun() method

At the SysAutoRun class, open the execRun() method. At the top declare the following variables:

RecId recId;
TableId tableId;
Args arg = new Args();
Common common;
DictTable dictTable;

At the bottom, find the place where a menu item is started. Before the if(mf) statement add the following code to read the RecId and TableId from the XML file and select the corresponding record:

recId = str2int64(this.getAttributeValue(_command,'RecId'));
tableId = str2int(this.getAttributeValue(_command,'TableId'));
if(recId != 0)
{
   dictTable = new DictTable(tableId);
   common = dictTable.makeRecord();
   select common where common.RecId == recId;
   arg.record(common);
}

Within the if(mf) block, add the Args object when the menu fuction is called to pass the record.

mf = new MenuFunction(name, menuItemType);
if (mf)
{
   this.logInfo(strfmt("@SYS101206", mf.object(), enum2str(mf.objectType())));
   mf.run(Arg);
   result = true;
}

Test your configuration

Now you can test your configuration. Create a new .axc file and point it to the XML file. Make sure the XML file has a valid TableId and Recid property. Start Dynamics AX using the .axc file and the defined menu item should open and view the record.

Video Training: Advanced Development for D365 F/SCM

In cooperation with Learn4D365 I’ve recorded another course on Dynamics 365 Finance and Supply Chain Management Development. This video training presents techniques to extend Dynamics 365 F/SCM and discusses the application frameworks. Please find the online course here:

Development II for Finance and Supply Chain Management 

If Sort-Field is empty sort by another field

At work we recently discussed a customer requirement regarding sorting of a SalesTable data set in Dynamics Ax. The requirement was to sort by ShippingDateConfirmed. If the order has no confirmation date yet, use the ShippingDateRequested instead.

If exists sort by Shipping Date Confirmed otherwise by Shipping Date Requested

There are several ways to implement this requirement. Depending on the technology you can use SQL code, computed columns in Dynamics Ax 2012+ or a union query in AX 2009.

SQL: Select CASE

The easiest way to achiev the goal is using pure SQL code where you can define a new column within the select statement and use it for sorting. Here is an example:

SELECT 
SalesId, SalesName, 
ShippingDateRequested, ShippingDateConfirmed, 
CASE 
WHEN ShippingDateConfirmed = '1900-01-01 00:00:00.000' 
THEN ShippingDateRequested 
ELSE ShippingDateConfirmed 
END 
AS ErpSortField
FROM SalesTable
WHERE DataAreaId = 'CEU'
ORDER BY ErpSortField

The result in SQL Server Management Studio for a Dynamics Ax 2009 database looks like this:

SELECT CASE WHEN .. THEN .. ELSE .. END in SQL

You may use such a SQL query as data source for an SSRS report

SSRS Report based on AX 2009 Sales Order

Dynamics 365 F/SCM: Computed Column

Since AX 2012 we can use computed columns in views. One way to address this requirement is to create a column that contains the same CASE – WHEN SQL Statement. To do so create a new view based on the SalesTable. Add a new static method:

private static server str compColShippingDate()
{
  #define.ViewName(MBSSalesTableView)
  #define.DataSourceName("SalesTable")
  #define.FieldConfirmed("ShippingDateConfirmed")
  #define.FieldRequested("ShippingDateRequested")
  str sReturn;
  str sRequested, sConfirmed;
  DictView dv = new DictView(tableNum(#ViewName));

  sRequested = dv.computedColumnString(
                   #DataSourceName,
                   #FieldRequested,
                   FieldNameGenerationMode::FieldList);
  sConfirmed = dv.computedColumnString(
                   #DataSourceName,
                   #FieldConfirmed,
                   FieldNameGenerationMode::FieldList);

  sReturn = "CASE WHEN " 
          + sConfirmed + " = '1900-01-01 00:00:00.000' THEN " 
          + sRequested + " ELSE " + sConfirmed + " END";

  return sReturn;
}

Add a computed column to the view and set the method as view method. Build and synchronize.

View with computed column in Dynamics 365 Finance

This will result in the following SQL definition in the AXDB:

Generated SQL view code in AxDB

Use the view as data source in form:

View in Dynamics 365 F/SCM form

Dynamics AX 2009: Union Query

Older versions of Dynamics AX link 2009 computed columns were not supported. One workaround is to use a UNION Query.

First create a new view called ERPSalesTableConfirmed. Set the SalesTable as data source. Add a range based on the ShippingDateConfirmed field and set the range value to != ” (i.e. not empty). Add a view field based on the ShippingDateConfirmed and call it ERPSortField. This view will return all SalesTable records with a confirmed shipping date and a new field with the value in it.

SalesTable with confirmed shipping date

Second, create a new view called ERPSalesTableRequested. Set the SalesTable as data source. Add a range based on the ShippingDateConfirmed and set the range value to = ” (i.e. empty). Add a view field based on the ShippingDateRequested and call it ERPSortField. This view will return all SalesTable records without a confirmed shipping data and use the ShippingDateRequested for the ERPSortField.

SalesTable with requested shipping date

Next, create a query called ERPSalesTableSort. Set the query type to UNION. Add both views as data source. The execution of this query will return all SalesTable records. If the sales order was confirmed, the ERPSortField will contain the ShippingDateConfirmed value, otherwise the ERPSortField will contain the ShippingDateRequested.

UNION query in Dynamics AX 2009

Finally, create a new view called ERPSalesTableSort based on the query with the same name. Use all fields you like to see and the ERPSortField.

Dynamics AX 2009 view based on UNION query

Open the view. The result is a SalesTable dataset that can be sorted on the confirmed shipping date, and if the confirmed date is not present sorted by the requested date.

Sort SalesTable in Dynamics AX 2009 by confirmed or requested shipping date

Using SQL DDL Triggers to restore read Permissions programatically after Dynamics AX 2009 Synchronization

Recently, a customer using Dynamics AX 2009 implemeted a web service that access a view directly in SQL Server. Therefore they created a new SQL user login and gave the user read permissions on the view.

Read permission on a view

However, when synchronizing the data dictionary in Dynamics AX 2009, the views are droped and recreated and the permission on the object is lost. Therfore the webservice call fails.

One way to address this issue from a SQL perspective is to create a DDL trigger that sets the permissions on the view programmatically. Here is a small SQL script that sets read permissions for the user view_user on the the DIRPARTYVIEW after the view has been created again.

CREATE TRIGGER [VIEW_PERMISSION] 
ON DATABASE 
    FOR CREATE_VIEW
AS 
BEGIN
    DECLARE @name SYSNAME
    SELECT  @name = EVENTDATA().value('(/EVENT_INSTANCE/ObjectName)[1]','SYSNAME')

    if @name = 'DIRPARTYVIEW' begin
        GRANT SELECT ON [dbo].[DIRPARTYVIEW] TO [view_user]
    end
END
GO

ENABLE TRIGGER [VIEW_PERMISSION] ON DATABASE
GO

Send SSRS Report as Email from Report Viewer in Dynamics 365 FO

A very common task required by Dynamics 365 Finance and Operations clients is to send a report directly from the report viewer. This can be achieved with a view lines of Code. Here is video on Youtube how it works:

image
https://www.youtube.com/watch?v=0yQ8wvzzJSg

To achieve this create an extension of the SRSReportViewerForm, add a “Send Email” button. Create a OnClicked Event Handler in a Class.

[FormControlEventHandler(formControlStr(SrsReportViewerForm,
FormButtonControl1), FormControlEventType::Clicked)]
public static void FormButtonControl1_OnClicked(FormControl sender, FormControlEventArgs e)
{
SrsReportViewerControl ct = sender.formRun().design(0).controlName('ReportViewerControl');
object viewerForm = ct.formRun();
SrsReportRunController ctr= viewerForm.controller();
Microsoft.Dynamics.AX.Framework.Reporting.Shared.ReportingService.ParameterValue[] parameterValueArray;
Map reportParametersMap;

SRSReportRunService srsReportRunService = new SrsReportRunService();
srsReportRunService.getReportDataContract(ctr.parmreportcontract().parmReportName());
srsReportRunService.preRunReport(ctr.parmreportcontract());
reportParametersMap = srsReportRunService.createParamMapFromContract(ctr.parmReportContract());
parameterValueArray = SrsReportRunUtil::getParameterValueArray(reportParametersMap);str fileName = ctr.parmReportName()+ ".pdf";

SRSPrintDestinationSettings settings;
settings = ctr.parmReportContract().parmPrintSettings();
settings.printMediumType(SRSPrintMediumType::File);
settings.fileName(fileName);
settings.fileFormat(SRSReportFileFormat::PDF);
SRSProxy proxy = SRSProxy::constructWithConfiguration(SRSConfiguration::getDefaultServerConfiguration());

System.Byte[] reportBytes = proxy.renderReportToByteArray(ctr.parmreportcontract().parmreportpath(),
parameterValueArray,settings.fileFormat(),settings.deviceinfo());

if(reportBytes.Length > 0)
{
SysMailerMessageBuilder messageBuilder = new SysMailerMessageBuilder();
messageBuilder.setSubject(fileName);
messageBuilder.addAttachment(new System.IO.MemoryStream(reportBytes),fileName);
SysMailerFactory::sendInteractive(messageBuilder.getMessage());
}
}

Feature-Based reuse in the ERP domain: An industrial case study

Enterprise Resource Planning (ERP) system vendors need to customize their products according to the domain-specific requirements of their customers. Systematic reuse of features and related ERP product customizations would improve software quality and save implementation time. In our previous research, we have developed a tool-based approach supporting feature-based reuse of ERP product customizations. Our tool environment automatically infers reusable features from requirements and their associated implementation artifacts. Furthermore, it allows domain experts to search for features based on natural language requirement descriptions representing the needs of new customers. Matching features can be automatically deployed to a new ERP product. In this paper, we present an industrial evaluation of our tool-based approach conducted together with an Austrian small- to medium-sized enterprise. A domain expert used our approach to identify matching features for 20 randomly selected requirements for new customer products and identified matching features for 17 of the 20 requirements. We compared the time needed to identify and deploy the candidate features with the time required to implement the requirements from scratch. We found that, in total, over 60% implementation time can be saved by applying our reuse approach presented in this case study.

The actual paper regarding reusing of ERP customizations across multiple instances for Dynamics AX has been presented at the 22nd International System and Software Product Line Conference 2018 in Gothenburg (SE). The paper is available at ACM

Dynamic filtered lookup fields in Dynamics AX 2009 report dialog

I recently faced a customer requirement in Dynamics AX 2009 where a customer needs two lookups in report dialog. Depending what was selected on the first lookup (InventLocation),  the content of the second lookup should be filtered (WMSLocationId). Michael has already documented in his blog how to overwrite a lookup in dialog.  In order to override the lookup methods a RunBaseReport class is needed to call the the report.

class WarehouseReportRun extends RunBaseReport
{
Dialog dlg;

    DialogField fieldInventLocationId;
DialogField fieldWMSLocationId;

    InventLocationId    inventLocationId;
WMSLocationId       wmsLocationId;
}

Overwrite the dialog and getFromDialog methods as usual

public Object dialog(DialogRunbase dialog, boolean forceOnClient)
{
dlg = super(dialog, forceOnClient);
fieldInventLocationId = dlg.addField(typeId(InventLocationId));
fieldWMSLocationId = dlg.addField(typeId(WMSLocationId));

    return dlg;
}


public boolean getFromDialog()
{
boolean ret;

    ret = super();

    inventLocationId = fieldInventLocationId.value();
wmsLocationId = fieldWMSLocationid.value();

    return ret;
}

Create two parm methods for the lookup variables

public InventLocationId parmInventLocationId(
InventLocationId _inventLocationId = inventLocationId)
{
;
inventLocationId = _inventLocationId;

    return inventLocationId;
}


public WMSLocationId parmWmsLocationId(
WMSLocationId _wmsLocationId = wmsLocationId)
{
;
wmsLocationId = _wmsLocationId;

    return wmsLocationId;
}

Implement the abstract method lastValueElementName and provide the name of the report to start. In my case the report is called WarehouseReport.

public identifiername lastValueElementName()
{
return reportStr(WarehouseReport);
}

Create a menu item and start the class. Right click the lookup fields and from the setup form note the name of the lookup fields. In my case the system generated name for the first lookup field is Fld6_1 (InventLocation) and the name for the second is Fld7_1 (WMSLocation)

Find the dynamically generated field name in the report dialog class

According to michaels blog overwrite the dialogPostRun method. Here you can defined that you want to overwrite methods and link an object with the overwritten methods.

public void dialogPostRun(DialogRunbase dialog)
{
super(dialog);

    dialog.dialogForm().formRun().controlMethodOverload(true);
dialog.dialogForm().formRun().controlMethodOverloadObject(this);
}

Next implement the code for the lookup on the second lookup field in the dialog. In my case it will only show WMSLocations for the selected InventLocation in the first lookup.

void Fld7_1_lookup()
{
FormStringControl ctr;
SysTableLookup lookup;
Query q;
QueryBuildDataSource qbds;
QueryBuildRange qr;
;

    q = new Query();
qbds = q.addDataSource(tableNum(WMSLocation));
qr = qbds.addRange(fieldNum(WMSLocation,InventLocationId));
qr.value(fieldInventLocationId.value());

ctr = dlg.formRun().controlCallingMethod();
lookup = SysTableLookup::newParameters(tableNum(WMSLocation),ctr);
lookup.addLookupfield(fieldNum(WMSLocation,WMSLocationId),true);
lookup.addLookupfield(fieldNum(WMSLocation,InventLocationId));
lookup.addLookupfield(fieldNum(WMSLocation,checkText));
lookup.parmQuery(q);
lookup.performFormLookup();
}

Test the class. It will only show WMSLocations for the selected InventLocation.

The values in  the second lookup is filted by the value of the first lookup

In the last step overwrite the init method in the report and set the range according to the values from the lookup fields. In my report I have a InventSum datasource linked with an InventDim datasource. I use the parm methods to set the InventDim ranges on the InventLocation and WMSLocation

public void init()
{
QueryBuildDataSource qbds;
QueryBuildRange rinv;
QueryBuildRange rwms;
WarehouseReportRun wrr = element.args().caller();
;

super();

    qbds = this.query().dataSourceTable(tableNum(InventDim));

    rinv = qbds.addRange(fieldNum(InventDim,InventLocationId));
rinv.value(wrr.parmInventLocationId());

rwms = qbds.addRange(fieldNum(InventDim,WMSLocationId));
rwms.value(wrr.parmWMSLocationId());
}

The report works as required and shows only data from InventLocation 22 and WMSLocation 01-01-01-1

Dynamics AX 2009 report with dynamic lookup filter

Graphical representation of warehouse usage in Dynamics AX

A often recurring requirement is a graphical inventory overview showing the usage of locations. There are many ways how to implement such a solution. One simple way is to use data shapes in Visio and link them to Dynamics Ax data.

graphical inventory usage

Visio

Since every warehouse is different, you have to create a separate Visio drawing for each one. Visio provides you with good standard shapes to draw a floor plan. In this example I am using a simple drawing of a warehouse with one door and 12 locations. In my example a square in Visio represents a WMSLocation in Dynamics AX. Create one Visio file per warehouse and save it on a file share.

Warehouse floor plan

Data

Next create a view for each warehouse on the Dynamics AX database. Ask you DBA to secure access to the view for your users. Here is an example SQL code I am using to fetch data from Location 11 and 12 ( Contoso Demo Data)

SELECT
w.INVENTLOCATIONID, w.WMSLOCATIONID, w.DATAAREAID, w.VOLUME, COALESCE (l.CURRENTVOLUMEADJUSTED, 0) AS CURRENTVOLUMEADJUSTED, w.VOLUME – COALESCE (l.CURRENTVOLUMEADJUSTED,0) AS FreeTotal, (w.VOLUME – COALESCE (l.CURRENTVOLUMEADJUSTED, 0)) * 100 / w.VOLUME AS FreePercent
FROM           
dbo.WMSLOCATION AS w
LEFT OUTER JOIN
dbo.WMSLOCATIONLOAD AS l
ON
w.INVENTLOCATIONID = l.INVENTLOCATIONID AND
w.WMSLOCATIONID = l.WMSLOCATIONID AND
w.DATAAREAID = l.WMSLOCATIONDATAAREAID
WHERE
(w.VOLUME > 0) AND
(w.DATAAREAID = ‘USMF’) AND
(w.INVENTLOCATIONID = ’11’) OR (w.INVENTLOCATIONID = ’12’)

Link SQL Data to Visio shapes

In the Visio main menu go to the Data tab and Link Data with Shapes. Go through the wizard and connect to your SQL Server and the view you have just created. This will open the External Data window showing the results from the SQL query.

Load Dynamics AX data in Visio

In the Visio drawing panel select the first square that represents a location. Right click on a record in the external data grid and select Link to selected shape. A chain symbol will appear next to the record, showing you that this record is new linked to a shape in your drawing.

Right click on the shape that is now linked to a record in the external data. In the shapes context menu go to shape data and open edit data graphic. Here you can add and format the column values from the record to the shape. In my case I’ve formatted the InventLocationId as Header and the FreePercent as progress bar.

image

Once you have formatted one shape you can copy & paste it multiple times. You only need to selected the copy and then right click on the corresponding row in the external data and link to shape. This will update the shape data with the values from the new record.

View in Dynamics AX

Finally some work is needed in Dynamics AX to view the Visio drawing. At the InventLocation table add a new field using the FileName extended data type. Add the field in the InventLocation form, so you can provide a Visio file path for each InventLocation.

Visio floor plan for invent location

Create a new form and add an ActiveX control. Use the Microsoft Visio Document class.

image

Overwrite the init() method of the form to load the Visio document.

public void init()
{
    InventLocation inventLocation;
    super();

    if(element.args() &&
       element.args().record() &&
       element.args().record().TableId == tableNum(inventLocation))
    {
        inventLocation = element.args().record();
        if(inventLocation.ERPFilenameOpen != "")
        {
            Visio.Load(inventLocation.ERPFilenameOpen);
        }
    }
}

Create a display menu item for the form and add it to the InventLocation form. Make sure to set the InventLocation as data source for the menu item. Now if you have created a Visio document and provided the file path in the InventLocation record, by clicking on the menu item you can see a graphical representation of your warehouse.

Open Invent Location floor plan from Dynamics AX

PowerBI finance report grouped by main accounts and cost center

A customer recently asked to create a PowerBI report in order to group and compare ledger postings. The report had to meet the following requirements:

  • Compare two time periods
  • Group postings by account and type (e.g. Assets)
  • Postings on a certain cost center need to be shown separately
  • Grouping of accounts and cost centers are defined by a key user in Excel
    e.g. 1001 – 1104 and 5001 – 5002 are “Assets”
  • Cost center groups are defined by using wildcard style
    e.g. 601500 – 61500 and Costcenter ?6?? is Development/Compliance

Dynamics AX ledger postings grouped by account and cost center

Report Data from Dynamics AX

First, we loaded the report data from Dynamics AX into PowerBI. The data contained the LedgerJournalTrans joined with the LedgerAccountView. The Dimenions were renamed to Department, CostCenter and CostUnit.

select
T.TRANSDATE, T.AMOUNTCURCREDIT, T.AMOUNTCURDEBIT, T.ACCOUNTNUM, V.ACCOUNTNAME, DIMENSION as DEPARTMENT, DIMENSION2_ as COSTCENTER, DIMENSION3_ as COSTUNIT
from LedgerJournalTrans as T
join LEDGERACCOUNTVIEW as V
on T.ACCOUNTNUM = V.ACCOUNTNUM
where ACCOUNTTYPE <= 2

Report Definition Data

Next we defined and loaded the report definition from Excel. We used to sheets, one for the definition of the two time frames and one for the group definition

date range for ledger postings

grouping definition for ledger postings

Like initially described the Accounts sheet defines the grouping of postings regarding their account number. For example in line 2 and 3 postings on  accounts 1101 .. 1104 and 5001 .. 5002 shall be grouped as “Assets”. Postings on accounts 601500 .. 606300 with a cost center where the 2nd character is 6 shall be grouped separately as “Development/Compliance” regardless if they are also part of the group “Expenses”.

Both Excel worksheets were loaded into PowerBI. The Accounts was modifed to replace an empty value in the Costcenter column with the text “%”. This was done to use the Costcenter value in a SQL statement with a Like clause (see section “Calling function from the account definition”).

Query Parameter

We added 3 parameters to the PowerBI called FromAccountNum, ToAccountNum and CostCenter. The default values are the smallest account number for the FromAccountNum, the largest account number for the ToAccountNum and the text % for the CostCenter.

PowerBI parameters

Next we changed the query of LedgerJournalTrans and added the parameter to the query. This can be done used “Edit query” on the data set and opening “Advanced Editor”

Parameters in PowerBI query

The new query text in the advanced editor looked like this

let
Source = Sql.Database(“localhost”, “DynamicsAx”, [Query=”select T.TRANSDATE, T.AMOUNTCURCREDIT,T.AMOUNTCURDEBIT, T.ACCOUNTNUM,V.ACCOUNTNAME,DIMENSION as DEPARTMENT,DIMENSION2_ as COSTCENTER,DIMENSION3_ as COSTUNIT #(lf)from LedgerJournalTrans as T#(lf)join LEDGERACCOUNTVIEW as V on T.ACCOUNTNUM = V.ACCOUNTNUM #(lf)where ACCOUNTTYPE <= 2 AND T.ACCOUNTNUM >= “&FromAccountNum&” AND T.ACCOUNTNUM <= “&ToAccountNum&” AND T.DIMENSION2_ like ‘”&CostCenter&”‘ #(lf)order by T.ACCOUNTNUM,T.TRANSDATE#(lf)”, CreateNavigationProperties=false])
in
Source

With the parameter in the query and the default values set to the parameters the dataset did not change. Next we added a new function to the LedgerJournalTrans. This can be done from the context menu of the query “Create Function”. PowerBI inspects the query statement and creates function parameter for each parameter in the query. In this case FromAccountNum, ToAccountNum and CostCenter.

Calling function from the Account Definitions

In PowerBI a function call can be used like a row wise join. A function can be added by using the used defined function button in the query editor. So we added the function call to the Accounts dataset, i.e. each account definition row fetches all postings from the LedgerJournalTrans with the corresponding accounts and costcenter.

PowerBI calling user defined function

The query parameter are mapped to the fields in the Accounts table.

Parameter values for used defined function

PowerBI will popup a warning that function calls can have a security impact. In the actual version (Mai 2018) PowerBI was quite annoying with security warnings and required a restart (close&open) to stop asking again and again. Finally, expand the Accounts table and the function call results by clicking on the Arrow Right-Left Button next to “GetPostings”. Per default PowerBI adds the fields from the function call result with the function name prefix e.g. GetPostings.Transdate, GetPostings.AmountCurCredit, etc.

As you can see below the Account definition 1101 – 1104 was expanded with all resulting rows from the LedgerJournalTrans that have an account between 1101 and 1104 and any Costcenter (%)

Expanding used defined function call results

Calculate Period Amounts

To get the amount values for each of the two periods, defined in the Daterange Excel sheet, we added 4 additional columns to the Accounts. A debit and credit column for period 1 and period 2.

Ledger postings in period

The code looks like this

CreditDate1 = IF(Accounts[GetPostings.TRANSDATE]>=FIRSTDATE(Daterange[FromDate1]);IF(Accounts[GetPostings.TRANSDATE]<=FIRSTDATE(Daterange[ToDate1]);Accounts[GetPostings.AMOUNTCURCREDIT];0);0)


DebitDate1 = IF(Accounts[GetPostings.TRANSDATE]>=FIRSTDATE(Daterange[FromDate1]);IF(Accounts[GetPostings.TRANSDATE]<=FIRSTDATE(Daterange[ToDate1]);Accounts[GetPostings.AMOUNTCURDEBIT];0);0)


CreditDate2 = IF(Accounts[GetPostings.TRANSDATE]>=FIRSTDATE(Daterange[FromDate2]);IF(Accounts[GetPostings.TRANSDATE]<=FIRSTDATE(Daterange[ToDate2]);Accounts[GetPostings.AMOUNTCURCREDIT];0);0)


DebitDate2 = IF(Accounts[GetPostings.TRANSDATE]>=FIRSTDATE(Daterange[FromDate2]);IF(Accounts[GetPostings.TRANSDATE]<=FIRSTDATE(Daterange[ToDate2]);Accounts[GetPostings.AMOUNTCURDEBIT];0);0)

Display results in matrix

Finally we used a matrix to display the values from the Accounts dataset and grouped it by Name and Accounts.

PowerBI matrix for ledger postings

Security considerations

Injecting range values in a query is not the best way to do this. A better way would be to refactor the LedgerJournalTrans query into a stored procedure and provide the FromAccountNum, ToAccountNum and Costcenter as parameter to the SP.