The power of MCP (Model Context Protocol) allows you to connect an AI application like Copilot oder Claude to an Application, in a way that the AI application can work with the connected system in the background. For example, the MCP impementation for Microsoft Dataverse allows an AI application to query and manipulate records in the Dataverse. Sounds simple but here is the magic:
Query dataverse in natural language 💬 e.g. “Find me all german customers”
Chat in your natural language no matter how Dataverse was setup in the background, e.g. talk in English 🇬🇧 and let AI work an a German 🇩🇪 dataverse installation
Let the AI investigate the database structure 🔍. If you dont provide information how tables are related it will find out by its own,
The European Commission is working on a proposal of a regulation on Artificial Intelligence. This proposal is origins from many initiatives and statements regarding the digital market and impact of AI on ethics and law. The goal is to create an EU wide effective law which protects rights and values by categorizing, forbidding and or requiring certain standards in Artificial Intelligence applications.
The proposal has a very wide idea on what AI is and what it wants to regulate. It aims on software based on techniques like machine learning, statistics and especially Bayse’ statistics, logic programming, inference and expert systems.
Category 1 : Forbidden
Some Artificial Intelligence applications which contradict rights and values of the European Union and it citizens shall be forbidden. The proposal names the following
Social Scoring by government agencies, i.e. scoring the social behavior of persons and creating a negativ impact. Such systems are known from China where non-conforming behavior can result in disadvantages when applying for a living space, university, etc.
Manipulate persons through subliminal techniques beyond their consciousness. A phenomenon that was recently shown in US elections where voters have been manipulated by using social media.
Remote Biometric Surveillance shall be banned but with very generous exceptions. For example searching for missing children, victims of crime and terrorists.
Category 2: High-Risk
Many Artificial Intelligence applications are considered to put rights of individuals on high risk and require therefore special legal treatment. The proposal lists a wide rang of possible high-risk applications. For example critical infrastructure, education, private and public services, law enforcement, migration, biometric identification.
The proposal states that for these applications require additional precautions like risk management, data quality, documentation, human supervision, hardening against security threats. It is also planned that high-risk applications have to be registered in a database before put to use.
Category 3: Low-Risk
Users of low-risk application needs to be informed that they are interacting with an AI application. For example using a chat bot. AI generated audio and videos also require labeling to prevent deep fakes. Games won’t need such a labeling because it is obvious that they present artificial generated content.
Fines
The AI act proposal suggests very high fines for violating the rules. For example using forbidden AI systems may result in a fine up to 30 Million € or 6% of the worldwide yearly revenue. Violating requirements for high-risk applications may result in 20 Million € or 4% world wide yearly revenue. Wrong or misleading information on national agencies 10 Million € or 2 % of world wide yearly revenue.
Industry statements regarding AI act
Many companies working on AI technology like IBM and Microsoft have handed in their own statement on the act. Microsoft has provided a statement that puts the spotlight on some problems in practice including the following key points.
The AI act proposal does not fully cover the complex AI eco-system. There are providers of general purpose AI components like image processing, text analysis etc. In many cases these of-the-shelf components are included in new applications which are then sold to customers and customized by other companies. Which participant in the eco-system has to take care of the requirements defined for high and low risk applications?
Some requirements in the act are unnecessary complex and unrealistic. For example article 10.3 requires error-free and complete data sets. This is almost impossible when training natural language or image processing applications.
Exception for remote biometric identification should be restricted. The actual proposal lists remote biometric identification as forbidden but gives law-enforcement a wide set of exceptions. For example searching for missing children, searching for victims, looking for terrorists and prevention of crimes. Microsoft states that the application of real-time biometric identification should only be used for serious and violent crimes. Moreover transparency reports should be mandatory for law-enforcement and judical authorities including what techniques were used, which training and test datasets were used, where, when, why and how long was remote biometric identification put to use.
The summary on the artificial intelligence act was created as part of the course “Algorithm, Discrimination and Law” at JKU Linz Winter term 2021.
PowerBI and Cognitive Services are a powerful combination. A nice example is a tag cloud based on the key phrases in your daily emails. This example requires the following cloud components:
PowerBI (of course)
Cognitive Services for Key Phrase extraction
Exchange Online
Flow and Table Storage in Azure
Cloud Infrastructure
First, go to your Azure portal and create a new Cognitive Services Resource. In the creation wizard place the cognitive services to a data center near your Office subscription. I’d also recomend to creata a seperate resource group where you place all the services.
Cognitive Services in Azure
At the Cognitive Services Overview tab, copy the Endpoint URL. From the Cognitive Services > Key tab also copy the Key1. You need both to connecto to the cognitive services.
Azure Storage Account
Next create a new stroage account. Like in the Cognitive services place it in the same resource group and same data center. After the storage account has been created successfuly go to the overview tab.
Azure Table Storage
Select “Tables” and create a new table. Give it a useful name e.g. keystorage. A table storage can be used to place structured data, which require at least to fields a RowKey and a PartitionKey. It is up to you to provide meaningful values to theses fields when inserting data.
Copy the storage account name and from the Access Keys tab the Key1 value. You will need both to connect to the storage account.
Implement transformation pipeline in Flow (first naive approach)
Now, lets create the extraction logic using Flow. There are some limitations with this approach that will result in errors. A more stable version of the flow is discussed at the end. Go to https://flow.microsoft.com and create a new triggered flow from blank.
Automated Flow from Blank
The trigger for the flow is Outlook > When a new email arrives.
Because almost all my mails are HTML formated, I need to add the Content Conversion > HTML to Text step to remove the HTML code from the email body.
The third step in the flow is the key phrase extraction. Therefore add the Text Analysis > Key Phrase extraction step. There you need to provide the Cognitive Services Account Key and Endpoint. The text to analyze is the output from the HTML to Text step.
The last step writes the key phrases to the Azure Table Storage. Like in the Cognitive Services step, you have to provide the name and a key. From the Table dropdown select the table you have create earlier in the Azure portal. The entity has to be a JSON string. In my example the Partition is always 1 and the Row key is a Guid. Because, one mail will have more than one key phrase, the insert is encapsulated in an Apply-to-each block
Test your flow by sending an Email to your account. All the steps should succeed
Keyword Extraction Flow Test
You can use the Azure Storage Explorer in the Azure portal to lookup the phrases extracted from the email. In this example I sent an email from my company account, to my private mail account. The flow extracted the key words from the mail (Signature).
Azure Storage Explorer
Tag Cloud in PowerBI
In PowerBI add a new data source from the Azure Table storage. Again you need to provide the storage name and one of the keys. After connecting successfuly to the table, open the transformation window an take a look at the retrieved keys. You can remove the PartitionKey, RowKey and Timestamp from the data set.
Azure Table Storage in PowerBI
In the PowerBI report window, from the Visuals, klick on the Elipsis (…) and search for the Word Cloud in the marketplace. Add the Word Cloud Visual to PowerBI
Word Cloud Visual for PowerBI
Add the visual to the PowerBI report window. Set the Key Phrases as category in the visual.
Word Cloud in PowerBI Desktop
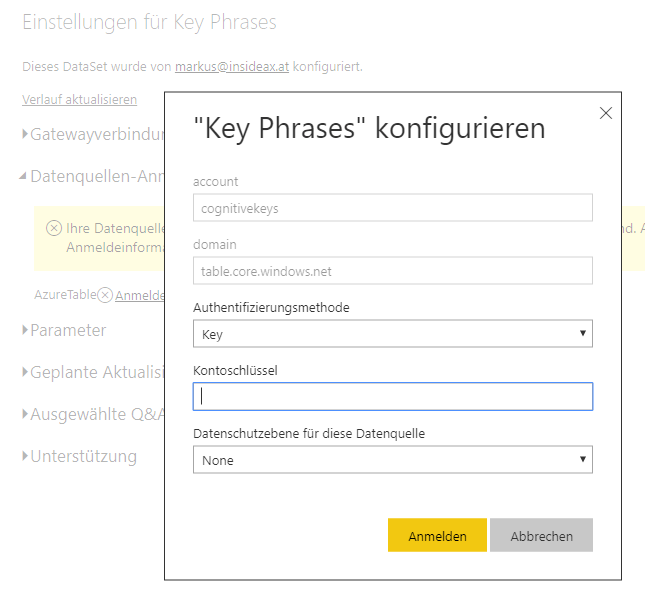
PowerBI Online Service and automated Refresh
Publish the PowerBI report to your workspace. Within PowerBI Online, go to your workspace and navigate to the dataset. From the Elipsis (…) open the settings page. Provide the Key for Azure Table storage.
Azure Table Storage Connection
Now you can also schedule the automatic refresh
Automatic Refresh from Azure Table Storage in PowerBI Online Services
Implement transformation pipline with a more stable Flow
Unfortunatelly, the text processing in Cognitive Services is limited to 5120 characters. In many cases, Emails contain more characters than this and the flow will fail with an error from the Cognitive Services. One way to address this issue, is to implement a loop that cuts the Email body into pieces of 5120 characters or less before feeding it to Cognitive Services. However, Flow is not very developer focused and requires some workarounds for simple tasks like assigning function calls with a variable to itself e.g substring()
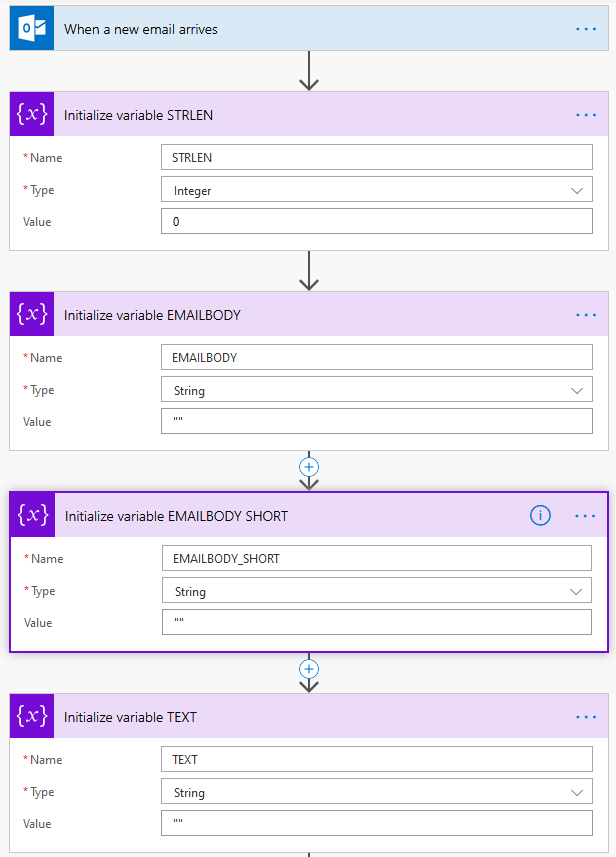
In the first place, delcare 4 variables
Some required variables in Flow
Next execute the HTML to Text block. An optimization is to use the Builtin Data-Operations action Compose to trim() the result to remove blanks from the start and end, and populate the STRLEN and EMAILBODY. Whereas the STRLEN requires a function: length(outputs(‘Trim_Text’))
Set the variables in Flow
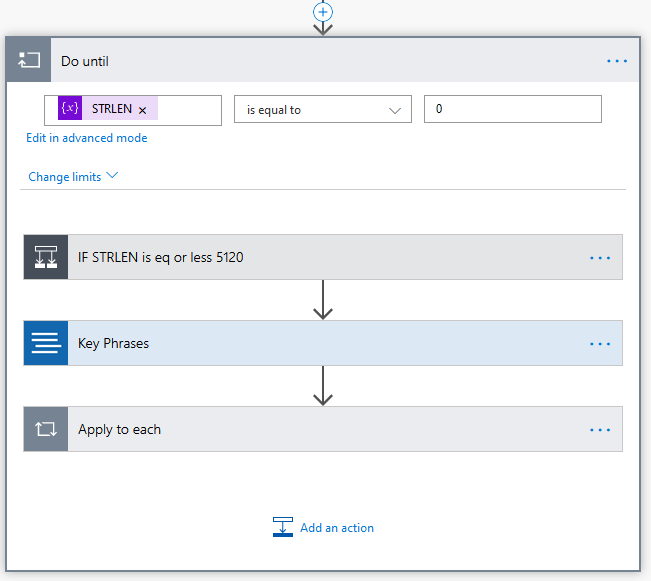
Next, create a Do-While Loop from the Control elements in Flow. The condition for the Loop is STRLEN <= 0 because we are cutting the Email into pieces until nothing is left
A loop to cut the Email into pieces of 5120 characters (or less)
Within the Loop, create a IF decision depending on the STRLEN. If the STRLEN variable is less then 5120, the STRLEN is set to 0 to end the Loop. The variable TEXT is set to the EMAILBODY.
Email body is shorter than 5120
If the Emailbody is longer than 5120 characters, the first 5120 characters are copied to the TEXT variable: substring(variables(‘EMAILBODY’),0,5120)
Next the variable STRLEN is reduced by 5120: sub(length(variables(‘EMAILBODY’)),5120)
In the third step, the variable EMAILBODY_SHORT is set to the substring starting at 5121 till the end of the original EMAILBODY. Is is done, because Flow does not support variable asignment by a function that contains the variable itself: substring(variables(‘EMAILBODY’),5121,sub(variables(‘STRLEN’),1))
In the last step the orignial EMAILBODY variable is set to be the EMAILBODY_SHORT. It contains now the body without the first 5120 characters.
Email body is larger than 5120
Within the loop, after the IF condition, Cognitive Services are called with the TEXT variable and the results are written to the Azure Table Storage like in the first naive implementation.
Save Cognitive Services Results to Azure Table Storage
More Optimization
There are three additional ways to optimize this solution.
One may argue, that cutting the text into pieces might cut a releveant word for the Word Cloud into pieces and therefore cannot be recognized by Cognitive Services, e.g. Micros … oft. One way to address this is to modify the substring function, by checking the last index of “_” (Blank) and cut there.
Another issue is that Cognitive Services are not aware of all stop words. Especially if using Non-English Key Phrases you may end up with a messy cloud. However, there are public available lists of stopwords in certain languages out there, that can be loaded into PowerBI and used to exclude certain findings from Cognitive Services. The Word Cloud visual provides an Exclude property where you can provide stop words to exclude.
In the example from above, the language for Cognitive Services is set to DE (german). Howerver, this might not be optimal if you receive Emails in different languages. An optimzation could be to use Cognitive Service to detect the language, and switch the Key Phrase Detection Call for the most common languages in your Email inbox, in my case German and English.
Flow Download (package)
Please find the Flow Package in the Sources Onedrive Folder. Import the .zip File in your Flow Tenant. You need to map Outlook, Cognitive Services, Azure Table Storage, etc. to your configurations.
Power Apps recently got the capability to create some computer vision AI models. One of the IMHO most popular ones is called object detection, which is used to detect (predefined) objects on images. For getting started you may use the free edtion of power apps.
Environment and CDM Entity
AI Builder is bound to a Power Apps environment and the Common Data Model. If you don’t have already created an environment, logon to https://web.powerapps.com and create a new environment.
Create new environment
To use the CDM entities you need a new database. In my case, I created a new one with USD and English as preferred language.
Create new database
It may take a while, and you may need to refersh your browser screen, but the AI Builder (Preview) option will appear on the left menu bar.
Create new Power Apps AI Builder Object Detection model
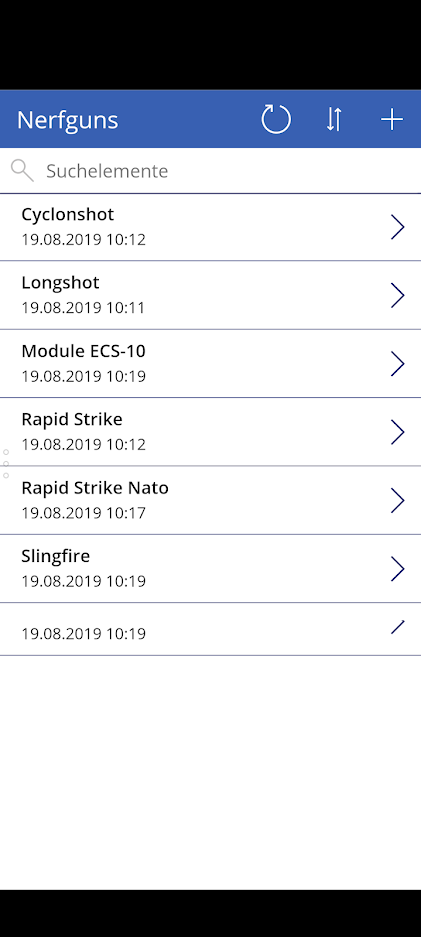
Next, go to Data > Entites and create a new entity for the type of objects you want to identify. In my case, I’m playing around with Nerf guns, therefore I created a new Nerfgun entity. It requires at least a useful name. Feel free to add more fields.
Select entity from Common Data Model
Provide entity data
In a next step you have to provide information about the different elements that shall be identified. In my cases, which Nerfs guns will be on fotos e.g. Rapidstrike, Slingfire, Cyclonshot, etc.
Entity in Common Data Model
There is an option to edit the entity via Excel. However, in my case the Excel addin is not working, and failing to authenticated 😦 If this happens to you, a workaround is to create a simple Power App and edit the entity via Power App.
Fill CDM entity with data using Power Apps
Create and train AI model
In Power Apps go to AI Builder and create a new model for object detection.
Create new AI model for object detection
Provide a name for the model and select the created entity for detection. From the records in the entity select those records that are relevant for detection.
Select object to detect using AI builder
Next comes the time consuming part, take pictures of your objects in different locations, lighting, quality, day time, etc. upload it to the power apps model. You need at least 15 pictures for each element you want to detect.
Upload images to Power Apps AI Builder
Tag each of the pictures with the corresponding object on the picture.
Tag object on images in Power App AI Builder
After uploading and tagging each picture, train the model. This may take a while and will result in a (not very usefull) quality estimation. Right now I didn’t see recall, precision, AUC, or any other more detailed information. If you are satisfied with the models estimated power, publish it so it can be used in your apps.
Train AI model for object detection
Use AI model in Power Apps
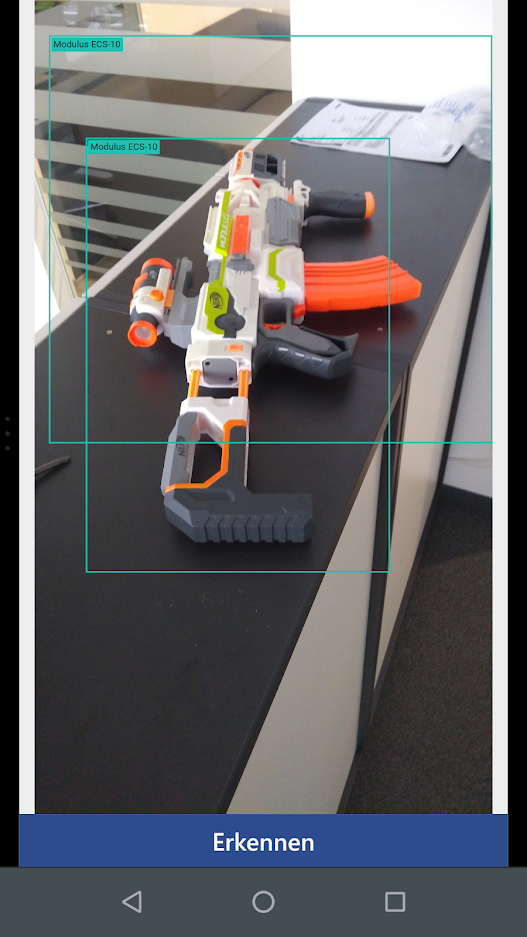
It’s easy to use the trained model in a Power Apps application e.g. on the smart phone. Create a new power app with empty layout. From the menu insert the object detection component.
Create a new PowerApps app with AI Builder
Select your object detection model for the component. Save and publish your app, load it on your phone and test it.