Integrate SharePoint Online with Dynamics AX Legacy Application

SharePoint Online is a wide spread solution for collaboration. Actual versions of Dynamics AX / 365 provide great integration capabilities and for all other purpose there exists the SharePoint Online Client API. However, legacy applications may not support the required libraries or .NET framework versions to use the SharePoint Online Client API. One way to overcome this issue is to utilize the REST API and communicate via HTTP. Here you can find a step by step guide how to provide an external application access to SharePoint Online via an App: http://www.ktskumar.com/2017/01/access-sharepoint-online-using-postman/

Register an App in SharePoint Online

The first thing you need to do is register an App in SharePoint Online. Open the registration site in a browser: https://YOUR_SITE.sharePoint.com/_layouts/15/appregnew.aspx . In my case I’m using a sub site, therefore my URL would look like this: https://YOUR_SITE.sharepoint.com/sites/development/_layouts/15/appregnew.aspx .Use the form to generate a client ID and a secret code. Provide any title you like. Set the domain to localhost and redirection URL to https://localhost

image

Set Permissions for the App

Open the following URL in a Browser: https://YOUR_SITE.sharepoint.com/_layouts/15/AppInv.aspx . Use the Client ID to lookup the created App. In the free text form add the required permissions e.g. access a list. You can find the syntax here: https://www.sumitagrawal.io/sharepoint-add-in-permission-xml-cheatsheet/ If you need access to more than one list, you have to repeat this step. In my case I only need access to one list. The XML Permission Code looks like this:

<AppPermissionRequests AllowAppOnlyPolicy="true">
<AppPermissionRequest
Scope="
http://sharepoint/content/sitecollection/web/list"
Right="Read" />
</AppPermissionRequests>

Click the Create button, this will forward you to a form where you can choose which list can be accessed by the app.

image

SharePoint Online Tenant ID

To find the Tenant ID open the following URL in your Browser https://YOUR_SITE.sharepoint.com/_layouts/15/appprincipals.aspx  Since I’m using a sub site my URL looks like this https://YOUR_SITE.sharepoint.com/sites/development/_layouts/15/appprincipals.aspx . There you can find the Tenant ID

image

Create a Token

To interact with SharePoint Online you need to generate a token.This is done by sending an HTTP POST requiest with client ID, secret, and desired resource to SharePoint Online. Here is the Code in X++ written in Ax 2009.

str clientID = “<YOUR_CLIENT_APP_ID>”;

str secret = “<YOUR_SECRET>”;

str tenant = “<YOUR_TENANT>”;

str ctx = “00000003-0000-0ff1-ce00-000000000000”; //i.e. SharePoint

str sp = “<YOUR_SITE>.sharepoint.com”;

str listName = “<NAME_OF_YOUR_LIST>”; // e.g. Customers

str listUrl = “https://YOUR_SITE.sharepoint.com/_api/web/lists/GetByTitle(‘”+listName+”‘)/items; “

str url = “https://accounts.accesscontrol.windows.net/”

+tenant+”/tokens/OAuth/2″;

System.Net.WebClient cl = new System.Net.WebClient();

System.Net.WebHeaderCollection headers = new System.Net.WebHeaderCollection();

System.Collections.Specialized.NameValueCollection body = new System.Collections.Specialized.NameValueCollection();

System.Byte[] response;

System.Text.Encoding enc = System.Text.Encoding::get_UTF8();

System.String responseText;

str xppResponse;

int indexOf;

int start;

int totalLength;

int length;

str token;

;

headers.Add(“Content-Type”,”application/x-www-form-urlencoded”);

body.Add(“grant_type”,”client_credentials”);

body.Add(“client_id”,clientID+”@”+tenant);

body.Add(“client_secret”,secret);

body.Add(“resource”,ctx+”/”+sp+”@”+tenant);

cl.set_Headers(headers);

response = cl.UploadValues(url,”POST”,body);

responseText = enc.GetString(response);

// cut token out of response text

indexOf = responseText.IndexOf(“access_token”);

start = indexOf + 15;

totalLength = responseText.get_Length();

length = totalLength – start – 2;

xppResponse = responseText;

token = responseText.Substring(start,length);


Query List Elements

The token has a valid timestamp measured in Unix Ticks. So it might be good idea to store the token in a parameter table and only request a new one if it is or will expire soon. However, in this example I go on and query the Customer List.

// .. Code from above

cl = new System.Net.WebClient();

headers = new System.Net.WebHeaderCollection();

headers.Add(“Accept”,”application/atom+xml”);

headers.Add(“Authorization”,”Bearer “+token);

cl.set_Headers(headers);

body.Clear();

url = listUrl;

responseText = cl.DownloadString(listUrl);

xppResponse = responseText;

info(xppResponse);


In this case the response type is an XML. You may parse the XML and only view e.g. the Title Tag or any other fields your are interested in. Here is the Infolog of the complete XML response from the SharePoint Online List.

image

Setup und Configure Office 365 Project Web App

Here you can find my video on how to setup Project Web App, link with Project Desktop client and how to setup a SharePoint subwebsite with a synchronized task list

pwa

Publish Dynamics Ax documents to SharePoint

A typical requirement is to publish documents like Invoice, Purchase Order, etc. to an DMS system like SharePoint. However, in Dynamics AX 2012 and lower there is no built-in functionality to publish these documents to SharePoint. But this requirement can easily be achieved without coding.

Prerequisite

  1. Install (at least) SharePoint 2013 Foundation incl. SP1. Foundation 2013 SP1 includes all the filters required to process PDF files and a basic search center. By default the configuration wizard creates a new team website collection.
  2. Make sure the WebClient window service is installed and running. If not, you may have to install the User Interface and Desktop Experience Feature on your server.
    WebClient Windows Service

Document Library and Content Type

In SharePoint  open the Settings image and open the Site Settings. From the User and Permissions group, open “People and Groups”. Select the Group “Owners”, Click “New” and add the Dynamics AX AOS Service account.

Provide AOS user access to SharePoint document library

In SharePoint create a new Document Library. On the team website open Settings image (right, on top) > Add an app > Name the document library “Invoice”.

Go to the newly created document library. Open the Library ribbon, and edit library with SharePoint Designer. SharePoint Designer is not installed by default, and you may have to download and install it first.

Open with SharePoint Designer

After SharePoint Designer was installed, click again on “Edit Library” with SharePoint Designer. Within SharePoint designer, select Content Types and create a new Content Type. Call it “Invoice” and make sure to select the parent content type form “Document Content Types” and parent content type “Document”. Save your modifications.

New content type for Invoice

In the navigation, select Lists and Libraries and open the Invoices library. Make sure the option “Allow management of content types” is enabled. At the “Content Types” group at the bottom, open “Add” and select your newly created Invoice content type. This will add the content type to the document library.

Add Invoice content type to library's managed content types

Select the Invoice content type at the content types group. At the ribbon select “Set as default”. Now every new document uploaded to the library will be an Invoice type. Save your modifications and go back go SharePoint.

Set invoice as default content type

At the Invoices document library in SharePoint, open the Library Ribbon and choose “Open in Explorer”. This will open a new instance of windows explorer, showing the content of the document library.

Open Library with Windows Explorer

Click in the address bar and copy the address.

image


Post and Publish Sales Invoice

Open Dynamics AX 2012 and go to “Accounts Receivable” > Periodic > Sales Update > Invoice. Change the Quantity to Packing Slip. Make sure the options “Posting”, “Late Selection” and “Post Invoice” are enabled.

Post Sales Invoice

Open “Select” and make sure the selection is configured to identify all Delivered sales orders. Click OK and save the selection.

Select only delivered sales orders

Open Printer Setup > Invoice. Select File as Target and choose File Format PDF. Open the File Name Dialog and provide the Document Library Address as Target. Repeat this step for the Invoice (Copy).

Print to SharePoint

Back at the Posting Invoice Dialog, open Batch processing (at the bottom). Enable batch processing and modify the recurrence to “No End” and repeat all 5 minutes.

Batch processing


Test

In Dynamics AX create one or more new sales order and post the packing slip. Wait until the Post Invoice batch job runs. The sales orders should be invoiced. Go to SharePoint and open the Invoices document library. There you should see the uploaded PDFs.

Dynamics Ax Invoice Document Library

Open the SharePoint Central Administration and go to Application > Manage service application > Search Service Application.

SharPoint Search Service

Select Content Sources and start the crawl manually. This will force SharePoint to index the PDF files in the Invoices document library. By default the crawler indices the documents on SharePoint periodically without manual interaction.

Manually start crawl

Open SharePoint Team Website. In the Search Box, type the Name of Customer. SharePoint will present a list of found documents related to the customer.

Find Dynamics AX documents on SharePoint


(Optional) Confirm and Publish Purchase Orders to SharePoint

Create a new document library with an purchase order content type as default:

Go to SharePoint, open the settings image menu and choose to add an app. Select document library and name it Purchases. Navigate to the new document library, and from the Library Ribbon, select “Open with SharePoint Designer”. In SharePoint designer create a new content type, based on a document content type, and name it Purchase. In SharePoint Designer navigate to the libraries, select the newly created Purchases library and make sure the option “Allow Management of Content Types” is enabled. Below, at the content types group add the Purchase content type you’ve created. Finally select the content type, and from the ribbon in SharePoint designer select “Set as Default”.

In Dynamics AX go to the Procurement and Sourcing module > Settings > Procurement and Sourcing Parameters > and activate Change Management. This option is required to run the purchase order approval workflow.

Activate change management

Next go to Procurement and Sourcing > Settings > Procurement and Sourcing Workflows. Create a new workflow based on the Purchase Order Workflow template. In the Workflow Configuration, add the Approve Purchase Order task to the workflow, between start and end.

Configure Purchase Order Workflow

Provide meaningful texts for the Workflow Submission instruction. Double click on the Approve Purchase Order taks to open the details. There assign Step 1 to a user or a user group. For testing purpose, you may assign the approval to yourself. Save and activate the workflow configuration.

Configure Purchase Order Workflow

Create a new purchase order. The purchase order starts in the approval state Draft. Submit it to the workflow for approval. This will change the state to “In Review”. Go back to the Purchase Order List Page and refresh the data. It may take a few minutes, depending on your workflow batch jobs configuration, until the purchase order is assigned to you for approval. When the purchase order is assigned for approval, approve the purchase and wait a few minutes until the purchase order has reached the state approved.

Purchase Order Approval State

Go to Procurement and Sourcing > Periodic > Purchase orders > Confirmation. Make Sure the Options Posting, Late Selection and Print purchase orders are active. From the Select button on the right, make sure only Approved and Open purchase orders will be selected.

Confirm Purchase Order

Open the Printer Setup > Purchase Order > Choose print to file as PDF and provide the path to the Purchases document library on your SharePoint. Repeat this for Printer Setup > Purchase Order (copy).

Print to SharePoint

Finally, open the Batch dialog  using the button on the lower right. Make sure to activate batch processing and set the recurrence to no end and recurring pattern to 10 minutes.

Batch processing

After a few minutes the purchase order state has change from Approved to Confirmed, and you should see the generated PDFs on SharePoint. These documents will be included within the next search crawl and can be found using the search box at your SharePoint website.

Purchase order confirmation

(Optional) Enhance Search Experience

Open SharePoint Central Administration and click the group Application Management. Go to “Create Site Collection” . Make sure your are using the same Web Application as the Team Website. Call the new site collection “Search” and provide an URL including like http://YOUR_SERVER/site/search. Make sure to select the “Basic Search Center” template from the Enterprise template group. Click OK, this will create a new basic search center.

Create Basic Search Center

Open the URL you have provided in a web browser. You should see an almost empty web page with a search box.

SharePoint Basic Search Center

In SharePoint Central Administration go to “Application Management” > “Manage Service Applications” > “Search Service Application”. Provide the Search Center URL at the property “Global Search Center URL”. This will instruct SharePoint to redirect all search to the Search Center.

Global Search Center URL

Open the Search Center URL in a browser and start a search e.g. for a Customer. This will open the result page. On the top right open the settings  image and click on “Edit page”. This will switch the page to edit mode. On the left side, click the drop down of the refiner web part and click “Edit Web Part”. This will open the Edit Dialog on the right.

Customize Search Center Refiner

Click on “Choose Refiners” and make sure SPContentType, File Type and Last Modified Time are selected. Remove all the other refiners from the select. Click OK in the dialog, Apply in the Web Part Configuration Dialog on the right and Stop Edition in the ribbon on the top left.

SharePoint Search Refiner

When you use the search center the next time, the result page will allow you to refine by Content Type like Invoice, Purchase Order, etc., File Type like PDF, Word, etc., and Date.

Dynamics AX Document Search

How to create a Word App for Address Lookup in Dynamics Ax

Office Apps provide additional functionality within an Office document like Excel and Word. This is an example how to create an App for Word 2013 which can be used to lookup an Address of a customer in Dynamics Ax.

Dynamics Ax Word App


Architecture

Word App Architecture

  1. Dynamics Ax will provide a web service which takes the (partial) name of a customer as input parameter, and returns a list of matching customers and their addresses.
  2. However, apps prefer a more lightweight form of communication.Therefore another web service will provide a simple JSON interface.
  3. Finally the Word App will be used to select a partial text within the document eg.”Contoso”, send it to AX and present the result of matching Customer / Addresses.

Dynamics Ax Service

Create a new data contract class and call it ERPCustomer. These will be the result objects for a customer lookup.

[DataContractAttribute]
class ERPCustomer
{
    CustName    custName;
    LogisticsAddressing address;
}

[DataMemberAttribute]
public LogisticsAddressing parmAddress(LogisticsAddressing _address = 
                                                              address)
{
    address = _address;

    return address;
}

[DataMemberAttribute]
public CustName parmCustName(CustName _custName = custName)
{
    custName = _custName;

    return custName;
}

Create a second class for the lookup logic and call it ERPAppHelper and add this static method:

public static List lookup(Name _name)
{
    CustTable custTable;
    DirPartyTable dirParty;
    List customers = new List(Types::Class);
    ERPCustomer customer;

    _name = strFmt("*%1*",_name);

    while select dirParty
        exists join custTable
        where dirParty.Name like _name && dirParty.RecId == custTable.Party
    {
        customer = new ERPCustomer();
        customer.parmAddress(dirParty.primaryAddress());
        customer.parmCustName(dirParty.Name);

        customers.addEnd(customer);
    }

    return customers;
}

Create a third class for the Lookup Service and call it ERPAppService

[SysEntryPointAttribute(true),
AifCollectionTypeAttribute(‘return’, Types::Class, classStr(ERPCustomer))]
public List lookup(Name _name)
{
    return ERPAppHelper::lookup(_name);
}

Create a new Service in the AOT, assign the ERPAppService class to the service and add the lookup method. Next create new privilege or use an existing one. Add the service lookup method to the privileges’ entry points. Right click on the service, from the context menu choose “Register”

Dynamics Ax App Service

Finally, to to System Administration > Setup > Services and AIF > Inbound Ports and create a new service. Use net.tcp port and add the lookup method as service operation.

Dynamics Ax App Service AIF

[Optional] Test the Dynamics Ax Service

Open Visual Studio, create a new Console Project and call it TestAifService. Add the Service reference (URI from the Screenshot above) to your project and call it ERPAppService. Call the lookup method and print the results. Use code below, and replace USR, PW, DMN with a valid User, Password, Domain combination in your environment.

using System;
using System.Collections.Generic;
using System.Linq;
using System.Text;
using System.Threading.Tasks;
using TestAifService.ERPAppService;

namespace TestAifService
{
    class Program
    {
        static void Main(string[] args)
        {
            var cred = new System.Net.NetworkCredential("USR","PW","DMN");
            var client = new ERPAppServiceClient();
            client.ClientCredentials.Windows.ClientCredential = cred;

            var context = new CallContext();
            context.MessageId = Guid.NewGuid().ToString();

            var result = client.lookup(context, "Contoso");
            foreach (var customer in result)
            {
                Console.WriteLine(customer.parmCustName);
                Console.WriteLine(customer.parmAddress);
            }
            Console.ReadKey();
        }
    }
}

If you are using the Contoso Demo Data, the result should look like this:

Test Dynamics Ax AIF Service

JSON Frontend Service

In order to host the JSON Frontend Service, you need to install the Application Server Role and HTTP Activation. You will also need the Webserver role installed, including Application Development with .NET and ASP.NET.

In Visual Studio 2013 create a new Website Project and choose a new WCF Service. Use .NET Version 4.5 and select the file system as host. Select a C:\inetpub\wwwroot\appservice as target directory. Name it ERPAppService. This will create a WCF service project in Visual Studio including a working Hello World Service. Add the service reference to the Dynamics Ax net.tcp service to your project and call it DynamicsAx. Your Visual Studio Project should look like this:
Add Dynamics Ax AIF Service as Service Reference

Next, modify the IService1.cs Interface:

namespace ERPAppService
{
    [ServiceContract]
    public interface IService1
    {
        [OperationContract]
        [WebInvoke(Method="GET",ResponseFormat=WebMessageFormat.Json,
            BodyStyle=WebMessageBodyStyle.Wrapped,
            UriTemplate="lookup/{name}")]
        ERPAppService.DynamicsAx.ERPCustomer[] lookup(string name);
    }
}

Go to the Service1.svc.cs object and implement the lookup method. Replace USR, PW and DOMAIN with a valid user to access Dynamics Ax.

namespace ERPAppService
{
    public class Service1 : IService1
    {

        public ERPAppService.DynamicsAx.ERPCustomer[] lookup(string name)
        {
            var cred = new System.Net.NetworkCredential("USR","PW","DOMAIN");
            var client = new DynamicsAx.ERPAppServiceClient();
            client.ClientCredentials.Windows.ClientCredential = cred;

            var context = new DynamicsAx.CallContext();
            context.MessageId = Guid.NewGuid().ToString();

            return client.lookup(context, name);
        }
    }
}

Open the web.config and go to the bindings element and add the webHttpBinding element. Within the webHttpBinding element add a binding element and set the security element to mode=Transport. This is required to host the service with SSL.
<bindings>
  <netTcpBinding>
    <binding name="NetTcpBinding_ERPAppService" />
  </netTcpBinding>
  <webHttpBinding>
    <!– SSL !!!  –>
    <binding>
      <security mode="Transport"></security>
    </binding>
  </webHttpBinding>
</bindings>


Save, Compile and publish the service to the local directory. In the IIS Manager, right click on the Default Website and from the context menu create a new application and name it AppService. Select as directory the directory where your service is deployed.

Host JSON App Service

Go to IIS Manager, select the server running IIS and from the feature pane open certificates. Create a new, self-signed SSL certificate. Next go to the Default Web Site, from the right pane open the Binding Dialog. Select the HTTPS:443 Binding and assign the newly created SSL certificate.

SSL Certificate for JSON App Service

Go to the AppService application and from the feature pane open SSL Settings. Set the “Requires SSL” active.

[Optional] Test the JSON Service

Open a web browser and navigate to the service address. In this example the server name is SRV-Demo within the Domain Demo.Local. Therefore the serivce URL is https://srv-demo.demo.local/AppService/Service1.svc. The result should look like this.

Test JSON App Service

Next call the service lookup method with parameter “Contoso”. The call should look like this https://srv-demo.demo.local/AppService/Service1.svc/lookup/Contoso. The result should like this:

Test JSON App Service

Develop a Word App

In order to create Office Apps, you need at least the professional edition. Community Edition and Express edition do not include the Office / SharePoint App Development projects:

Create new App Project in Visual Studio

Create a new Office App Project. In the wizard choose to develop a side pane app for Word. This will create a new project which already contains an app that can be used to process the selected text within word. The Home.js contains the getDataFromSelection function, which will be used to call the JSON Service.

JSON Call from Word App

Modify the code in the getDataFromSelection() method. Change the URL of the JSON Service to the URL of your service. Use HTTPS and the server name for which the SSL certificate was created. The following code will send the selected text to the JSON service, parse the result display the result as list of links within the word app. By clicking on the link, the text will be pasted into word.

function getDataFromSelection() {
       

Office.context.document.getSelectedDataAsync(Office.CoercionType.Text,
    function (result) {
        if (result.status === Office.AsyncResultStatus.Succeeded) {
            var lookupUrl = https://srv-demo.demo.local/AppService/
                            Service1.svc/lookup/
+ result.value;

            $.getJSON(lookupUrl, function (data) {
                var result = data.lookupResult;
                $.each(result, function (key, val) {
                    var custname = val.parmCustName;
                    var address = val.parmAddress;
                    address = address.replace(/\n/g, ",");

                    $(‘#result_list’).append("<h3>" + custname + "</h3>");
                    $(‘#result_list’).append("<a onclick=
           \"Office.context.document.setSelectedDataAsync(‘"+address+"’)\">"
                                              + address + "</a>");

                     });
                 });

             } else {
                app.showNotification(‘Fehler:’, result.error.message);
             }
        }
    );
}


Run and test your app Smiley

Stacked Bar chart in Access

Recently a colleague asked how to display a stacked bar chart in Access.

Create a table where one column is used to group data e.g. Year, and additional fields containing values to be stacked e.g Revenue. For example, the columns Revenue by Item Group will be stacked by Year.

Access bar chart data

Next, create a new form and add a diagram object to the form

Add a chart to access

In the diagram wizard select your table with data. Next move the Year and the Revenue fields from the table to the diagram data box.

Add data fields to diagram

Next choose a bar chart. There is no stacked bar chart in the wizard.

Choose bar chart

Drag and drop the year to the axis drop box. Drag and drop the Revenue fields to the data box on the left. By double click on field in the left box you can choose the aggregation function e.g. Count, Sum, None

Assign fields to data and axis

Preview the diagram, it should look like this

Preview bar chart in access wizard

Finish the wizard. A diagram is placed on the form.

Bar chart in access form

Double click the diagram will open the designer view. Here right click on the diagram an open change the diagram type to stacked bar chart

Change chart type to stacked bar chart

Format the diagram as you like. Save your design and open the form

Stacked bar chart in access form

Use Aggregation Function in Document Data Source

Dynamics AX 2012 supports to publish a query as document data source e.g. to load data in excel. However, document data sources are very limited. For example aggregation like sum() is not supported. Here is an example

  • Create a new query and use the CustInvoiceJour as datasource.
  • Set the Dynamic Fields property to No, but add a SUM field for the InvoiceAmoutMST
  • Append the LogisticsPostalAddress as datasource to the CustInvoiveJour
  • Add a relation and use the predefined InvoicePostalAddress_FK relation
  • Set the Dynamic Fields property to No, but add the CoutryRegionId and City
  • In the query add CountryRegionId and City as Group By Fields

Dynamics AX Query with SUM aggregation


Go to System Administration > Setup > Document Management > Document data sources > Add a query reference for the newly create query.

Publish Query with aggregation function as document data source

When you try to load data from this query using Excel Addins, you will face an error message.

Query with aggregation functions fails in Dynamics AX Excel Addin

When you open the document data source in a browser, your will see that there are no useful entries in the data feed. By default the URL is http://localhost:8101/DynamicsAx/Services/ODataQueryService

Dynamics AX OData XML feed has no data

However, one simple workaround is to create a view based on the query.

  • Create a new view
  • Add the previous create query as data source
  • Add the SUM field, CountryRegionId and City to the view fields

Create a view for the query

Open the view. The result should look like this

Dynamics AX view displays query data

Finally, create a second view and use the view as data source. Add a query reference to the second query at the document data sources. The data feed now contains valid data.

Dynamics AX OData XML feed with aggregated data

Now you can load your data using Excel Addins.

Dynamics AX Excel Addin with aggregated SUM data

View Sales Data on Map in Excel 2013

Excel provides great BI features for end users and professionals. Loading, transforming and presenting data can easily be done with PowerView and PowerMap. This is an example to visualize Dynamics AX sales data.

Dynamics AX sales data in PowerMap

Prerequisites

Provide Data via ODataFeed

  1. Open Dynamics AX 2012 R2 development workspace
  2. Create a new Query called ERPCustInvoiceJour
  3. Add the CustInvoiceJour as datasource, set the Fields Dynamic property to false
  4. Add InvoiceAmount, InvoiceDate and CustGroup to the field list
  5. Add the LogisticsPostalAddress
  6. Add the CountryRegionId and City to the field list
  7. Set the Relations property to No
  8. Add a new relation manually, clear the Field and Related Field property but select InvoicePostalAddress_FK

image

In Dynamics AX Application workspace go to Organisation Administration > Setup > Document Management > Document Data Sources. Create a new record for module “Sales and Marketing”, type Query Reference for ERPCustInvoiceJour query. Enable the data source.

image

Open the ODataFeed in a browser, depending on the server name and AOS Port it should look like this http://localhost:8101/DynamicsAx/Services/ODataQueryService/ERPCustInvoiceJour

image

Enable PlugIns

  1. Open Excel and go to File > Options > Add Ins > COM Add-ins > Go…
  2. Enable PowerPivot, PowerView and PowerMap

image

          Create Map

        In Excel go to DATA > From other sources > Data Feed > provide the URL from Dynamics AX data feed. Load the data in Excel. go to INSERT > Map. Set the LogisticsPostalAddress_City as Geography field and click next.

      image

      Leave the Type as Column. Set the CustInvoiceJour_InvoiceAmount as Height for the Column. Set the CustInvoiceJour_CustGroup as Category and CustInvoiceJour_InvoiceDate as Time.

      image

      Run the map time line and watch where and when sales takes place. Watch the implementation in this short video

      Create a PowerPivot BI Application for AX Project Postings (Update)

      This is an update on the first posting how to create a PowerPivot Application for Dynamics AX. These are the changes and updates:

      • Excel 2013
      • XML Data Feeds instead of SQL
      • Timeline Filter instead of calculated fields

        Create and Publish Data Access Services

        You can publish Dynamics AX queries as open data feed. In contrast to direct SQL access it gives you more control on what is published because the builtin Dynamics AX security layer is used. Furthermore the data is delivered as XML and can easily be processed by other applications  Create three queries using these datasources and fields:

        Datasource            
        ProjTable ProjId Name        
        ProjJournalTrans ProjId CategoryId Txt Qty Transdate Worker
        HCMWoker join
        DirPerson
        Person RecId from HCMWorker Name      

      HcmWorker join DirPerson

      Go to Organization Administration > Setup > Document Management > Document data sources. For each of the queries create a new entry using Module “Project” and Type “Query Reference”. Choose your query from the dropdown and activate them.

      Document Data Sources

      You can check your services by opening the ODataService URL in your Browser. Depending on the name of the Server and Ports it might look like this http://localhost:8101/DynamicsAx/Services/ODataQueryService. You should see three available data services.

      ODataFeed collections

      You can load the data by adding /COLLECTION_NAME to the URL. For example http://localhost:8101/DynamicsAx/Services/ODataQueryService/ERPProjTable to view the data from the ERPProjTable collection based on the ERPProjTable query.

      Projtable ODataFeed

      Build the Data Model

      PowerPivot and PowerView reports are builtin with Excel 2013. However, these addins need to be activated manually. Go to File > Options > Addins > Dropdown COM Addins. Activate PowerPivot and PowerView.

      Active PowerPivot and PowerView

      Go to PowerPivot Tab > Manage > Get External Data From Data Service. In the wizard copy the data service URL (without collection name) and click next. Select the data feed collections and finish the import

      Import Dynamics AX ODataFeed in Excel

      Switch to the Diagram View using the small button on the right bottom. Create the relations between the tables by drag and dropping the related fields. ProjTable.ProjId on ProjJournalTrans.ProjId and ProjJournalTrans.Worker on HcmWorker.RecId

      PowerPivot 2013 Relations

      Switch back to Excel. From the PowerPivot tab, select Calculated Fields and create 2 new calculated fields. One for the Qty sum and another sum of postings on project Holiday and Illness.

      • sum(ERPProjJournalTrans[ProjJournalTrans_Qty])
      • CALCULATE(sum(ERPProjJournalTrans[ProjJournalTrans_Qty]);
        ERPProjTable[ProjTable_ProjId] = "50002" || ERPProjTable[ProjTable_ProjId] = "50003")

       image

      Create a KPI to visualize Absence vs. Productive

      In the PowerPivot Tab, create a new KPI. Use the C_Absence as base value and the C_Total as Target value. Change the color scheme to Gree-Yellow-Red and set the sliders to 5% and 10%.

      image

      Go to Insert Tab, from the Tables Group select PowerPivot Table. In the Dialog select “External Datasource”. Switch to Tables and use Workbook Data Model.

      image

      Select the ERPWorker and drag the DirPers_Name field in the rows. Select the ERPProjJournalTrans and drag the C_Total calculated field in the Values box. Expand the C_Absence KPI. Drag the Value(C_Absence) and the Status in the values box.

      image

      Go to the Analyze Tab (only visible if the pivot table is selected), from the group Filter, create a new Timeline Filter and select the ProjJournalTrans_TransDate field. Place the Filter above the table (or wherever your want)

      image

      Create a PowerPivot BI Application for AX Project Postings

      PowerPivot is a great extension for Excel to realize BI applications in very short. For Excel 2010 download and install the free PowerPivot extension. PowerPivot ist built in with Excel 2013. To activate PowerPivot go to File > Options > Addins > Choose COM Addins > activate PowerPivot.

      PowerPivot Tab in Excel 2010

      Load Data

      Open PowerPivot Window > External Data > SQL Server. Provide Credentials to access Dynamics AX database. Select PROJTABLE, PROJJOURNALTRANS, HCMWORKER and DIRPARTYTABLE. For each table open the preview and select the following fields.

      ProjTable ProjId Name DataAreaId        
      ProjJournalTrans ProjId CategoryId Txt Qty Transdate Worker DataAreaId
      HcmWorker Person RecId          
      DirPartytable Name RecId          

      In the import wizard set a filter on the DataAreaId for PROJTABLE and PROJJOURNALTRANS on CEU

      PowerPivot Data Import

      After the tables have been imported, create relations between these tables. Back in the PowerPivot window > Relations > Manage Relations create these relations.

      • ProjJournalTrans[PROJID] to ProjTable[PROJID]
      • ProjJournaltrans[WORKER] to HcmWorker[RECID]
      • HcmWorker[PERSON] to DirPartytable[RECID]
        Data Model in PowerPivot
        In the PowerPivot window select PROJJOURNALTRANS table and on the right side after the last column select the new empty column. Write =YEAR(‘PROJJOURNALTRANS’[TRANSDATE]) in the formula text field. Rename the new calculated field to YEAR. Add a second calculated column =MONTH(‘PROJJOURNALTRANS’[TRANSDATE]) and rename to MONTH

      Calculated Field in PowerPivot

      Create the first pivot table

      Close the PowerPivot windows and return to Excel. From the PowerPivot tab create new pivot table. Place the PROJJOURNALTRANS[QTY] field in the right lower Values box. Place PROJTABLE[NAME] and PROJJOURNALTRANS[CATEGORYID] in the rows box. Place PROJTABLE[NAME] and PROJJOURNALTRANS[CATEGORYID] in the vertical slicer box. Place PROJJOURNALTRANS[YEAR] and PROJJOURNALTRANS[MONTH] in the columns box and horizontal slicer.

      Pivot Table based on Dynamics AX Data

      Create charts

      From the PowerPivot tab open the PowerPivot table dropdown, select 2 charts vertical and place them in a new sheet. For both charts place the PROJJOURNALTRANS[QTY] in the lower right values box. For the first diagram place the PROJTABLE[NAME] field in the columns box. In the second diagram place the DIRPARTYTABLE[NAME] in the rows box. Now there are two diagrams, postings per employee and postings per project. Place PROJTABLE[NAME], PROJJOURNALTRANS[CATEGORYID] and DIRPARTYTABLE[NAME] in the vertical slicer. Place PROJJOURNALTRANS[YEAR] and PROJJOURNALTRANS[MONTH] in the horizontal slicer.

      Dynamics AX Project Postings per Project and per Employee

      Connect Slicer to other sheets

      Select the YEAR slicer, from the context menu open the pivot table connections. Connect the slicer to the other pivot table created earlier. By connecting the slicer a selection made on one sheet also effects the other sheet.

      PowerPivot Slicer

      Create Measures and define a KPI

      From the PowerPivot tab, PowerPivot table dropdown create a new simple pivot table on a new sheet. Place the DIRPARTYTABLE[NAME] field in the rows box. Place the PROJJOURNALTRANS[YEAR] in the horizontal slicer On the fieldlist select the PROJJOURNALTRANS table and create a new measure from the PowerPivot tab. Call the measure M_TOTAL and use the formula  =sum(PROJJOURNALTRANS[QTY])

      PowerPivot Measure posted Qty

      Create a second measure on the PROJJOURNALTRANS table called M_ABSENCE. This will be the sum of all postings made on project HOLIDAY (PROJID 50002) and ILLNESS (PROJID 50003). Use the formula
      =CALCULATE(sum([QTY]);PROJJOURNALTRANS[PROJID] = "50002" || PROJJOURNALTRANS[PROJID] = "50003") .

      PowerPivot Measure posted Qty on Holiday or Illness

      On the fieldlist, select the measure M_ABSENCE in the PROJJOURNALTRANS table. From the PowerPivot tab, create a new Key Performance Indicator (KPI) based on the M_ABSENCE Measure. Select the M_TOTAL as target. Choose green > yellow > red color schema. Define green to be from 0 – 5 percent, yellow from 5 to 10 percent and red to all above.

      PowerPivot KPI

      The pivot table with KPI should look like this

      PowerPivot table with KPI

      How to create a custom ribbon Addin for Excel 2010

      Creating a custom ribbon addin for Excel can be done in a few steps

      1. Develop your VBA code in a new Excel sheet, save it as Excel addin .xlam
      2. Open the addin with Custom UI Editor to create Buttons, Groups, etc. and link it with your VBA code
      3. Add the addin directory to the secure folders in excel
      4. Configure Excel to load your addin at startup

          Here are the required steps in detail

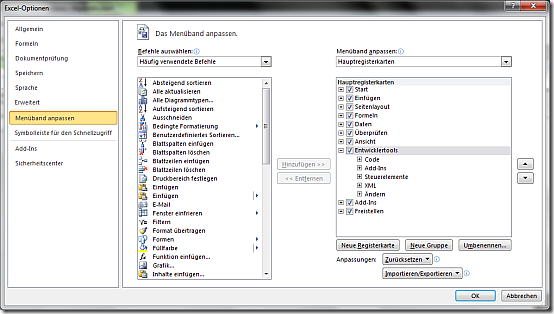
        Start Excel and develop your VBA code as you did before. If you do not see a development tab in excel, activate it via the options menu. File > Options > Ribbon > On the right side check “Development Tools”

        Activate the VBA Development Tab in Excel 2010
        You need to create an event handler to make your functions callable from the UI. Here is an example for a function and an event handler. The event handler foo_eventhandler calls the function foo which displays a message box with “Hello World from Excel”.

      Sub foo_eventhandler(control As IRibbonControl)
          foo
      End Sub

      Sub foo()
          MsgBox ("Hello World from Excel")
      End Sub

      Save your Excel as Excel Addin (.xlam) to your C:\Users\YOURNAME\AppData\Roaming\Microsoft\Addins directory. You can save it wherever you want, but the predefined addins directory might be good idea.

      Yet the addin does not have any UI elements. You have to define these elements by yourself. Download and install the Custom UI Editor from http://openxmldeveloper.org/blog/b/openxmldeveloper/archive/2009/08/07/7293.aspx . Start the editor and open your previous saved .xlam file. The editor shows a blank text field. From the Menu > Insert > Sample XML choose Excel Custom Tab. Use the onAction property at the button to call an eventhandler. Here is an example code to call the foo_eventhandler

      <customUI xmlns="http://schemas.microsoft.com/office/2009/07/customui">
          <ribbon>
              <tabs>
                  <tab id="customTab" label="MyTab" insertAfterMso="TabHome">
                      <group id="customGroup" label="MyGroup">
                          <button id="customButton1" label="Say Hello" size="large"
                           onAction="foo_eventhandler" imageMso="HappyFace" />
                      </group>
                  </tab>
              </tabs>
          </ribbon>
      </customUI>

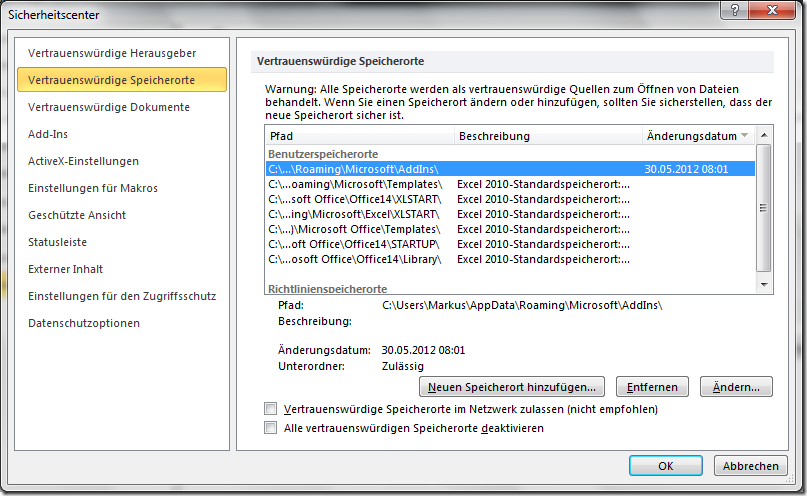
      Start Excel from the program menu. Go to File > Options > Security Center > Settings > Secure Locations > Add Location, and add your addins directory e.g. C:\Users\YOURNAME\AppData\Roaming\Microsoft\Addins as secure directory to load stuff from. Close Excel.

      Add the Addins directory to the secure locations in Excel 2010

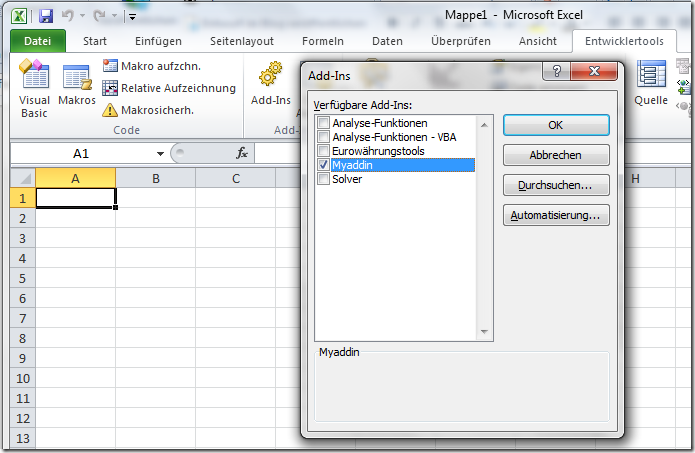
      When you open the .xlam file using Excel, you can already use your addin. However, it is not available when you start Excel from the programs menu. To load the addin when excel starts, go to the development tab  > Add-Ins and check your addin. (The form displays addins from the Appdata\Roaming\Microsoft\Addins directory)

      Load your Addin when Excel starts

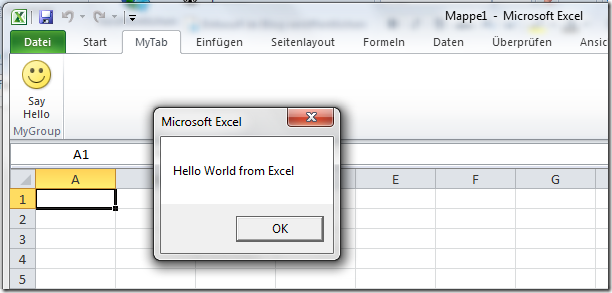
      Now the Addin is loaded when Excel starts. Whenever you change something and the Addin does not appear anymore, go and check your xml UI code. Make sure that all IDs are unique and do not have blanks
      (e.g. id=”My Button2” is a bad idea)

      Custom Hello World Addin for Excel 2010

      More Icons

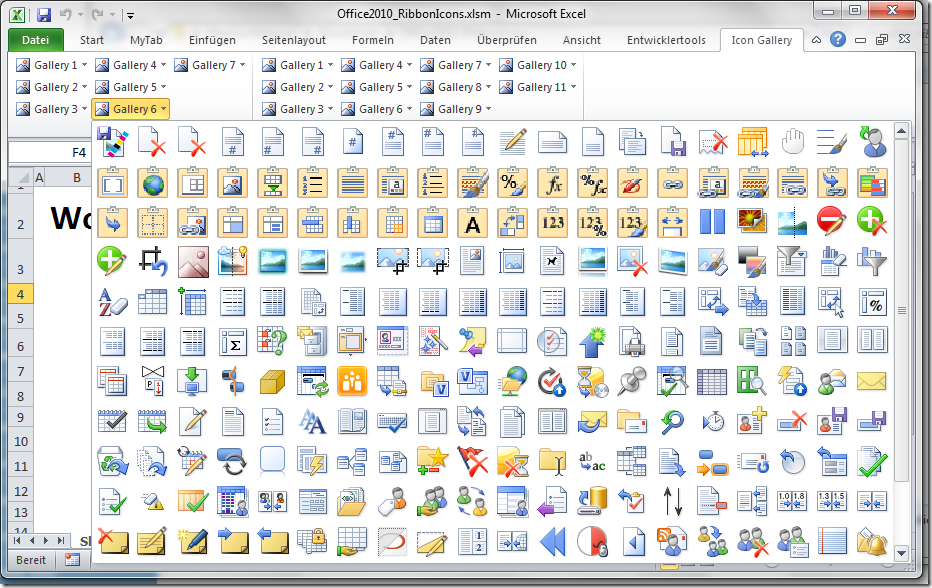
      There are many icons available you can use for your addins. For example download the icon gallery addin from http://www.accessribbon.de/index.php?Downloads:24 . To change the icon on button modify the imageMso property in your xml file.

      <button id="customButton1" label="Say Hello" size="large"
       onAction="foo_eventhandler" imageMso="HappyFace" />

      Have fun!

      Many icons in Excel 2010