The power of MCP (Model Context Protocol) allows you to connect an AI application like Copilot oder Claude to an Application, in a way that the AI application can work with the connected system in the background. For example, the MCP impementation for Microsoft Dataverse allows an AI application to query and manipulate records in the Dataverse. Sounds simple but here is the magic:
Query dataverse in natural language 💬 e.g. “Find me all german customers”
Chat in your natural language no matter how Dataverse was setup in the background, e.g. talk in English 🇬🇧 and let AI work an a German 🇩🇪 dataverse installation
Let the AI investigate the database structure 🔍. If you dont provide information how tables are related it will find out by its own,
LLMs like ChatGTP, Copilot, Gemini, Claude etc. are very convenient for lot of tasks like coding, generating and optimizing documents and data analysis. With an MCP (Model Context Protocol) Server that connects to a SQL database you can use your AI to perform business intelligence tasks without the need of a classic BI Tool like PowerBI.
I’ve made a short video that shows Claude Desktop connecting to an Azure SQL Database (Adeventure Works) and performs data analysis and visualization:
Here is my second video on Unified Price Management explaining how to Best-Price discounts work and how to configure concurrent Back-to-School and Black-Friday discounts.
A colleague developing for On-Prem Business Central using VS Code ran into an Authentication error downloading symbols. Although he provided his domain user and password the authentication failed.
Authorization has failed or the credentials have expired. The credential cache has been cleaned. Any access to reach Business Central would require new authorization.
Symptoms
Business Central On-Prem installation on Domain Joined Server
Authentication Windows
Visual Studio Code installed on a non-domain joined Windows 11 client (WORKGROUP)
Work Account (Azure AD / Entra ID User) logged on on in Windows 11
Open URL in Browser asks for User + Password but works correctly 🤔
AL: Download Symbols reports an error
Solution: RunAs
A workaround that solved the issue was to use the RunAs command and provide the domain user + password.
Since Tier1 Cloud Hosted Environments (CHE) will be deprecated, there are still good reasons (💰) to use them anyway instead of UDEs. Tier1 CHE from withing Lifecycle Services can be paired with Power Platform environment including Dual Write Configuration with Dynamics 365 Sales. In the Tier1 configuration I’ve encountered an authentication error at creating new records in FO.
History and symptoms 🤒
I’ve deployed a new Tier1 Dev/Test Environment 10.0.43 to the linked Azure Subscriptions. At the configuration dialog in LCS I’ve enabled Power Platform integration based on Dynamics 365 Sandbox. Deployment took a while but succeeded. 👍
After the deployment I’ve restored a AxDB database with some basic configurations and performed a full database synchronization in Visual Studio. 👍
Next I’ve linked the D365 Finance and Supply Chain machine with the deployed D365 Sales Sandbox environment from the LCS environment details page. Finally I’ve enabled the Dual Write Configuration also from the LCS environment details page. 👍
In Power Platform Admin Center, Environment, Dynamics 365 Apps two solutions were already deployed. Dynamics 365 Dual Write Core and Dynamics 365 Dual Write Application Core. Because the environment was a sales prototype I’ve added the Dynamics 365 Dual Write Human Resource, Dynamics 365 Dual Write Finance, Dynamics 365 HR Common Tables (!), Dynamics 365 Dual Write Global Address Book and Dynamics 365 Dual Write Supply Chain Solution from the App Source. 👍
In Dynamics 365 Finance & Supply Chain at the Data Management Workspace I’ve imported the Core Solution and Supply Chain Solution. The table mappings have been populated successfully and I’ve choosen to synchronize only one legal entity (company) with Sales. 👍
The basic table mappings (e.g. Legal Entities, Customer Groups, Currencies, Units, Size, Colors, etc.) including initial synchronization from FO to Sales were successful. I’ve also enabled synchronization between CustomersV3 and Accounts👍
In Dynamics 365 Sales it was possible to create a new account from type customer, link it to the corresponding legal entity and assign a customer group. The customer account from Dynamics 365 Sales was successfully synchronized into FO within seconds and became a customer. 👍
Vice versa, from Dynamics 365 Finance Supply Chain to Dynamics 365 Sales did not work. As soon as a new records in a synchronized table was create a Dual Write error message came up. No matter if it was a customer, product, etc. 🤬
Unable to write data to entity accounts
Authentication failed with error
Failed to authenticate for https://__crm4.dynamics.com/api/data/v9.0/accounts
For information on troubleshooting see
https://go.microsoft.com/fwlink/?linkid=2244045
Unable to get access token
Solution Step-by-Step
Microsoft has cut off CHE connections from accessing tenant information. I found some blog posts from other folks dealing with Business Events and a Microsoft documentation to setup Onebox environments. Following the instructions I’ve done the following:
App Registration
I’ve created an App Registration in EntraID. I’ve added the URL of the D365 FO Environment as response URL from type Web as well as the URL including /oauth
I gave API permissions to User.Read, User.Read.All, Dynamics ERP AX.FullAccess and LCS user_impersonation.
Self-Signed Certificate via PowerShell
Following the documentation I’ve create a simple self-signed certification via PowerShell on the Tier1 VM.
The export generates a .cer file. By double clicking the file you can install the file on the computer. I’ve done this twice. As local machine and choosen the place to be the root certificate authorities. The same with installation as user and also selected the installation to be placed in the root certificate authorities.
web.config and wif.config
The web.config file can be found at K:\AosService\WebRoot directory. I’ve made a copy before editing and changed the following lines. The spn: is the application ID from the app registration. The thumbprint can be found in the .cer file on the Details tab.
In the wif.config I’ve also added the application ID
<?xml version="1.0"?>
<system.identityModel>
  <identityConfiguration>
    <securityTokenHandlers>
      <securityTokenHandlerConfiguration>
        <audienceUris>
       <!-- WARNING: MUST be first element; updated at web role instance startup -->
          <add value="spn:00000015-0000-0000-c000-000000000000" />
          <add value="spn:MY_APP_ID_HERE" />
Application User in Dynamics 365 Power Platform
In the Power Platform Admin Center, on the environment page, under settings in groups users I’ve added an application user. I’ve assigned System Administrator Role like the already existing Finance and Operations Service account.
EntraID Application in FO
Finally to avoid any additional problems I’ve also create a new record in Dynamics 365 Finance Supply Chain at the EntraID Applications page.
Finally the synchronization from Dynamics 365 Finance Supply Chain to Dynamics 365 Sales was working. Customers, Products, Sales Orders, Invoices etc. can be created in FO and be found Sales. 💚
Since the original Dual Write Orchestration packages has been replaced by a pack of smaller packages, its needed to setup the packages in the correct order. You can deploy a Power Platform environment using the Dynamics 365 template from within LCS.
Also from the Environment Full Details page, you can trigger the installation of Dual Write solution and initial configure the Dual Write solution. You will end up with Dual Write Core and Dual Write Application Core Solutions installed. To have the full Dual Write Experience you have to install the other Packages as well.
You might run into an installation error when deploying Dual-Write packages from App Source.
Error details
How to troubleshoot
To fix this problem retry installation. For directions on how to do this see here.

msdyn_Dynamics365SupplyChainExtendedAnchor
NotProvided
Solution manifest import: FAILURE: The following solution cannot be imported: Dynamics365SupplyChainExtended. Some dependencies are missing. The missing dependencies are : <MissingDependencies><MissingDependency canResolveMissingDependency="True"><Required type="1" schemaName="cdm_worker" displayName="Worker" solution="HCMCommon (2.2.0.3)" /><Dependent type="10" schemaName="msdyn_transferorder_receivingcontactpersonnel" displayName="msdyn_transferorder_receivingcontactpersonnel" parentSchemaName="cdm_worker" parentDisplayName="Worker" /></MissingDependency></MissingDependencies> , ProductUpdatesOnly : False
There is also an additional required package that is not labeled “Dual Write” but required, the Dynamics 365 HR Common Tables package:
Here is an order of installation that worked for me (Apr. 2025)
Ever wanted to habe a Code Sandbox to run a script in Flow? I had this issue to calculate an SHA1 hash value which is not possible with builtin flow functions. Obvious solution would be to put it in an Azure Function. There is a solution by Valentin Gasenko to create a custom connector and utilize the Code feature.
You may create a custom connector that connects to nowhere😉 with a fake method and place C# code there. It has some limitations to an Azure Function e.g. you can’t install packages etc. but it might help for many other issues.
OpenAPI Definiton
Create a new OpenAPI Definition Swagger file that defines a method you would like to use in your flow. Here is an example for an API with a method called executeScript that takes a string as input and returns a string as output.
{
  "openapi": "3.0.0",
  "info": {
    "title": "Script Execution Service",
    "version": "1.0.0",
    "description": "A simple REST API that executes a script and returns text output."
  },
  "paths": {
    "/ExecuteScript": {
      "get": {
        "summary": "Executes a script and returns text output",
        "operationId": "executeScript",
        "parameters": [
          {
            "name": "input",
            "in": "query",
            "description": "The script input as a string",
            "required": true,
            "schema": {
              "type": "string"
            }
          }
        ],
        "responses": {
          "200": {
            "description": "Successful execution",
            "content": {
              "application/json": {
                "schema": {
                  "type": "object",
                  "properties": {
                    "output": {
                      "type": "string",
                      "description": "The output of the executed script"
                    }
                  }
                }
              }
            }
          },
          "400": {
            "description": "Invalid input provided"
          }
        }
      }
    }
  }
}
Create a custom connector in PowerAutomate
In PowerAutomate create a new custom connector. You may have to lookup the custom connector link by clicking on “… More” on the left pane.
Create a new custom connector by importing the OpenAPI definition file. Provide name and description if you like. Make sure to set the Host to valid URL. It doesn’t matter if there is no real host with this name. I use fakeapi.local in my example.
Place C# code
Go to the Code section and enable code by selection the slider. Choose the method you want to use. In my example it’s the executeScript Method. Copy the C# code you want to execute in the code editor window below. This is an example code that reads the input parameter from the request and returns it in a Hello statement.
public class Script : ScriptBase
{
  public override async Task ExecuteAsync()
  {
    HttpResponseMessage response = new HttpResponseMessage(HttpStatusCode.OK);
    string url = this.Context.Request.RequestUri.PathAndQuery;
    string parsedUrl = url.Split('?')[1];

    var paramsCollection = HttpUtility.ParseQueryString(parsedUrl);
    string value = paramsCollection["input"];

    response.Content = CreateJsonContent("{\"message\": \"Hello "+value+"\"}");
    return response;
  }
}
Save and Test
You have to select “Create Connector” before testing. If your code is not working you will get an error here. If the creation was successful you can test your connector.
Use C# Sandbox in your Flow
Simply create a new flow or use an existing one. You we’ll find the connector under the custom connectors. In my example it has a single action to execute the code to which I pass the value of the variable Name.
Like in the connector test scenario, it executes the C# script and returns Hello and the provided value.
The combination of Dynamics 365 Finance and Supply Chain Management Cloud ERP and Microsoft Flow helps to automate many tasks. For example, you can easily notify a customer about changes regarding the confirmed shipping date.
Concept
Configure a Blob Storage Endpoint for Business Events
Create a Change Based alert for ShippingDateConfirmed
Add a flow that triggers on new events
Read Email from sales order and notify customer
Configure a Business Event Endpoint
Business events in Dynamics 365 FSCM can be used to notify external systems. It supports different endpoint types like Azure Event Hub, HTTPS web hook and Blob Storage Account. I personally prefer to use a storage account because it’s a very cheap and easy to use, understand and support cloud infrastructure.
In Entra ID admin Portal (Azure Active Directory) create a new app registration. Note the client ID and create a new secret. Note the application secret as well.
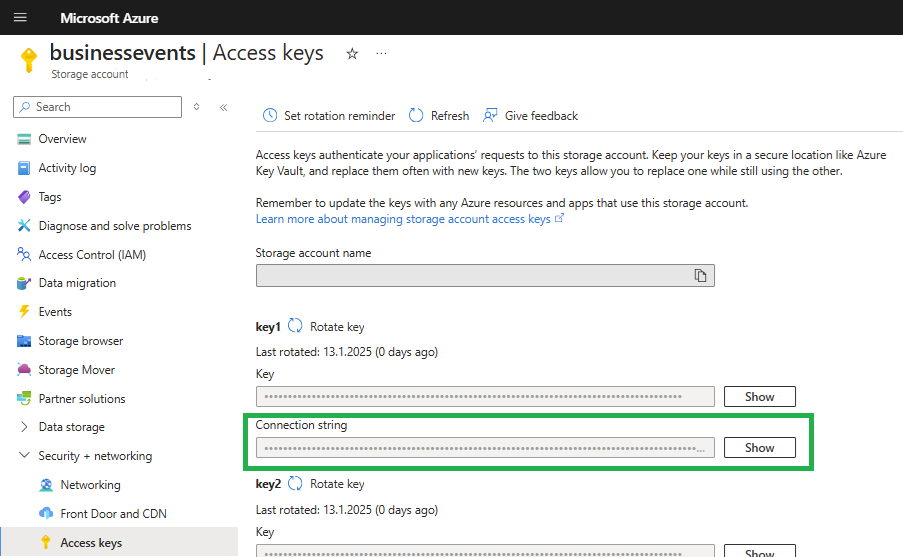
In order to use a Blob Container for Business Events you need some resources. First, of course a storage account with a public endpoint. Copy the Storage Account Connection String. On the menu on the left side select Storage browser. Navigate to the Blob Storage and create a new container.
Next, create a key vault to store the connection string. When creating the key vault make sure to use Vault Access Policies. At the key vault create a new secret and place the connection string there.
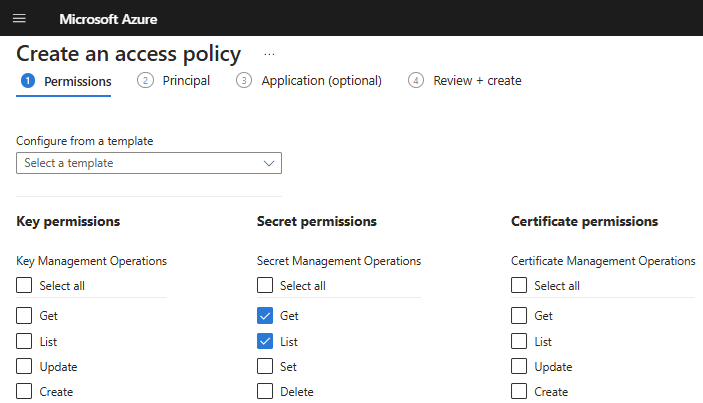
In the Key Vault switch to Access Policies and create a new one. Assign the registered app the rights to list and get secrets.
In Dynamics 365 Finance and Supply Chain Management open the Business Event Catalog (System Administration > Setup > Business Events). Switch to the Enpoint tab and create a new Blob Endpoint. In the dialog provide
the name of the secret that holds the connection string
Switch to the Business Event Catalog and filter the Business Event ID entries containing the term “Alert”. Make sure you select the BusinessEventsAlertEvent and click on Activate. In the dialog select the legal entity and the recently created blob endpoint.
Test Business Event Endpoint configuration for Alerts
Make sure you have a batch job handling change based alerts in Dynamics 365 Finance and Supply Chain. If you don’t have such a batch job, create on from System Administration > Periodic Tasks > Alerts > Change Based Alerts. Change the recurrence to no end date and provide a time interval e.g 10 minutes.
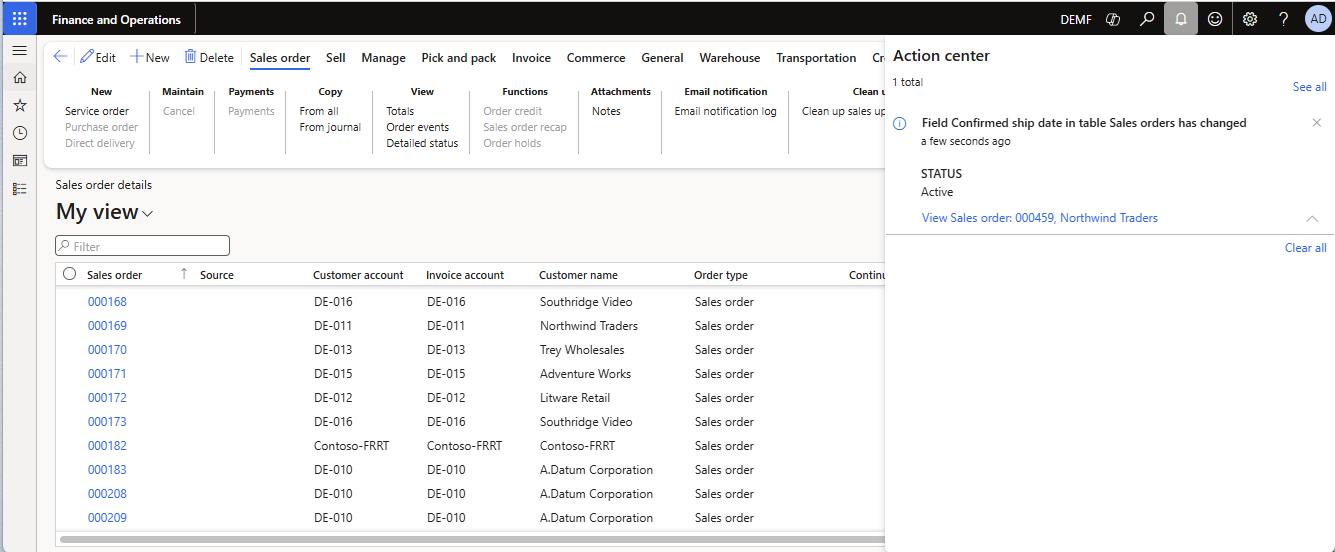
In Dynamics 365 FSCM go to an existing sales order or create one. In the top menu switch to Options and select Create custom alert.
In the alert dialog choose the Confirmed Ship Date from the field drop down. This will change the alert trigger to Has Changed. Make sure to activate the Send Externally Option as well. Save the alert rule.
Change the confirmed ship date in the sales order. Depending on the time interval for change based alerts batch job you will get notified that the value has been changed.
Switch to the Azure Portal and go to your storage account. From the Storage Browser, select the Blob Storage and the container you created for the business events. There you should see at least one entry named as GUID.
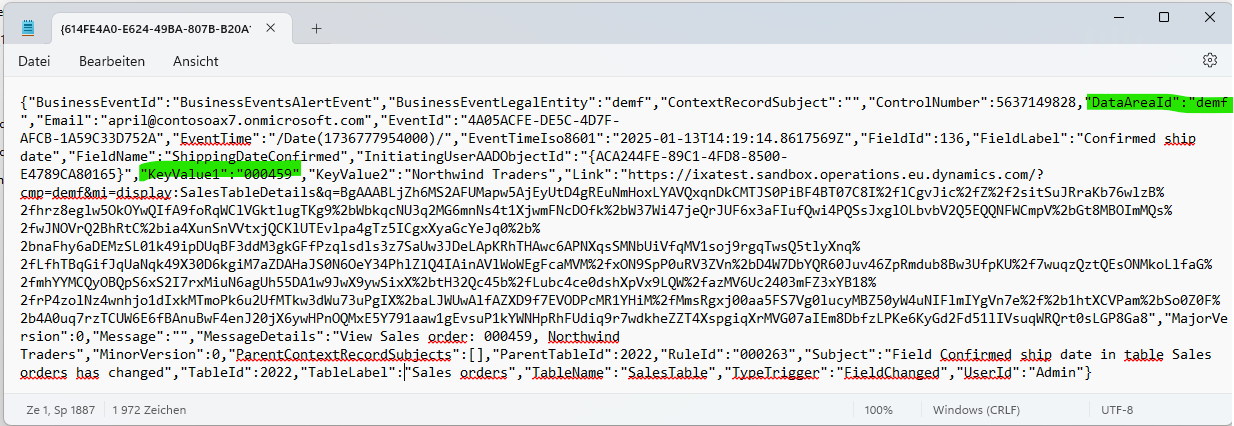
Download and open the file in a text editor. I should contain the JSON for the business event. You will find the Sales Order Number in KeyValue1 and the legal entity in the DataAreaId property. You can use this values to lookup the sales order in D365.
Create a flow to notify the customer
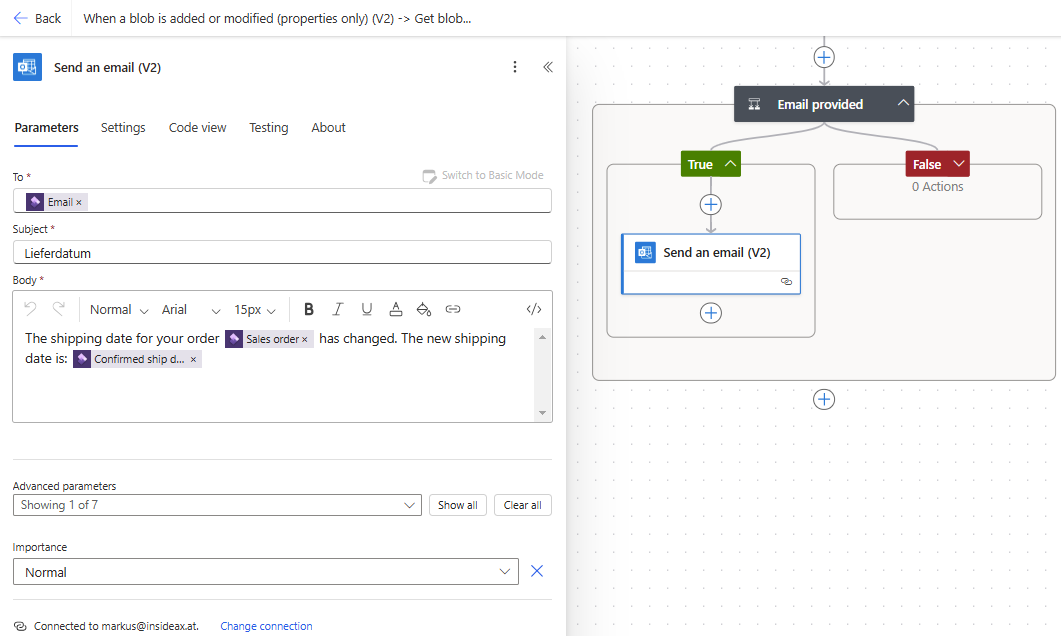
Go to Power Automate and create a new flow that triggers when a blob entry is created or modified. Check if the event was a shipping data change and send an email to the customer. The flow may look like this.
The first action Get Blob Content is used to download the event file itself. The next action will parse the event JSON string. Since the blob file has no file extension, it is necessary to provide the content as string() to the Parser. The schema can be generated by example. E.g. copy the JSON string from the test file and flow will generate the schema.
Because the blob storage account may be used by different business events in the future it is advised to add a condition to check if the alert is triggered by the shipping date.
Next use the DataAreaId and KeyFieldValue1 to lookup the Sales Order in Dynamics 365 FSCM by combining both values seperated with a comma e.g. demf,001234
Add a second condition to check if there is an Email address provided in the sales header. If so use the Send Email action to notify the customer. If required you may work on the FALSE condition and lookup the customer instead to find an email address.
There are many ways to analyze Dynamics 365 Finance and Supply Chain data in Fabric. One way is to replicate the Entity Export database. Then load it into a Lake House and combine it with additional data for reporting. Here is a video that shows the complete process from scratch:
Considerations
Exporting entities in Dynamics 365 Finance and Supply Chain to your own Azure SQL DB has been around for a long time. There are some considerations and limitations when using your BYOD (Bring Your Own Database) feature with Fabric:
Sizing: 100+ DTUs are required. Free and small Basic versions are not supported.
Networking: Public Endpoint and allow Azure Services