Office Apps provide additional functionality within an Office document like Excel and Word. This is an example how to create an App for Word 2013 which can be used to lookup an Address of a customer in Dynamics Ax.

Architecture

- Dynamics Ax will provide a web service which takes the (partial) name of a customer as input parameter, and returns a list of matching customers and their addresses.
- However, apps prefer a more lightweight form of communication.Therefore another web service will provide a simple JSON interface.
- Finally the Word App will be used to select a partial text within the document eg.”Contoso”, send it to AX and present the result of matching Customer / Addresses.
Dynamics Ax Service
Create a new data contract class and call it ERPCustomer. These will be the result objects for a customer lookup.
[DataContractAttribute]
class ERPCustomer
{
CustName custName;
LogisticsAddressing address;
}
[DataMemberAttribute]
public LogisticsAddressing parmAddress(LogisticsAddressing _address =
address)
{
address = _address;
return address;
}
[DataMemberAttribute]
public CustName parmCustName(CustName _custName = custName)
{
custName = _custName;
return custName;
}
Create a second class for the lookup logic and call it ERPAppHelper and add this static method:
public static List lookup(Name _name)
{
CustTable custTable;
DirPartyTable dirParty;
List customers = new List(Types::Class);
ERPCustomer customer;
_name = strFmt("*%1*",_name);
while select dirParty
exists join custTable
where dirParty.Name like _name && dirParty.RecId == custTable.Party
{
customer = new ERPCustomer();
customer.parmAddress(dirParty.primaryAddress());
customer.parmCustName(dirParty.Name);
customers.addEnd(customer);
}
return customers;
}
Create a third class for the Lookup Service and call it ERPAppService
[SysEntryPointAttribute(true),
AifCollectionTypeAttribute(‘return’, Types::Class, classStr(ERPCustomer))]
public List lookup(Name _name)
{
return ERPAppHelper::lookup(_name);
}
Create a new Service in the AOT, assign the ERPAppService class to the service and add the lookup method. Next create new privilege or use an existing one. Add the service lookup method to the privileges’ entry points. Right click on the service, from the context menu choose “Register”

Finally, to to System Administration > Setup > Services and AIF > Inbound Ports and create a new service. Use net.tcp port and add the lookup method as service operation.

[Optional] Test the Dynamics Ax Service
Open Visual Studio, create a new Console Project and call it TestAifService. Add the Service reference (URI from the Screenshot above) to your project and call it ERPAppService. Call the lookup method and print the results. Use code below, and replace USR, PW, DMN with a valid User, Password, Domain combination in your environment.
using System;
using System.Collections.Generic;
using System.Linq;
using System.Text;
using System.Threading.Tasks;
using TestAifService.ERPAppService;
namespace TestAifService
{
class Program
{
static void Main(string[] args)
{
var cred = new System.Net.NetworkCredential("USR","PW","DMN");
var client = new ERPAppServiceClient();
client.ClientCredentials.Windows.ClientCredential = cred;
var context = new CallContext();
context.MessageId = Guid.NewGuid().ToString();
var result = client.lookup(context, "Contoso");
foreach (var customer in result)
{
Console.WriteLine(customer.parmCustName);
Console.WriteLine(customer.parmAddress);
}
Console.ReadKey();
}
}
}
If you are using the Contoso Demo Data, the result should look like this:

JSON Frontend Service
In order to host the JSON Frontend Service, you need to install the Application Server Role and HTTP Activation. You will also need the Webserver role installed, including Application Development with .NET and ASP.NET.
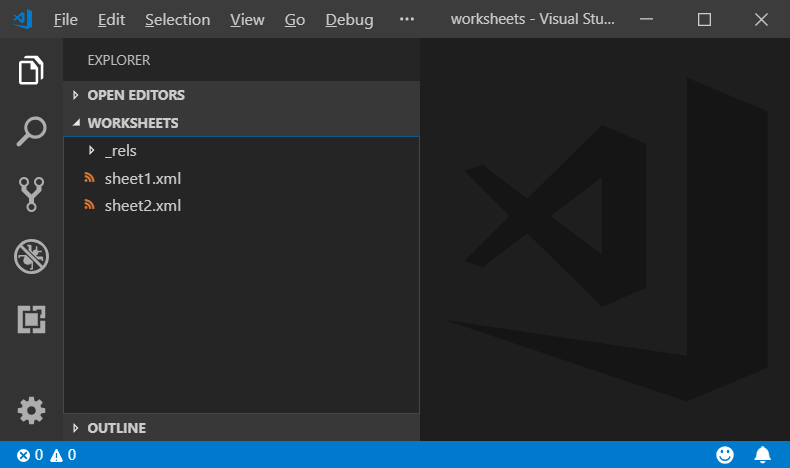
In Visual Studio 2013 create a new Website Project and choose a new WCF Service. Use .NET Version 4.5 and select the file system as host. Select a C:\inetpub\wwwroot\appservice as target directory. Name it ERPAppService. This will create a WCF service project in Visual Studio including a working Hello World Service. Add the service reference to the Dynamics Ax net.tcp service to your project and call it DynamicsAx. Your Visual Studio Project should look like this:

Next, modify the IService1.cs Interface:
namespace ERPAppService
{
[ServiceContract]
public interface IService1
{
[OperationContract]
[WebInvoke(Method="GET",ResponseFormat=WebMessageFormat.Json,
BodyStyle=WebMessageBodyStyle.Wrapped,
UriTemplate="lookup/{name}")]
ERPAppService.DynamicsAx.ERPCustomer[] lookup(string name);
}
}
Go to the Service1.svc.cs object and implement the lookup method. Replace USR, PW and DOMAIN with a valid user to access Dynamics Ax.
namespace ERPAppService
{
public class Service1 : IService1
{
public ERPAppService.DynamicsAx.ERPCustomer[] lookup(string name)
{
var cred = new System.Net.NetworkCredential("USR","PW","DOMAIN");
var client = new DynamicsAx.ERPAppServiceClient();
client.ClientCredentials.Windows.ClientCredential = cred;
var context = new DynamicsAx.CallContext();
context.MessageId = Guid.NewGuid().ToString();
return client.lookup(context, name);
}
}
}
Open the web.config and go to the bindings element and add the webHttpBinding element. Within the webHttpBinding element add a binding element and set the security element to mode=Transport. This is required to host the service with SSL.
<bindings>
<netTcpBinding>
<binding name="NetTcpBinding_ERPAppService" />
</netTcpBinding>
<webHttpBinding>
<!– SSL !!! –>
<binding>
<security mode="Transport"></security>
</binding>
</webHttpBinding>
</bindings>
Save, Compile and publish the service to the local directory. In the IIS Manager, right click on the Default Website and from the context menu create a new application and name it AppService. Select as directory the directory where your service is deployed.

Go to IIS Manager, select the server running IIS and from the feature pane open certificates. Create a new, self-signed SSL certificate. Next go to the Default Web Site, from the right pane open the Binding Dialog. Select the HTTPS:443 Binding and assign the newly created SSL certificate.

Go to the AppService application and from the feature pane open SSL Settings. Set the “Requires SSL” active.
[Optional] Test the JSON Service
Open a web browser and navigate to the service address. In this example the server name is SRV-Demo within the Domain Demo.Local. Therefore the serivce URL is https://srv-demo.demo.local/AppService/Service1.svc. The result should look like this.

Next call the service lookup method with parameter “Contoso”. The call should look like this https://srv-demo.demo.local/AppService/Service1.svc/lookup/Contoso. The result should like this:

Develop a Word App
In order to create Office Apps, you need at least the professional edition. Community Edition and Express edition do not include the Office / SharePoint App Development projects:

Create a new Office App Project. In the wizard choose to develop a side pane app for Word. This will create a new project which already contains an app that can be used to process the selected text within word. The Home.js contains the getDataFromSelection function, which will be used to call the JSON Service.

Modify the code in the getDataFromSelection() method. Change the URL of the JSON Service to the URL of your service. Use HTTPS and the server name for which the SSL certificate was created. The following code will send the selected text to the JSON service, parse the result display the result as list of links within the word app. By clicking on the link, the text will be pasted into word.
function getDataFromSelection() {
Office.context.document.getSelectedDataAsync(Office.CoercionType.Text,
function (result) {
if (result.status === Office.AsyncResultStatus.Succeeded) {
var lookupUrl = https://srv-demo.demo.local/AppService/
Service1.svc/lookup/ + result.value;
$.getJSON(lookupUrl, function (data) {
var result = data.lookupResult;
$.each(result, function (key, val) {
var custname = val.parmCustName;
var address = val.parmAddress;
address = address.replace(/\n/g, ",");
$(‘#result_list’).append("<h3>" + custname + "</h3>");
$(‘#result_list’).append("<a onclick=
\"Office.context.document.setSelectedDataAsync(‘"+address+"’)\">"
+ address + "</a>");
});
});
} else {
app.showNotification(‘Fehler:’, result.error.message);
}
}
);
}
Run and test your app