Data Management in Dynamics 365 Finance and Supply Chain Management can be used to export Entities in different formats like XML. In many cases the default Entity schema is not what you want. However, you can easily transform the XML output by applying an XSLT transformation directly in Dynamics.
I’ve made a short video how to transform the EcoResReleasedProductsV2 XML entity export into another schema with different structure and element names.
Business Events in Dynamics 365 Finance and Supply Chain Management can be used to notify external systems in near-time when a certain event occurs in the ERP system. Dynamics 365 F/SCM comes with a set of predefined business events. You may want to develop you own specific business events to send data to another system. Three artifacts are needed for a custom Business Event. The contract that contains the data that is sent, the Business Event and at least one trigger. Here is an example for a Business Event that triggers when a new customer is created.
Required Model Dependencies:
Application Foundation
Application Suite
Directory
Contact Person
Contract
[DataContract]
public class ERPCustomerCreatedContract extends BusinessEventsContract
{
    protected Name name;

    [DataMember('Name'),BusinessEventsDataMember("Customer Name")]
    public Name parmName(Name _name = name)
    {
        name = _name;
        return name;
    }

    public static ERPCustomerCreatedContract newFromCustTable(CustTable _custTable)
    {
        ERPCustomerCreatedContract contract = new ERPCustomerCreatedContract();
        contract.parmName(_custTable.name());
        return contract;
    }
}
Business Event
[BusinessEvents(classStr(ERPCustomerCreatedContract),
                'Customer Created',
                'Customer Created',
                ModuleAxapta::Customer)]
public class ERPCustomerCreated extends BusinessEventsBase
{
    CustTable custTable;

    protected void new()
    {
    }

    public static ERPCustomerCreated newFromCustTable(CustTable _custTable)
    {
        ERPCustomerCreated event = new ERPCustomerCreated();
        event.parmCustTable(_custTable);
        return event;
    }

    public CustTable parmCustTable(CustTable _custTable = custTable)
    {
        custTable = _custTable;
        return custTable;
    }

    [Wrappable(false), Replaceable(false)]
    public BusinessEventsContract buildContract()
    {
        return ERPCustomerCreatedContract::newFromCustTable(custTable);
    }
}
Trigger
Make sure the trigger runs after inserted not on inserting 😉
class ERPCustTable_EventHandler
{
    [DataEventHandler(tableStr(CustTable), DataEventType::Inserted)]
    public static void CustTable_onInserted(Common sender, DataEventArgs e)
    {
        CustTable custTable = sender as CustTable;
        ERPCustomerCreated::newFromCustTable(custTable).send();
    }
}
Configuration
Make sure your code builds. In Dynamics 365 F/SCM open the Business Events Catalog. Rebuild the catalog to see your Business Event. Make sure you have an endpoint configured. Activate the Business Event. Create a new Customer. The Business Event will trigger and send the contract to your endpoint.
After creating a new customer, the Business Event triggers and sends the message to the configured endpoint. In my case it’s a Blob Storage in Azure. Here is the resulting JSON Message:
PowerBI goals are used to keep track of targets like sales quantity, quality, etc. Goals can be linked to values from PowerBI reports. This video shows how to create a scorecard with goals based on Dynamics 365 Finance data.
Dynamics 365 Finance & Supply Chain allows you to store attachments in the database, on Azure BLOB and on SharePoint. See here how you can configure SharePoint as storage location and create a document type “Fact Sheet”:
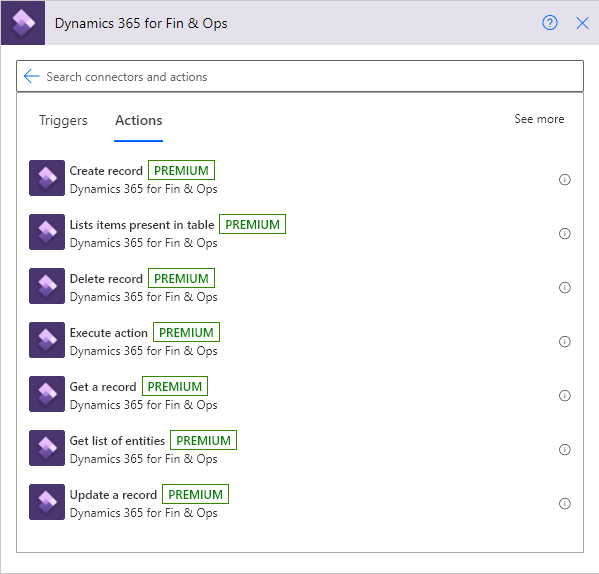
The Dynamics 365 connector in Power Automate provides the basic operations to interact with your Dynamics 365 FO instance. You can create new records via flow (e.g. a new Customer), read, update and delete records (e.g. Sales Order Lines) and retrieve the list of available entities.
Dynamics 365 Finance and Supply Chain Connector in Power Automate
The connector uses OData to interact with the entities in Dynamics 365 FO. Therefore, it also supports OData syntax for filter expressions. If you want to filter on a boolean Extended Datatype like NoYes and try to use “Yes” or “1” or true it will not work. Dynamics 365 has its own Datatype that comes from the entity definition Microsoft.Dynamics.DataEntities.NoYes .
One Time Customer in Dynamics 365 Finance
For example, if you want to get all One-Time Customers from Dynamics 365 FO, use the Dynamics 365 connector and choose the action “List items in present Table”. Use the Customers entity. To filter on a NoYes field like One-Time Customer you have to use the following syntax:
Dual Write is a Power Platform based solution to synchronize Dynamics 365 Finance and Supply Chain with Dynamics 365 Customer Engagement in real time. I’ve uploaded a Youtube Video that shows Dual Write in Action. The default solution comes with a set of synchronization entities like Products, Customers, Vendors, Quotations, Sales Orders and Invoices. In a Dynamics 365 project you typically need to add additional information in both applications.
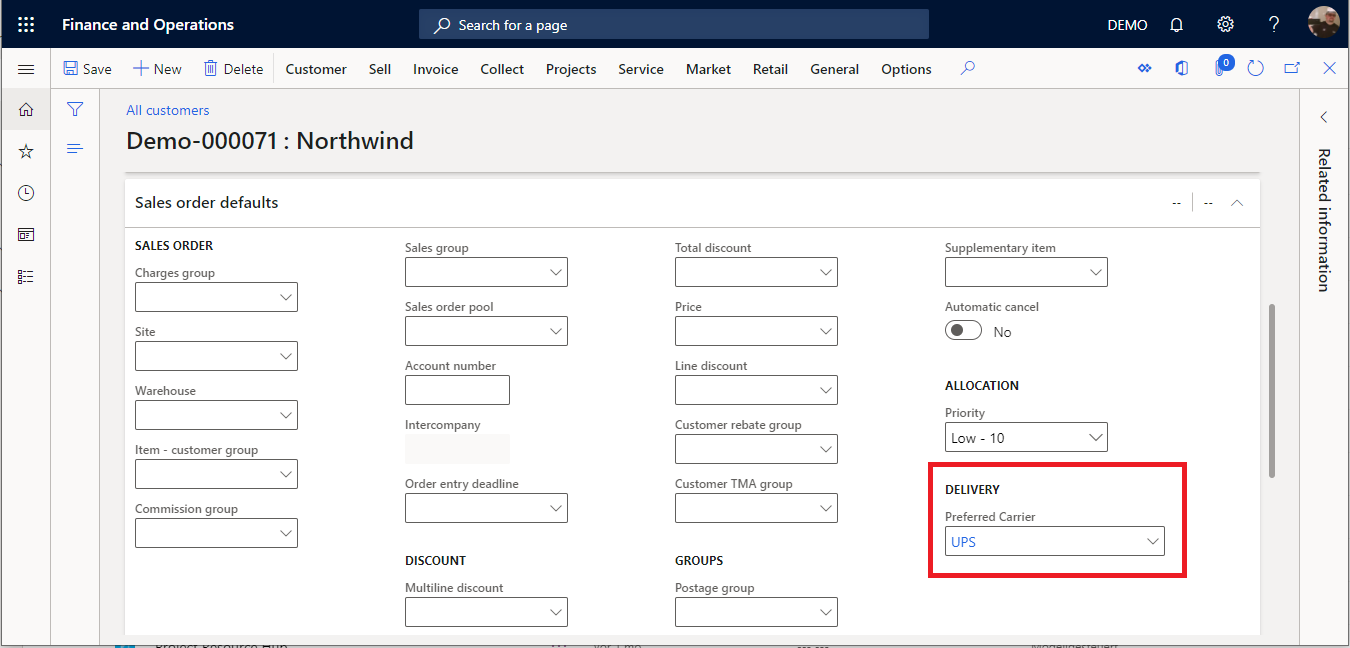
In this example a customer shall have a preferred carrier. The carrier (e.g. UPS, DHL) will be stored in a main table. The customer entity will have a reference to set the carrier. The corresponding account entity in Dynamics 365 Sales will have the same lookup field and preferred carrier settings will be synchronized between Finance and Sales.
Carrier in Dynamics 365 Finance and Supply Chain Management
Extend Dynamics 365 Finance / SCM Data Model
For Dynamics 365 Finance / SCM create the necessary artifacts in Visual Studio:
A carrier table with a mandatory Name and Description field. Also create a primary index based on the Name.
An entity to make the carrier table accessible from external applications.
An extension of the CustTable with a Carrier field and a table reference from the CustTable to the Carrier table.
Dynamics 365 Finance / SCM Solution for customers preferred carrier
Save, compile and create a deployable package. Upload the package to your projects LCS asset library. After the package was validated, deploy the package to your target environment. After the package was deployed, go to Data Management Workspace > Framework Parameters > Entity settings and refresh the entity list.
Extend Dataverse (aka. Common Data Service) Entities
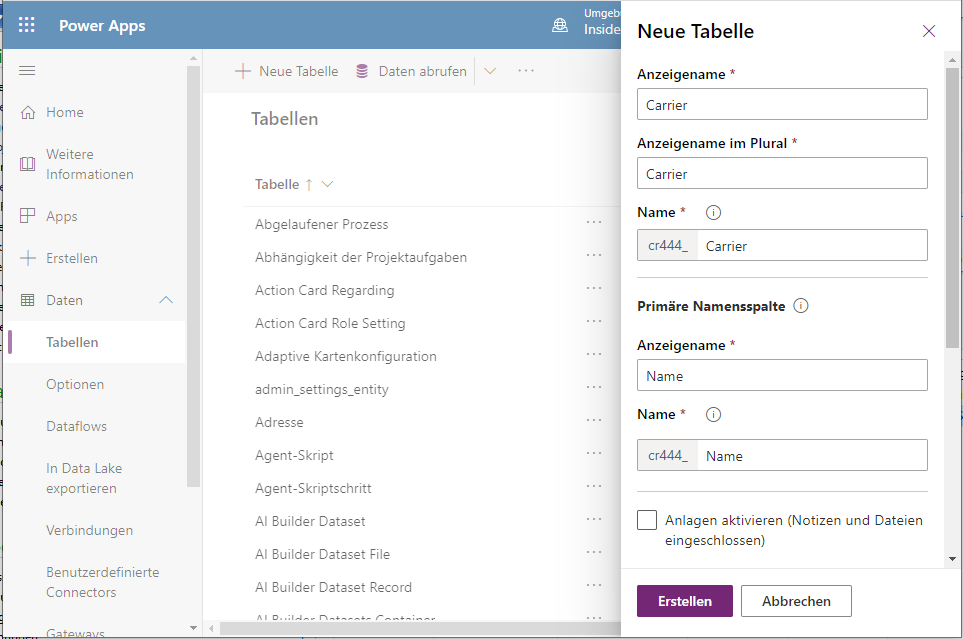
Navigate to https://make.powerapps.com and switch to your target environment. Go to Data > Tables and create a new table for the carrier. The table shall match the carrier table in Dynamics 365 FO. Make the Name field as mandatory primary field and add a second optional text field for the Description. Add a lookup field to the existing company table to match the DataAreaId that will come from Dynamics 365 Finance. Note that PowerApps will add a lot of other fields like owner, created, etc. as well.
Create a carrier entity in the Dataverse (CDS)
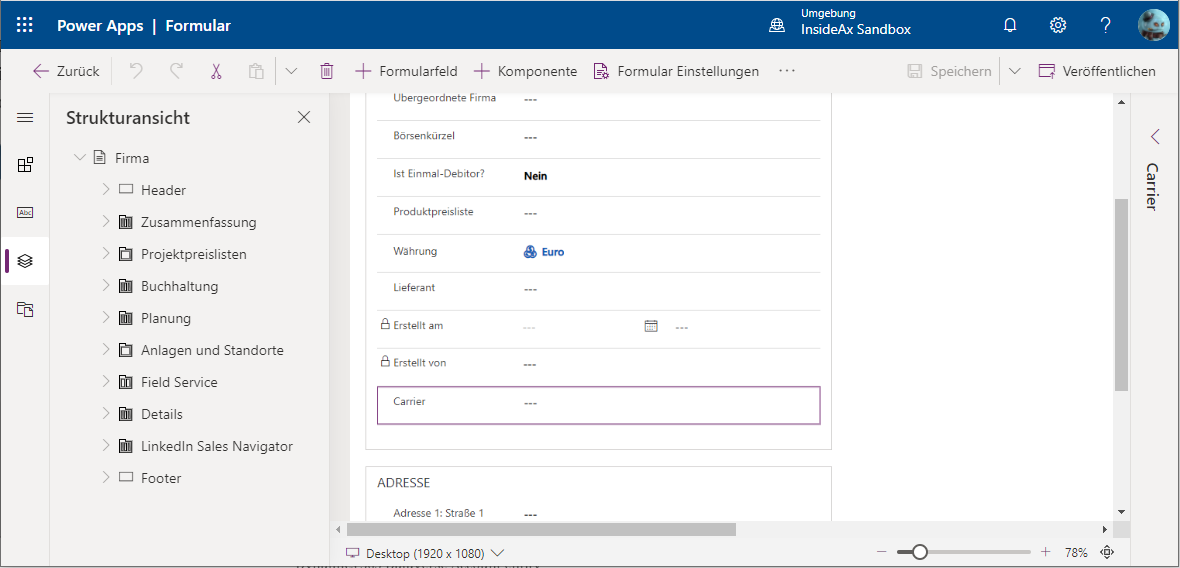
Find the account entity that was created by the Dual Write solution. Add an addition lookup field called Carrier that references the newly created carrier table.
Carrier lookup in the account entity
Customize the accounts form in Dynamics 365 sales
In PowerApps > Data go the accounts table and switch to the forms tab. There go to the Main form that is used in Dynamics 365 Sales to work with accounts. Click on the Name of the form, this will open the forms designer.
Dynamics 365 Dataverse Account entity
In the PowerApps designer add the Carrier field to the form. Save the change and publish the customized form.
Add carrier to Dynamics 365 Sales Account Form
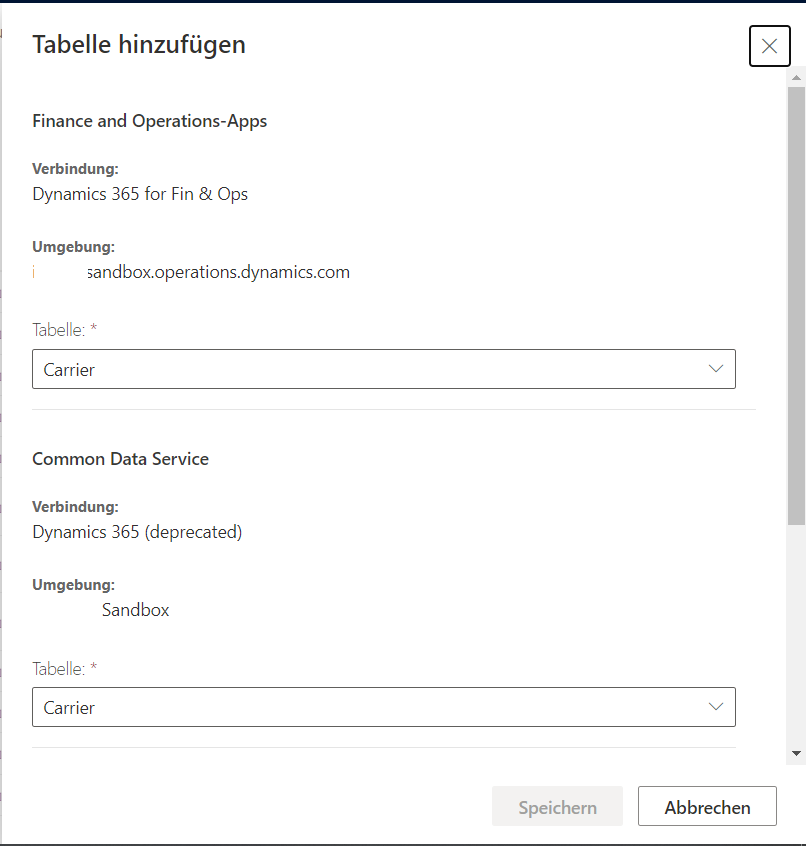
Map the Carrier Entity from Dynamics 365 Finance to the Carrier table in Sales
In Dynamics 365 Finance open the Data Management Workspace and go to Dual Write. Create a new table mapping. Map the Carrier entity from Dynamics 365 FO with the Carrier table form the Dataverse.
Create a new table mapping in Dynamics 365 Dual Write
Next map the Carrier Name fields and the Carrier Description fields. Save and start the initial synchronization.
Map Dynamics 365 FO entity to Dynamics 365 Sales table
Check if the synchronization was successful. Open https://make.powerapps.com in a browser and switch to your target environment. At the left menu go to Data > Tables. Click on the Carrier table and switch to the Data tab. You should see the same carrier like in Dynamics 365 Finance.
Add the Carrier Lookup field to CustomverV3 mapping
Stop the synchronization of the CustomerV3 to account. Go to table mappings and refresh the tables. This will load the table schema from the Dataverse with the new carrier lookup field. Create a new mapping from the Carrier in Finance to the Carrier field in Dataverses entity. Save the mapping definition as a new version. Restart the synchronization and make sure there are no errors.
Mapping carrier fields in Dual Write
Now you should see and edit the Carrier in Dynamics 365 Finance as well in Dynamics 365 Sales. Changes made in any of the two products will be synchronized.
Preferred Carrier field in Dynamics 365 Finance and Supply Chain ManagementMapped and synchronized Carrier field in Dynamics 365 Sales
Limitations
Dual Write has some limitations regarding the number of lookup fields. If you come across an error during the synchronization you may need to remove some of the lookup fields from the Dual Write table mapping.
Power BI goes hand in hand with Dynamics 365 Finance and Supply Chain Management. By default Power BI can be used within workspaces and Dynamics 365 comes with a data warehouse and a large set of reports and dashboards. But wouldn’t it be nice to show Power BI visuals in common forms and filter on the active record? This can be done without coding by using Power Apps:
D365 Parameter to Power BI filter
Dynamics 365 Finance is capable to load Power Apps and pass parameters to the App, while Power Apps can load PowerBI reports and pass a filter to Power BI.
Create a Power BI report
Create a report that can be drilled down to the granularity you want to display in Dynamics 365 Finance. For example if you want to show customer specific information, your report should support filtering on a customer account.
For example I’m using the SalesInvoiceV2Lines and ReleasedProductsV2 entities. The SalesInvoiceV2Lines comes with a table reference to the SalesInvoiceHeaders where the invoice account is stored. The ReleasedProductsV2 can be linked to the lines via the product number.
Dynamics 365 Finance SalesInvoiceV2Lines entity in Power Query editor
Next create the desired visuals. For example a column chart for the revenue by Year and a donut chart for the revenue by product group. Add a filter and inspect the different results you would expect for differnt customers.
Revenue by Year and Product Group
Save and Publish the report. Open the report in Power BI Online and pin the two visuals on a new dashboard. Make sure to give the visuals on the dashboard a useful title and subtitle.
Power BI tiles on a dashboard
Power Apps
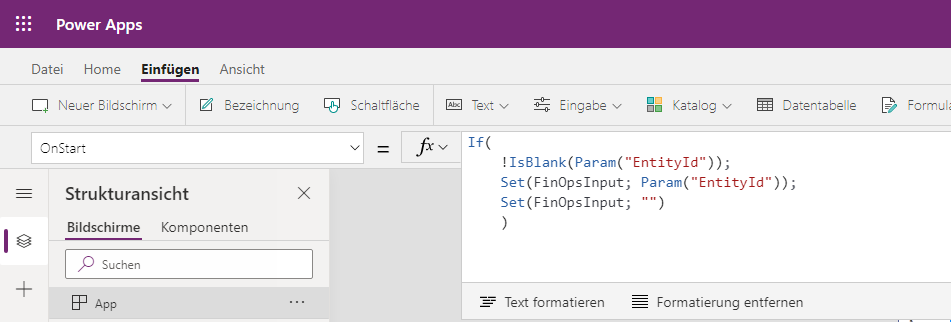
Everything comes together in Power Apps. Here the parameter from Dynamics 365 Finance is stored in a variable and passed as filter to Power BI. Open Power Apps via https://make.powerapps.com and create a new canvas app. I’d suggest to use the smart phone layout. According to the documentation add the following code to the OnLoad in Power Apps. This will store the parameter value from Dynamics to a Power Apps variable called FinOpsInput. (Depending on your local settings you may need to replace , with ; in PowerApps)
Read parameter from Dynamics 365 Finance in Power Apps
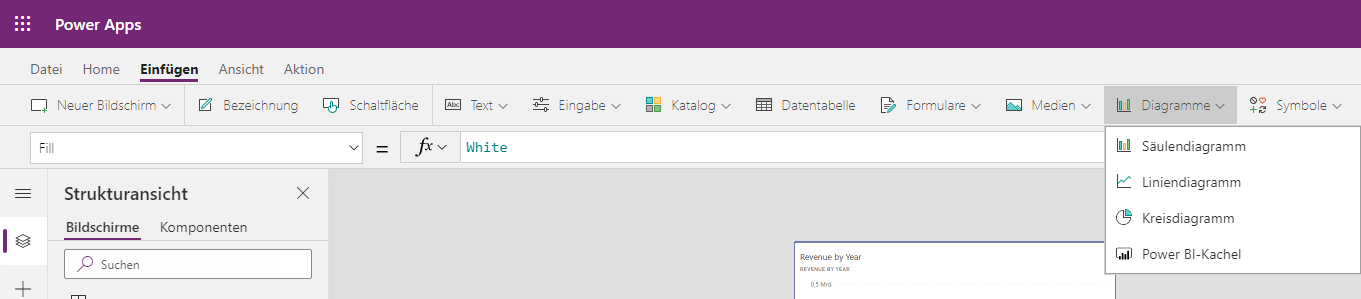
Next, add the Power BI tiles. From the ribbon go to Insert > Diagram > Power BI. Insert a Power BI tile to the empty screen. Choose your workspace, next the dashboard and finally the tile.
Insert a Power BI tile in Power Apps
The Power BI tile is referenced via an URL. This can be edited by selecting the Power BI tile and switch to Advanced. The syntax is:
&filter=TableName/FieldName eq 'YourValue'
Add a filter on the customer account with the values from the FinOpsInput variable as value. Make sure that the filter matches the field in your Power BI report. For example this would look like the following URL in my example:
Save and publish your App. From the list of your Apps, open the details page of your app and copy the App ID.
Power App DetailsCopy the App-ID from the details page
Add the Power App in Dynamics 365 Finance and Supply Chain
Logon to Dynamics 365 Finance and navigate to the screen where you want to display the Power BI tiles. In my example I’d choose Module Accounts Receivable > All Customers. In the upper right at the ribbon click on the Power App button and select add an App.
Add a Power App to Dynamics 365 Finance and Supply Chain Management
In the Add an app dialog provide a useful name. Paste the App-ID in the second field. From the context dropdown select the field to pass as parameter to Power Apps. In my case this would be the AccountNum. Finish by clicking on Insert.
Dynamics 365 Finance requires a reload of the page (F5). Test your Power App by selecting a record and the from the Power Apps button open the Power App. It will load the Power App and present the filtered Power BI tiles.
Dynamics 365 Finance / SCM Tier1 sandbox environments are heavily used by partners for development and building Dynamics 365 Finance / SCM applications. Microsoft-hosted Tier 1 environments were a great deal because we got well sized VMs with 28 GB RAM and 4 Cores plus SQL Server, Visual Studio and Dynamics 365 Finance pre-installed for a very small fixed price per month available 24/7. Now Microsoft recently announced that they will no longer include Microsoft-Hosted Tier1 Sandbox environments with the Dynamics 365 Financen / SCM license and we will no longer be able to purchase additional Tier1 sandbox Addons. The preferred solution is to use Cloud-Hosted environments instead.
No more Microsoft-Hosted Tier1 environments
Microsoft-Hosted vs. Cloud-Hosted
From a technical standpoint there is no difference between a Microsoft-Hosted or a Cloud-Hosted environment. Both solutions deploy a Windows Server VM in Azure. In both cases the deployment is managed via Lifecycle Service (LCS).
LCS management of a Cloud-Hosted environmentArtefacts of a Cloud-Hosted Dynamics 365 FO Tier 1 environment in Azure
However, there are 3 major aspects to consider:
One big difference is the pricing model. Microsoft-Hosted environments (or Addons) come with a fixed (!) price per month while Cloud-Hosted environments deploy on an Azure subscription and therefore are billed like a classic IaaS (aka. virtual Machine in Azure). Make sure to calculate the costs (!) and turn of the environments if not needed.
Another difference is the ability to choose the sizing of the deployed environment. In contrast to Microsoft-Hosted Tier 1 environments, you are now free to choose a sizing that fits your needs e.g. more (or less) RAM, CPU, Premium SSD storage, etc.
Moreover, in contrast to Microsoft-Hosted environments, we now get an Admin account on our machines. It was understandable that Microsoft tried to lock down the cheap VMs to prevent the misusage with anything else then Dynamics 365. Since we own and pay the VM in a Cloud-Hosted environment its more than fair to have Admin access on the machine.
Video: How to deploy a Cloud-Hosted Dynamics 365 Tier1 developer VM
Make sure to visit my Youtube channel and watch how to deploy a Cloud-Hosted Dynamics 365 FO developer VM using an Azure Subscription.
Update: Management Certificates
The use of management certificates is not supported when using a CSP Azure Subscription. Use a user-connection instead.
Update: Provisioning Admin User
Please note that the user deploying the environment is provisioned as the administrator. Microsoft-Hosted environment had to be signed off using a user from the customer tenant. I’d recommend to stick to this process when deploying a Cloud-Hosted environment
This is an update to my older post how to extend the SalesTable 2 Line framework. The big difference is that in Dynamics 365 Finance and SCM overlaying is not supported and extensions and delegates need to be used. This post uses the same use case. A sales-notes field from the SalesTable needs to be updated in the SalesLines if it is configured so.
Create a new string datatype and call it ERPSalesNote. Extend the SalesLine and add the ERPSalesNote datatype to the list of fields. Extend the SalesTable and add the ERPSalesNote to the fields. Also add the ERPSalesNote field to the field group HeaderToLineUpdate.
Extend the user interface
Extend the SalesTable form. Place the SalesTable.ERPSalesNote in the Delivery group of the HeaderView tab.
Add the SalesLine.ERPSalesNote field to the delivery group in the LineView tab.
Prepare the update-order-lines dialog
The dialog to choose if and which fields need to be updates at the lines is generated automatically based on the HeaderToLineUpdate field group. There is some code needed to show the fields name in the dialog. This is done by subscribing a custom method to the delegate SalesTable2LineField.lineUpdateDescriptionDelegate
Create a new class that returns a name for the ERPSalesNote field.
Open the Header to Line update dialog by clicking on Accounts receivable > Setup > Accounts receivable parameters > Tab update > update order lines
Extend the framework classes
Create an extension for the AxSalesTable class and create a parm method for the ERPSalesNote field
[ExtensionOf(classStr(AxSalesTable))]
final class AxSalesTable_Extension
{
public ERPSalesNote parmERPSalesNote(ERPSalesNote _salesNote = "")
{
  if (!prmisDefault(_salesNote))
  {
    this.setField(fieldNum(SalesTable, ERPSalesNote), _salesNote);
  }
  return salesTable.ERPSalesNote;
}
}
Create an extension for the AxSalesLine class. Implement a parm and set method. Use the chain of command pattern to extend the setTableFields method.
[ExtensionOf(classStr(AxSalesLine))]
final class AxSalesLine_Extension
{
public ERPSalesNote parmERPSalesNote(ERPSalesNote _salesNote = "")
{
if (!prmisDefault(_salesNote))
{
this.setField(fieldNum(SalesLine, ERPSalesNote), _salesNote);
}
return salesLine.ERPSalesNote; } protected void setERPSalesNote() { if (this.isMethodExecuted(funcname(), fieldnum(SalesLine, ERPSalesNote))) { return; } this.setAxSalesTableFields(); if (this.isAxSalesTableFieldsSet() || this.axSalesTable().isFieldModified(fieldnum(SalesTable, ERPSalesNote))) { this.parmERPSalesNote(this.axSalesTable().parmERPSalesNote()); }} protected void setTableFields() { next setTableFields(); this.setERPSalesNote(); }
}
Test your implementation
Make sure that the update method in the parameter is set to prompt. Open an existing sales order. Change to Header view and switch to edit mode. Change the notes in the delivery tab and save.
A dialog pops up and asks to update the lines. Click yes.
Check the sales note field in the sales line. The note field at the sales line should be updated with your text from the header.