Load Dynamics 365 F/SCM in Synapse and visualize in PowerBI
Synapse link for Dataverse is the replacement for Export to Datalake which has been deprecated in 2023. Although it is called link for Dataverse, it can be used to access Dynamics 365 Finance and Supply Chain tables (and CE data from dataverse as well).
SQL Track Changes has to be enabled in D365 F/SCM. Creates, Updates and Deletes are written to a storage account in CSV format. Synapse is running a spark pool that converts the CSVs into Deltalake format which relies on the (Open-Standard) Parquet format. As result you can see and query the F/SCM tables in the lake like it were tables in a relational database.
Good news, Synpase has a serverless SQL pool and a public SQL endpoint. You can find the SQL endpoint from the Manage Icon (down left) > SQL Pools > Select your pool > Workspace SQL Endpoint.
You can create databases in this SQL pool and create views based on the tables in the datalake. For example join CustTable and DirPartyTable and provide a view that contains customer data with a name and address.
You can use the development workspace in Synapse web based workspace but you could also use other tools to connect e.g. SQL Server Management Studio. Tables in the datalake and views in another database can be accessed.
PowerBI has a built-in connector for Synapse Workspace. You can easily load data from the tables and also from the views.
Data Management in Dynamics 365 Finance and Supply Chain Management can be used to export Entities in different formats like XML. In many cases the default Entity schema is not what you want. However, you can easily transform the XML output by applying an XSLT transformation directly in Dynamics.
I’ve made a short video how to transform the EcoResReleasedProductsV2 XML entity export into another schema with different structure and element names.
Business Events in Dynamics 365 Finance and Supply Chain Management can be used to notify external systems in near-time when a certain event occurs in the ERP system. Dynamics 365 F/SCM comes with a set of predefined business events. You may want to develop you own specific business events to send data to another system. Three artifacts are needed for a custom Business Event. The contract that contains the data that is sent, the Business Event and at least one trigger. Here is an example for a Business Event that triggers when a new customer is created.
Required Model Dependencies:
Application Foundation
Application Suite
Directory
Contact Person
Contract
[DataContract]
public class ERPCustomerCreatedContract extends BusinessEventsContract
{
    protected Name name;

    [DataMember('Name'),BusinessEventsDataMember("Customer Name")]
    public Name parmName(Name _name = name)
    {
        name = _name;
        return name;
    }

    public static ERPCustomerCreatedContract newFromCustTable(CustTable _custTable)
    {
        ERPCustomerCreatedContract contract = new ERPCustomerCreatedContract();
        contract.parmName(_custTable.name());
        return contract;
    }
}
Business Event
[BusinessEvents(classStr(ERPCustomerCreatedContract),
                'Customer Created',
                'Customer Created',
                ModuleAxapta::Customer)]
public class ERPCustomerCreated extends BusinessEventsBase
{
    CustTable custTable;

    protected void new()
    {
    }

    public static ERPCustomerCreated newFromCustTable(CustTable _custTable)
    {
        ERPCustomerCreated event = new ERPCustomerCreated();
        event.parmCustTable(_custTable);
        return event;
    }

    public CustTable parmCustTable(CustTable _custTable = custTable)
    {
        custTable = _custTable;
        return custTable;
    }

    [Wrappable(false), Replaceable(false)]
    public BusinessEventsContract buildContract()
    {
        return ERPCustomerCreatedContract::newFromCustTable(custTable);
    }
}
Trigger
Make sure the trigger runs after inserted not on inserting 😉
class ERPCustTable_EventHandler
{
    [DataEventHandler(tableStr(CustTable), DataEventType::Inserted)]
    public static void CustTable_onInserted(Common sender, DataEventArgs e)
    {
        CustTable custTable = sender as CustTable;
        ERPCustomerCreated::newFromCustTable(custTable).send();
    }
}
Configuration
Make sure your code builds. In Dynamics 365 F/SCM open the Business Events Catalog. Rebuild the catalog to see your Business Event. Make sure you have an endpoint configured. Activate the Business Event. Create a new Customer. The Business Event will trigger and send the contract to your endpoint.
After creating a new customer, the Business Event triggers and sends the message to the configured endpoint. In my case it’s a Blob Storage in Azure. Here is the resulting JSON Message:
Reflection is used to dynamically retrieve metadata information from code artifacts dynamically at runtime. In older versions of Dynamics AX this was done using TreeNode framework which reflected the AOT structure. In Dynamics 365 Finance and Supply Chain Management you can use the MetadataSupport class.
Example: Table and its Fields
Create a temporary table that has a name field. The table will be dynamically populated with table names or field names. On the temporary table add 2 static methods to populate a table buffer with table names or field names.
public static TmpTableName populateTableName()
{
    TmpTableName _tmpTableName;
    var tables = Microsoft.Dynamics.Ax.Xpp.MetadataSupport::TableNames();
    while (tables.MoveNext())
    {
        _tmpTableName.clear();
        _tmpTableName.Name = tables.Current;
        _tmpTableName.insert();
    }
    return _tmpTableName;
}

public static TmpTableName populateFieldName(TableId _tableId)
{
     SysDictTable table = new SysDictTable(_tableId);
     Set fields = table.fields();
     SetEnumerator enum = fields.getEnumerator();
     TmpTableName _tmpTableName;

     while(enum.moveNext())
     {
         SysDictField field = enum.current();

         _tmpTableName.clear();
         _tmpTableName.Name = field.name();
         _tmpTableName.insert();
     }

     return _tmpTableName;
 }
Create a regular table that has 2 name fields, one for a table name and another for the field name. Overwrite the lookup method and provide the temporary table buffer as datasource.
JSON strings can easily be handled using the FormJSONSerialized class in Dynamics 365 FO. Here is an example:
// JSON with string and number
str jsonString = @'{"Name":"Dynamics 365","RefRecId":123456789}';
Data Contract
Create an X++ class that matchtes the properties and add the DataContract and DataMember attributes. The attribute name has to match the JSON property name. You can stick to the parm*() naming schema for the method.
[DataContract]
class ERPDataContract
{
    Name name;
    RefRecId refRecId;

    [DataMember("Name")]
    public Name parmName(Name _name = name)
    {
        name = _name;
        return name;
    }

    [DataMember("RefRecId")]
    public RefRecId parmRefRecId(RefRecId _refRecId = RefRecId)
    {
        refRecId = _refRecId;
        return refRecId;
    }
}
Dynamics 365 Finance and Supply Chain Management uses SQL Server Reporting Services for reporting and document generation. In 2022 Microsoft included SSRS (aka. Paginated Reports) in PowerBI Pro license. One may ask if it is possible to use PowerBI Paginated Reports as well for reporting purpose in Dynamics 365 F/SCM.
X++ SSRS
PowerBI Paginated Reports
+ Direct access to transaction DB + Business logic in X++ + Integrated with Dynamics 365 FO
– Complex development – Embedded in Dynamics 365 FO deployment cycle
+ Simple development using Report Builder + Integrated with Business Intelligence + Reuse existing data models
– Limited development possibilities – No direct data access
Pros and Cons for Paginated Reports
Side-to-side comparison SSRS X++ report vs. PowerBI Paginated Report
Data Access
Paginated reports in PowerBI have only a limited capability to access data. There is no Dynamics 365 FO connector or OData access to entities. You could use different approaches to get Dynamics 365 FO data.
PowerBI dataset. The report builder can access PowerBI datasets. If you don’t have real time requirements for the paginated reports, this may be the preferred approach. Use the ETL functionality in Power Query to prepare the dataset or use an existing one.
Development
Paginated reports are designed by using the Report Builder. It is an adapted version of the SSRS Report Builder with some more data access features. In theory you could develop an SSRS report using Visual Studio and upload the .RDL file. However, PowerBI Paginated Reports are a limited version of SSRS and you might get errors.
Fazit
Paginated Reports are a reduced SSRS feature in PowerBI. The Report Builder is very limited. You can define data access, defined parameters and place data on the report sheet. If you want to create printable documents without real-time requirement the Paginated Reports may be an option for you.
Recently we had the requirement to use the product categories from Dynamics 365 Supply Chain Management in a PowerBI report as well. It should be used to filter products by categories and sub-categories. We were using Data Lake export in D365 FSCM.
This is how product category hierarchy looks like in Dynamics 365 SCM:
Dynamics 365 FSCM: Products by Category
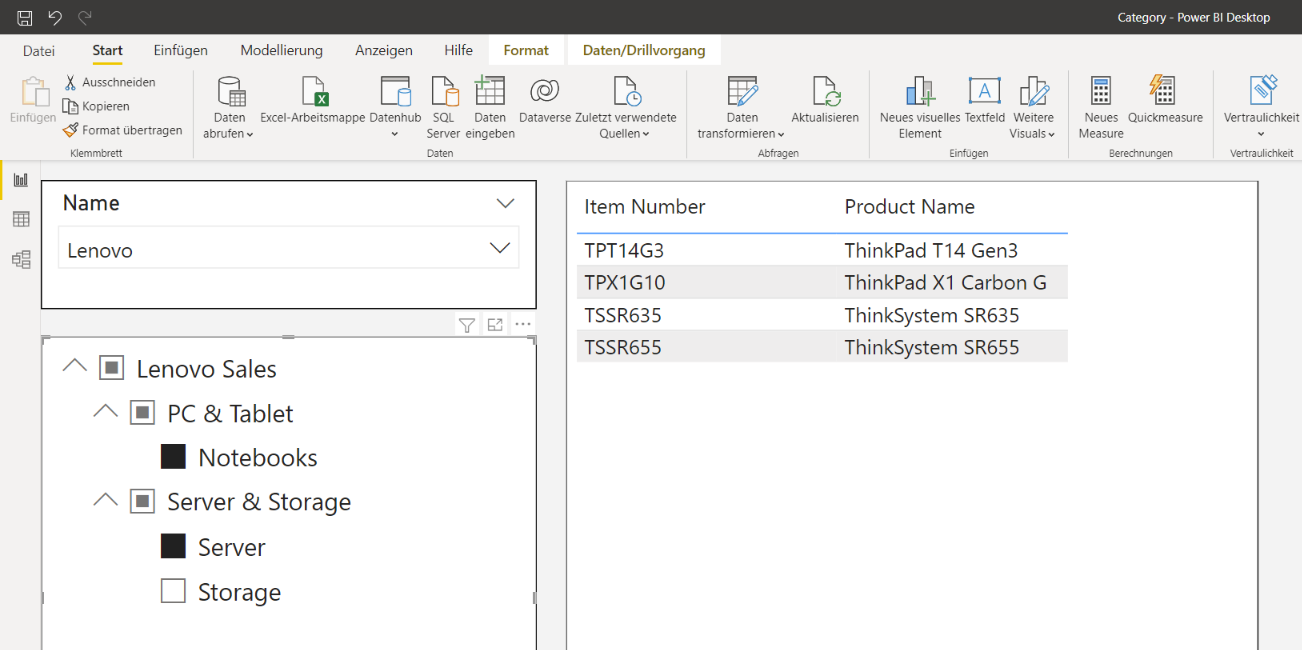
This is how it should look in PowerBI:
Data sources
To build a product category model in PowerBI some tables need to be exported:
EcoResCategoryHierarchy
EcoResCategory
EcoResProductCategory
EcoResProduct
Load and model the category hierarchy data
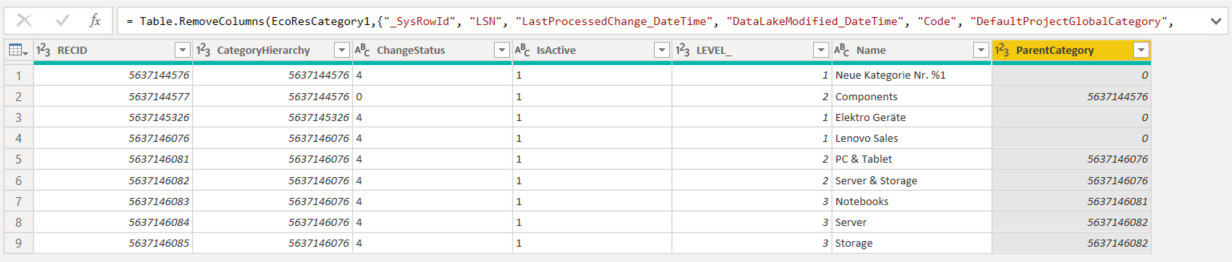
Start with EcoResCategory table. I’d recommend to remove all unnecessary fields and keep at least RecID, Name and ParentCategory.
EcoResCategory table in PowerQuery editor
The field ParentCategory is a reference to the RecID of the parent line. In theory this would be sufficient to build the hierarchy in PowerBI. In practice we want to create the hierarchy via the name, not the RecID. Create a copy of the table and remove all fields except the Name and RecID. I call the new table EcoResCategoryName:
A duplicate of EcoResCategory with RedID and Name
Create an outer join from the original table to the new EcoResCategoryName table via the ParentCategory to the RecID.
Left Outer Join from EcoResCategory to the Name table to get the parent name
As result the Name of parent is now part of the table. For example the parent of PC&Tablet is Lenovo Sales. and the parent of Server as well as the parent of Storage is Server & Storage.
Category with name and parent name
Safe and load the data.
Build the Hierarchy
In PowerBI you can use the DAX formula PATHITEM to identify a certain element within a hierarchy. You have to provide the PATH (i.e. Name and ParentName) how the hierarchy is linked. For example to get the first level hierarchy element use the following code:
In my example “Lenovo Sales” is a root element for my hierarchy. The other root elements like “Neue Kategorie” and “Elektro Geräte” belong to another hierarchy (see CategoryHierarchy field). My hierarchy has 3 levels, therefore I create 3 additional fields called Level1, Level2, Level3.
Use PathItem() to identify Level1, Level2, Level3 elements
To create the hierarchy in PowerBI right click on the Level1 field and select create hierarchy. Right click on Level 2 and choose “Add to hierarchy”. Do the same with Level 3. Your hierarchy should look like this:
Hierarchy in PowerBI
Create the PowerBI data model
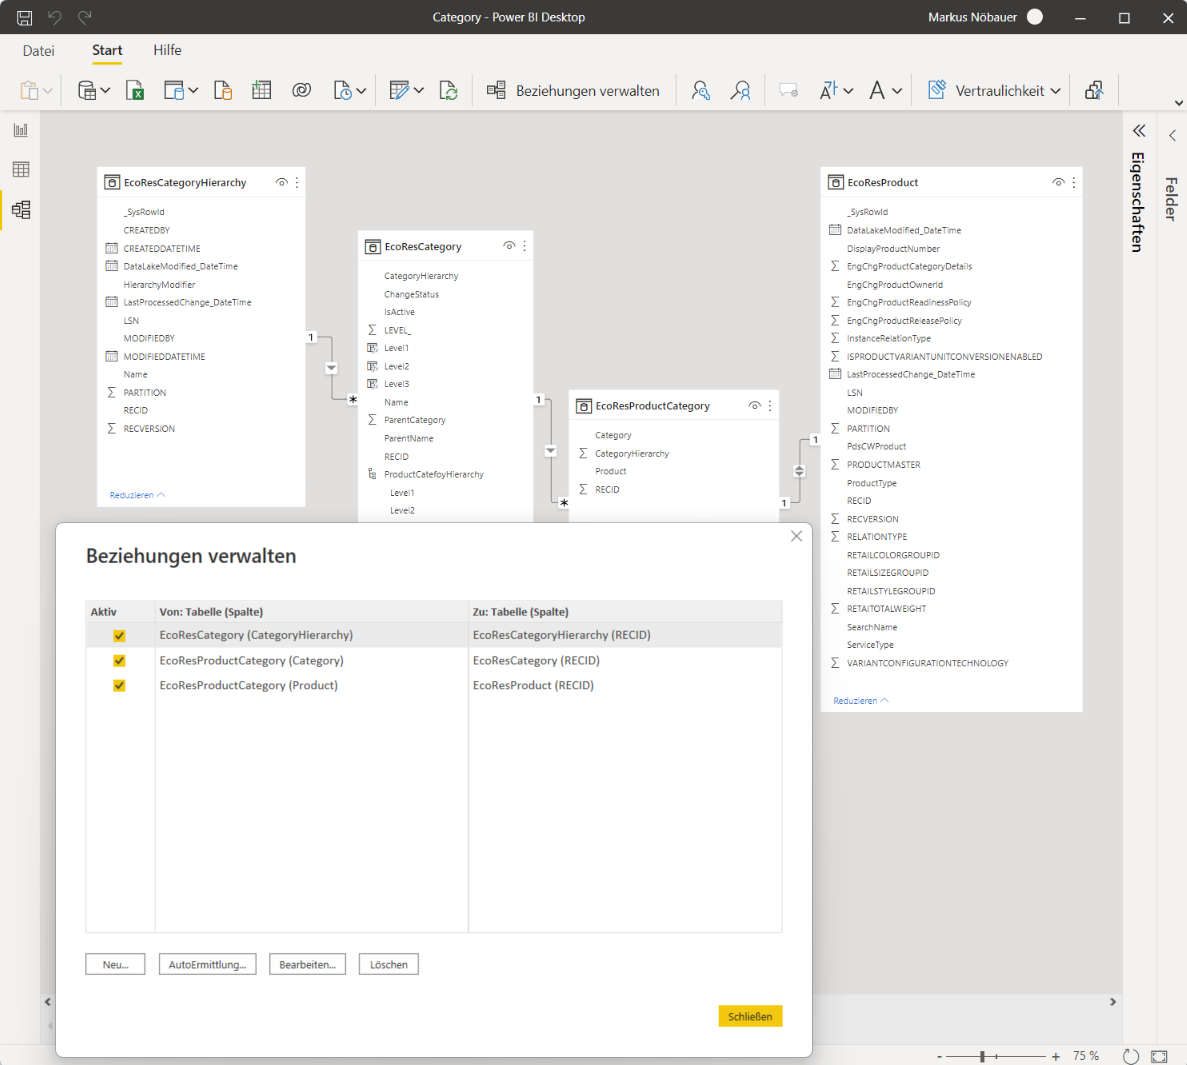
To implement a report like in Dynamics 365 SCM, load 3 additional tables:
EcoResCategoryHierarchy
EcoResProductCategory
EcoResProduct
Link the EcoResCategoryHierarchy.RecId to EcoResCategory.CategoryHierarchy Link the EcoResCategory.RecId to EcoResProductCategory.Category Link the EcoResProductCategory.Product to EcoResProduct.RecId
In my example the relations look like this:
PowerBI data model for Dynamics 365 SCM product category hierarchy
Add visuals to the report
I’ve added 3 visuals to the report. First, a filter element to choose from the EcoResCategoryHierarchy. For example the “Lenovo” hierarchy consisting of Laptops, Servers and Storage products.
Next a filter element for the hierarchy that was created earlier. PowerBI presents the hierarchy in a drop down tree. To avoid “Blank” elements in the hierarchy create a visual level filter and exclude the blanks
exclude blank values from the hierarchy using a visual level filter
My third visual is a table containing the product. The products get filtered based on the selection of the hierarchy elements.
Custom Scripts in Dynamics 365 Finance and Supply Chain Management enables you to upload and execute X++ Code without the need to deploy a new release. Custom Scripts serve the same purpose like X++ Jobs in AX 2012 and earlier versions e.g. data correction. This short video shows how to create such a custom script, upload and execute it in a Dynamics 365 FO instance:
The Custom Scripts feature in Dynamics 365 Finance and Supply Chain Management allows you to upload and execute code snippets. Microsoft implemented some barriers because this feature is potential dangerous. You need two accounts, one for uploading the script and one for approval. The feature can be found in System Administration > Periodic Tasks > Database > Custom scripts.