Dataverse is the name of the Dynamics 365 Apps database (e.g. Sales, Service, Field Services, etc.). PowerBI desktop comes with a builtin Dataverse connector. However, if you have multiple environments not all of them may show up in the connector.
Dataverse environment missing in PowerBI connector
In order to make the environment visible in PowerBI Desktop Dataverse Connector you have to enable PowerBI Embedded in your environment.
Azure Analysis Services are SSAS as a Service hosted and managed in Azure. We recently had to migrate an analysis model from one tenant to another. Here is a video that illustrates how this can be done:
Modern cloud-based ERP systems are complex distributed software applications. These systems became more powerful over the last decades and provide more features to satisfy user needs than previous generations of ERP systems. Furthermore, they are integrated with other cloud-based systems. [Question/problem] The resulting increase in complexity leads to a higher probability of failures within this integrated system. This makes it difficult for users to fully understand these systems and even qualified key users don’t have an overview of possible system issues anymore. As a result, the number of support calls and diffuse support ticket requests have increased in the last years. Moreover, ERP partner organizations such as insideAx experience that users lose trust in their systems. [Principal idea/results] The goal of our work is to foster the trust of ERP users in cloud-based ERP systems and to reduce the number of unnecessary support requests, by enhancing existing user feedback and monitoring mechanisms and provide a visualization of system health indicators to users. Overall, these visualizations and explanations of the system health status need to be easy to understand by users. [Contribution] In this workshop paper, we provide insights from industry on how to foster user trust in complex software systems and depict a conceptual solution which makes use of system monitoring data to communicate the system status to users in a simple and understandable way. Our conceptual solution, for which we also provide a first implementation architecture proposal, foresees that simple modifications to the software and ambient light devices allow to build such visualizations.
Microsoft released a new offer: Windows Cloud-PC. You can choose between two licensing types, Windows 365 Business for small companies and Enterprise for larger ones. Technical speaking, Windows 365 is nothing more than a Windows 10 VM running in Azure providing access via RDP and RDP Web Client. This means you can operation your Windows from almost any device with a Browser e.g. a Tablet or shared PC. Windows 365 is integrated within Office 365. You can assign a cloud pc to a user from within the Office 365 admin panel. Users can access the cloud pc from Office 365.
A Cloud-PC can be accessed using a web browser from your Office 365 portal
In contrast to a typical Azure VM, Windows 365 comes with a fixed price you pay per month depending on the sizing. Unfortunately, you can only choose from different configurations based on CPU and RAM but not storage technology. For example, if you select a cheaper one with 2 cores and 4 GB RAM you will get a HDD instead of an SSD.
Cloud-PC: Windows 10 as a Service
In theory you can use a Cloud-PC from a tablet, like in my case from a Samsung Galaxy Tab. But in practice it turns out that it is very buggy to use. The on-screen keyboard pops up very often. The full-screen view resizes many times. Calling the Windows start menu triggers strange actions. One opportunity for Windows 365 could be to provide Home-Office users a workplace.
Power Automate (aka. Flow) is a great solution for process automation. It is very useful to realize cross-application processes. Power Automate features a wide variety of tasks and connectors. It also comes with a connector for Dynamics 365 Finance and Supply Chain Management. It can be used to trigger a flow, interact with data and execute business logic in D365 FO from within a flow. You can find all videos on my YouTube Channel.
Part 1: Trigger a Flow with Business Events
Business Events in Dynamics 365 Finance and Supply Chain Management are use to interact with other systems. For example you can send message to Azure Event Hub but also to Power Automate. There are some specific events but you can also use change-based alerts in Dynamics. This video shows how to trigger a flow using such a business event.
Business Events can trigger Power Automate flows
Part 2: Interact with data in Dynamics 365 Finance and SCM
The Connector for Dynamics 365 FO uses entities to interact with data in the ERP system. You can create new records, read, update and delete records. Here is an example where Power Automate receives data from Forms Pro and create a new customer in Dynamics 365 FO.
Create new records in Dynamics 365 FO from Flow
Part 3: Execute Business Logic in Dynamics 365 Finance and SCM
The Dynamics 365 FO Connector in Power Automate supports to execute business logic by calling actions on entities. Here is a video how to approve a Bill of Materials in Teams and execute the Approval logic via Flow.
We’re back in a hard lock-down. In contrast to the second lock-down in November and December 2020 this one is a proactive lock-down to keep the infections after Christmas under control. Started on 26th December we are under an all-day curfew and non-essential business are closed. Up to now, the impact of the new GB mutation which is more infectious is unclear. Hopefully this will prevent uns from a third wave.
The last year was very challenging for all of us. COVID-19 killed approximately 1.8 million people, and many suffer from severe consequences of a COVID-19 infections. Actions taken to get the pandemic under control brought us into a economic and social crisis. However, from an IT perspective the good news are that COVID-19 boosted Digitization.
Something good in 2020
Microsoft Teams: 2020 was the year of Teams. Never ever was a Microsoft Product adopted so quickly by so many people and organizations. Thanks to the (very) hard lock-downs in Europe in spring, Teams was one of the few products that kept many organizations operable.
2020 – The year of Teams
The Cloud: Those who didn’t understand the benefit of the cloud have learned it the hard way this year. The only way to scale up in a very short time is the cloud. No matter if it’s in a public or private cloud. But the situation in early 2020 showed that only the public cloud like Azure could handle the situation. When millions of people are forced to work from home, classic on-premises installations and VPN Gateways collapse.
Azure Region Austria: Microsoft announced to build two data centers in Austria. We will get our own Azure region. Typically our customers host their Azure Workloads in the West-Europe region. In the future we will be able to place the cloud workloads closed to the our customers.
E-Health: Digitalization and health care has never been a big issue in Austria and Digitalization projects like ELGA (electronic health file) was not very widely used. But COVID-19 boosted Digitalization in health care. We’ll get an electronic vaccination pass next year and e-prescription.
Home / Distance Schooling: It is said that the Austrian Education system is very old fashioned and stuck in traditions over decades. Over the last centuries E-Learning was explored from time to time but never ever taken serious. COVID-19 forced the education system to adapt to the situation. Universities also struggled to make exams remote compatible and came up with modern, naive and lazy solutions: The closest solution to a normal exam are Zoom-Meeting based exams, where you have to be online including audio and being watched through the webcam. Some Law-Schools found another way without all the fancy technology stuff. You get the exam online and have to upload the results within a given time, including a sworn declaration that you didn’t cheat. And some other lecturers replaced the classic exam by letting the students write an essay about some textbooks.
Bitcoin: Lucky you if you are a Bitcoin hodler 😉
Bitcoin skyrocketing in 2020
“A very merry Christmas and a happy New Year Let’s hope it’s a good one” – John Lennon, Merry Christmas
Since the early days the integration of Dynamics AX ERP and Dynamics CRM was a painful challenge. Microsoft came up with may not so great working solutions. Dual Write is a Power Platform solution for Dynamics 365 Finance / SCM and Dynamics 365 CE. It supports the synchronization beween these two products almost in real time.
I’ve made a short video to demonstrate the synchronization between Finance and CE. A customer is created in CE and becomes immediately a customer in FO. The quotation from CE is synchronized to FO where it is converted into a sales order. The sales order is visible in CE. The order is invoiced in FO and can be reviewed from within CE.
Dynamics 365 Finance – CE integration via Dual Write
Three weeks of hard lock-down have passed and we are about to switch back to lock-down “light”. Stores will re-open on Monday 7th, but hotels, restaurants, bars and ski lifts remain closed. The curfew will be reduced from all-day to 18:00 – 06:00. Home-office has never been mandatory but recommended and will be recommended in the future.
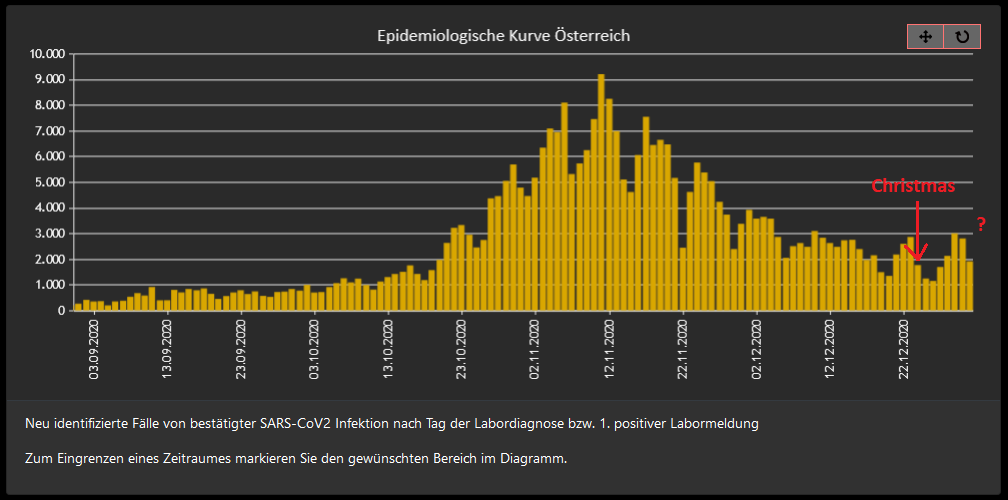
Data shows that both lock-down “light” and “hard” lock-down were successful and infection rate is going down to high but stable niveau. Question is how will Christmas and New Year impact? We are eagerly watching the data from US and how Thanksgiving impacted the number of infections.
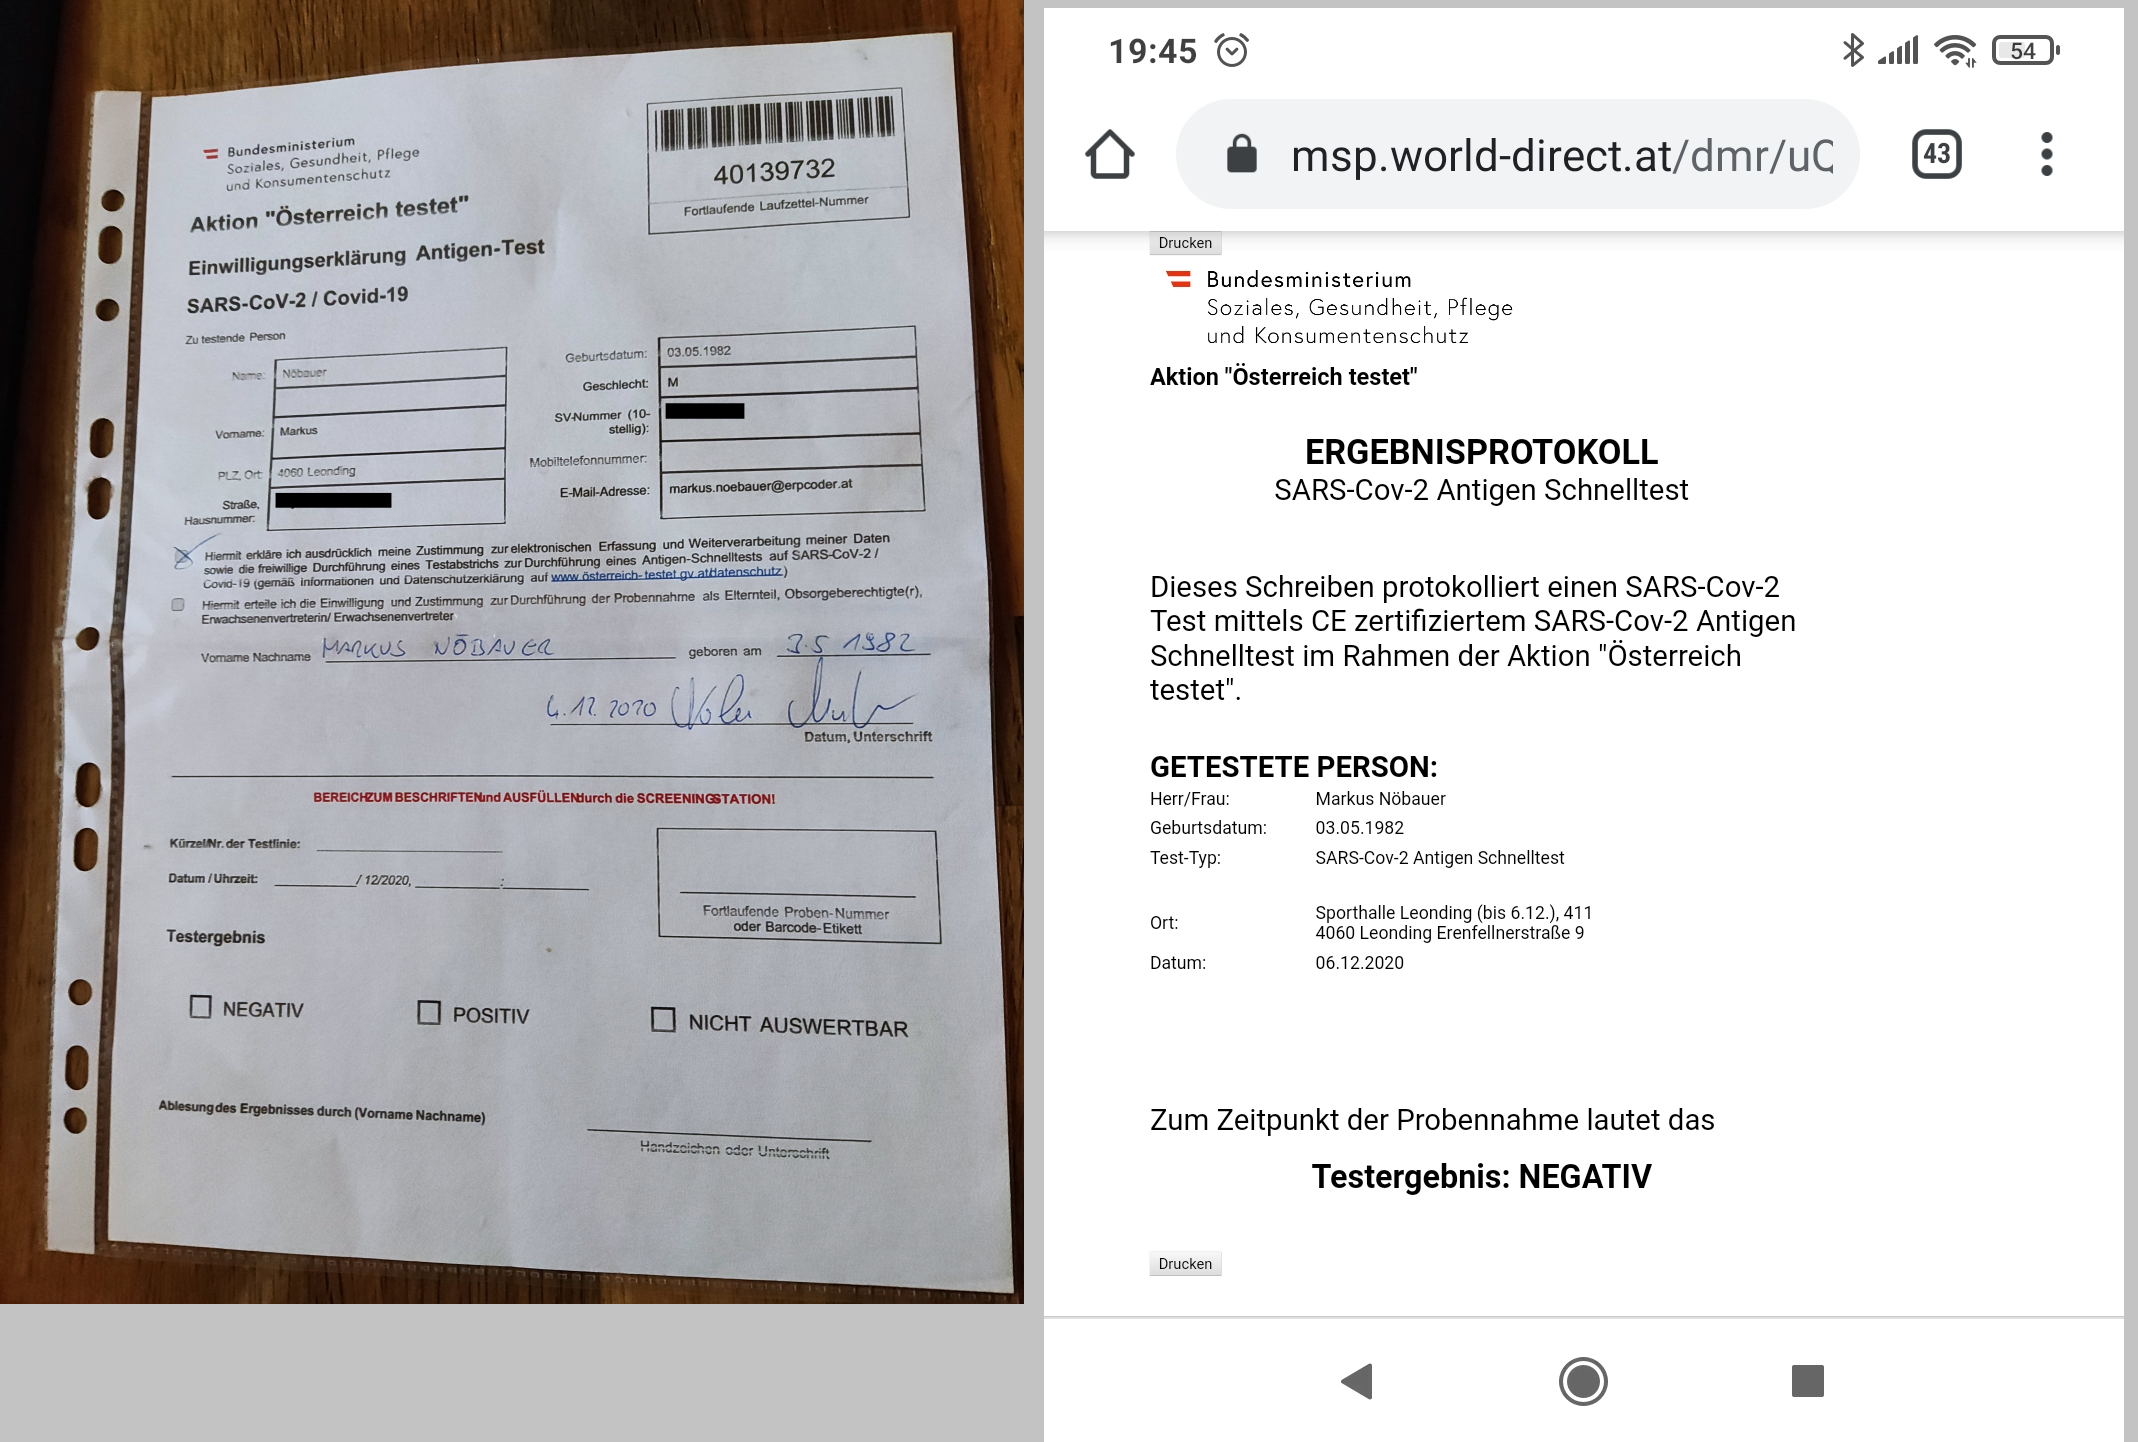
Austria is staring voluntary free mass-testing. The army is organizing hundreds of testing sites all over the country. Anti-Gen quick tests are used to identify infectious people. These test have a very low false-negative rate. In case someone is identified as positive, a PCR test is done. Hopefully many non-symptomatic infections people can be found and isolated before Christmas to avoid a third wave and a third lock-down in January. While the registration was a digital disaster the testing itself was easy. Make an appointment and fill out a form. Bring the form and an ID card to the test site. If you have no printer at home it will be printed for you. Get tested and leave the test site. The result is sent to your mobile phone after aprox. 15 minutes.
Negativ Covid-19 test result 🙂
It’s all over now, baby blue
No more Microsoft-Hosted Tier1 Dynamics 365 Finance / SCM environments
Microsoft-Hosted Dynamics 365 Finance and Supply Chain Management Tier1 environments are gone. If you need a development or build environment you have to host it at your own costs in an Azure subscription. Typically partners will create an Azure Subscription for the customer and deploy the Tier1 environments there. Depending on the size (recommended ist D12v2) and Auto-Shutdown strategy the costs will be somewhat equal to the former Tier1 Addons.
During the first lock-down in spring Azure reached its capacity limit in Europe. Even Netflix and YouTube reduced the streaming quality to HD and lower. Microsoft shut of Teams functionality like seaing someone typing in the chat window and video conferences. In spring we were advised to deploy Tier2 environments in other regions than Europe. Thankfully this time we did not experience such capacity limits although many partners deployed many virtual machines for their customers in November.
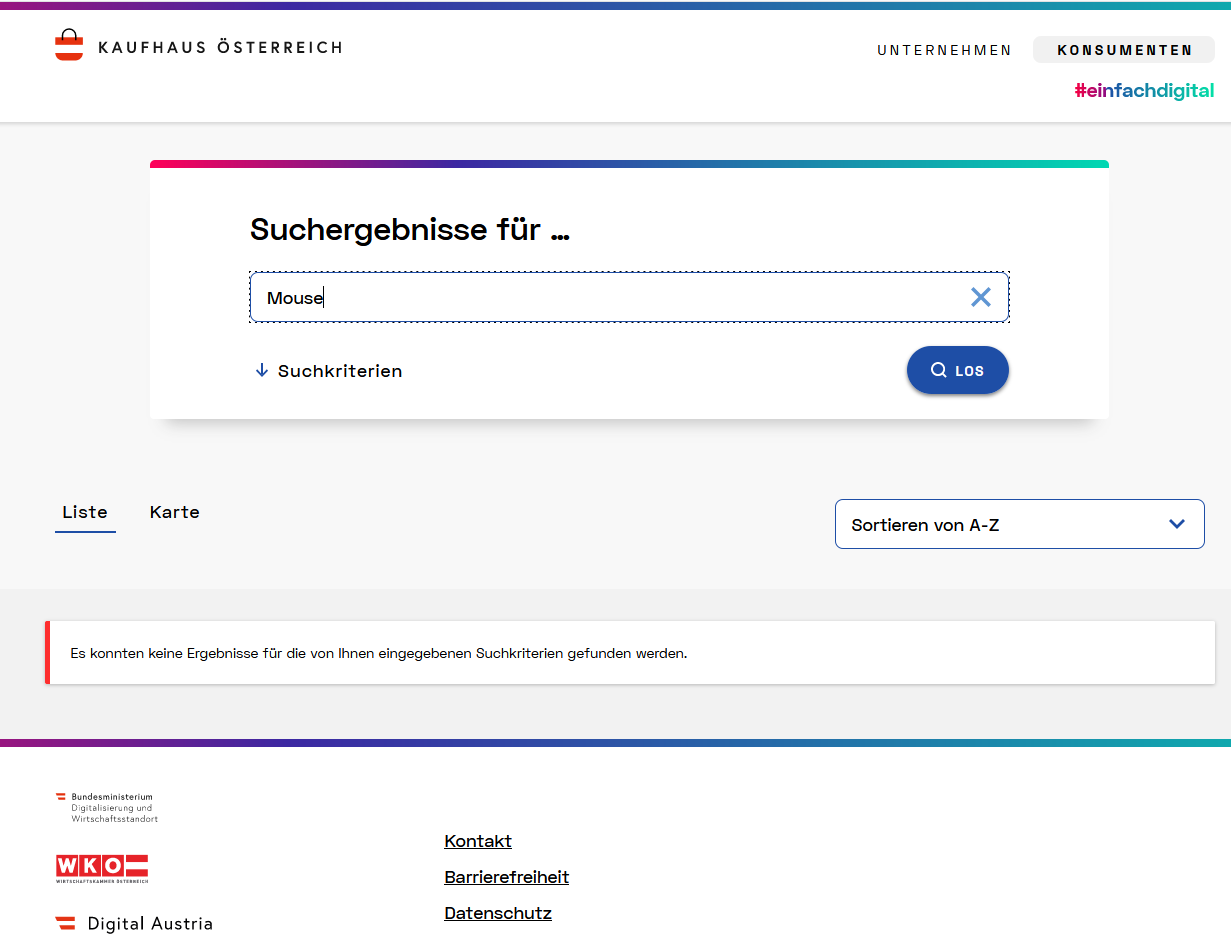
IT-Disaster Austria Part 1 – The empty Online Shop
This week was an IT disgrace for the Austrian government. Last week was Black-Friday week and Cyber Monday at Amazon. In order to strengthen Austrian companies the Ministry for Digital and Economic affairs together with the Austria Commerce Chamber decided invest 700.000€ to develop and launch an Austrian Online Shop. This week the “Kaufhaus Österreich” / “Store Austria” was launched and failed immediately. Because it is nothing more than a link list with a not functional search. The search does not index the products from the vendors but only their company name and description. For Example, if you search for a mouse no results are returned because no registered vendor has “mouse” in their company name 🤣
No mouse in Austria
IT-Disaster Austria Part 2 – COVID-19 mass-test registration
Austria will conduct free corona mass tests in December. To organize these tests an online registration page. There you have to provide name, social security number, Email or phone number. After the registration a mail is sent with a link to make an appointment in a local test center. The registration site was announced in the media but the registration site failed permanently with an unexpected error. People report that 5 or more try were required to get registered.
Registration site for Corona mass-test failed
But the “unexpected server error” on submit was not the only problem. The Austrian news paper Der Standard reported a list of problems:
The site went offline only few hours after launch because of an DDOS attack
People could not book an appointment in their home district
Someone managed to book so many appointments that a test site was exclusively blocked
Some Email addresses were deleted
The website had no imprint
Much more problematic is a huge data leak. More and more people report that they get personal data from other people. For example, on Wednesday a teacher from Carinthia reported that he got an appointment for another person from Vienna.
The first lock-down in spring was a game changer. Home office has become normal. But also in non-lock-down times the usage of Microsoft Teams now is on a high volume. For us it has become the collaboration backbone.
Teams usage is stable no matter if lock-down
Webcast Marathon
Last week on 26th November we held a webcast marathon. We presented 6 talks for Dynamics 365 Finance and Power Platform. The webcasts were organized using Microsoft Teams Live Events. The registration pages were quickly built using Microsoft Forms and automated using Power Automate. When a new participant registered for a webcast, PA read the registration from Form, picked the corresponding .ics calendar, sent a mail to the participant with the calendar .ics as attachment and created a new record in Azure table storage.
Webcast Registration via Power Automate
It turned out that the combination of Office 365, Power Platform and Teams work great together and allows to manage a complex distributed scenario like a webcast with different speakers exclusivly in the cloud.
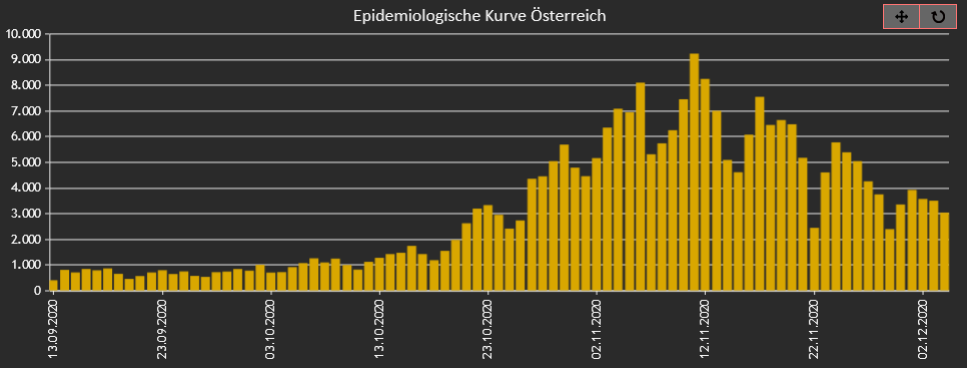
Lock-down results
In contrast to the very strict first lock-down in spring, the actual “hard” lock-down allows more exceptions.
Monday morning: Some stay at home but many (have to) go to work (30th November)Monday morning : First week of first lock-down in spring (16th March)
In theory we have a curfew all day. Schools and Universities are closed, many retail stores are closed, home depots are closed for B2C customers and gastronomy is limited to delivery. But since going to work, sport and shopping is allowed we don’t really feel the pressure like in spring. However, it seems to work and the numbers are dropping.
Taking backups is crucial. I prefer to use the Azure cloud for storing backups. In case a disaster strikes on-premises, the data is at least save in the cloud. Microsoft is offering a great solution with Azure Backup. For taking simple file-based backups you only need the recovery agent installed on the source server. For taking more complex backups e.g. from SQL Server and HyperV the Azure Backup Server is required.
Azure Backup Server (aka. DPM)
The Azure Backup Server is a re-branded System Center Data Protection Manager. Backups can be stored locally on disk and in an Azure Backup Vault. Like the SCDPM Server, the Azure Backup Server requires agents to be installed on the source systems. This can be done using push or pull techniques. Within a domain you can instruct the DPM Server to install an agent on a server. You may also install the agent by hand and instruct DPM to connect to an already installed agent.
Azure Backup Server Console
I had one legacy server hosting a SQL Server 2012 instance, which was protected with System Center Data Protection Manager 2012 a while ago. The old agents were uninstalled years ago but left some entries that blocked the installation of the new DPM agent.
Identifying the problem
When the installation fails, a Log is created in C:\Windows\Temp. A look in the log file revealed that the installer found an installed product that should not be installed.
Agent installation started
 The agent bootstrapper is doing prerequisite checks
 Querying for Product with Upgrade code: {0BEE7F6A-CE2A-A5CF-FFEB-8E0F8A8CDE75}
 Querying for Product with Upgrade code: {EFF053DE-592F-5574-9AA3-64662A944952}
 IsProductInstalled: MsiEnumRelatedProducts returned ERROR_SUCCESS and product code found is {EECBB752-2C6E-45B7-9F18-2327B886309A}
 IsProductInstalled: Product: {EECBB752-2C6E-45B7-9F18-2327B886309A} is installed
 PerformAgentInstall failed with errorcode=addfd060
 Install ProtectionAgent failed with errorcode=addfd060
 Failed: Hr: = [0x80990a2d] DPMAgentInstaller failed, error says: [(null)]
 Failed: Hr: = [0x80990a2d] : SC-DPMRA found. Cannot install Microsoft Azure Backup Agent
 Failed: Hr: = [0x80990a2d] : Encountered Failure: : lVal : PerformAgentInstall(installargs, silent, skipKB)
 Failed: Hr: = [0x80990a2d] : Encountered Failure: : lVal : InstallProtectionAgent(false , false )
To identify the problem get_wmiobject can be used to display ID and Name. A old version of System Center Data Protection Manager Agent was not removed properly.
A first attempt to get rid of the DPM 2012 was to clean the registry. Therefore the regedit.msc was called and all entries referencing {EFF053DE-592F-5574-9AA3-64662A944952} were deleted. This was not sufficient to install the new agent.
Microsoft provides a tool to remove entries from uninstalled programs. The tool MicrosoftProgram_Install_and_Uninstall.meta.diagcab can be downloaded here: Fix problems that block programs from being installed or removed . It found the entry for DPM 2012 and removed it.
Fixit for blocking installation / uninstallation
The tool was a great step in the right direction, however the installation failed again because the DPM service could not be installed. The log file showed the following entry:
Received type [0x01000000] message [Service 'DPM CPWrapper Service' (DpmCPWrapperService) could not be installed. Verify that you have sufficient privileges to install system services.]
It turned out that there was already a CPWrapper Service but it was not functional anymore. The path to binary was no longer working. Therefore the property dialog from the service MMC was also not working. But there exists a tool to remove corrupt service entries. Process Hacker can be used to simple delete the service entry.