Order Change: Notify customers using Business Events and Flow

The combination of Dynamics 365 Finance and Supply Chain Management Cloud ERP and Microsoft Flow helps to automate many tasks. For example, you can easily notify a customer about changes regarding the confirmed shipping date.

Concept

  • Configure a Blob Storage Endpoint for Business Events
  • Create a Change Based alert for ShippingDateConfirmed
  • Add a flow that triggers on new events
  • Read Email from sales order and notify customer

Configure a Business Event Endpoint

Business events in Dynamics 365 FSCM can be used to notify external systems. It supports different endpoint types like Azure Event Hub, HTTPS web hook and Blob Storage Account. I personally prefer to use a storage account because it’s a very cheap and easy to use, understand and support cloud infrastructure.

In Entra ID admin Portal (Azure Active Directory) create a new app registration. Note the client ID and create a new secret. Note the application secret as well.

In order to use a Blob Container for Business Events you need some resources. First, of course a storage account with a public endpoint. Copy the Storage Account Connection String. On the menu on the left side select Storage browser. Navigate to the Blob Storage and create a new container.

Azure Storage Account for storing business events in a blob container

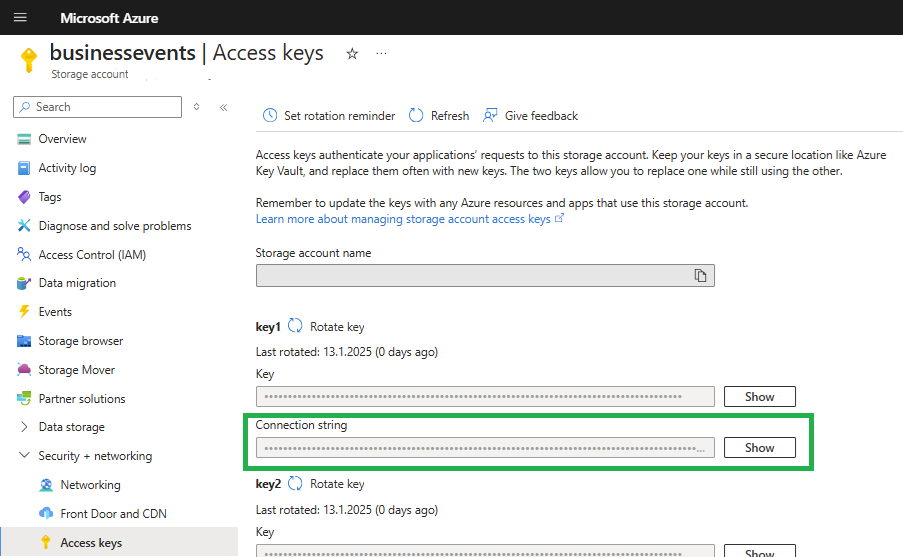
Next, create a key vault to store the connection string. When creating the key vault make sure to use Vault Access Policies. At the key vault create a new secret and place the connection string there.

Azure Key Vault with Vault Access Policies

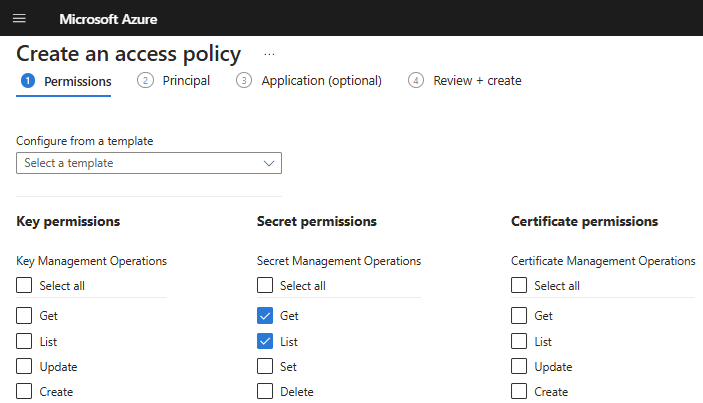
In the Key Vault switch to Access Policies and create a new one. Assign the registered app the rights to list and get secrets.

Assign List and Get secrets permissions to the service principal

In Dynamics 365 Finance and Supply Chain Management open the Business Event Catalog (System Administration > Setup > Business Events). Switch to the Enpoint tab and create a new Blob Endpoint. In the dialog provide

  • a meaningful name
  • the name of the Blob container
  • client ID from the app registration
  • client secret
  • the key vaults URI (from the key vaults overview pane)
    e.g. https://yourkeyvault.vault.azure.net/
  • the name of the secret that holds the connection string

Switch to the Business Event Catalog and filter the Business Event ID entries containing the term “Alert”. Make sure you select the BusinessEventsAlertEvent and click on Activate. In the dialog select the legal entity and the recently created blob endpoint.

Business Events Catalog in Dynamics 365 Finance and Supply Chain Management

Test Business Event Endpoint configuration for Alerts

Make sure you have a batch job handling change based alerts in Dynamics 365 Finance and Supply Chain. If you don’t have such a batch job, create on from System Administration > Periodic Tasks > Alerts > Change Based Alerts. Change the recurrence to no end date and provide a time interval e.g 10 minutes.

In Dynamics 365 FSCM go to an existing sales order or create one. In the top menu switch to Options and select Create custom alert.

Create a change based alert for sales orders in Dynamics 365 Finance Supply Chain Management

In the alert dialog choose the Confirmed Ship Date from the field drop down. This will change the alert trigger to Has Changed. Make sure to activate the Send Externally Option as well. Save the alert rule.

Create a change based alert for sales orders in Dynamics 365 Finance Supply Chain Management

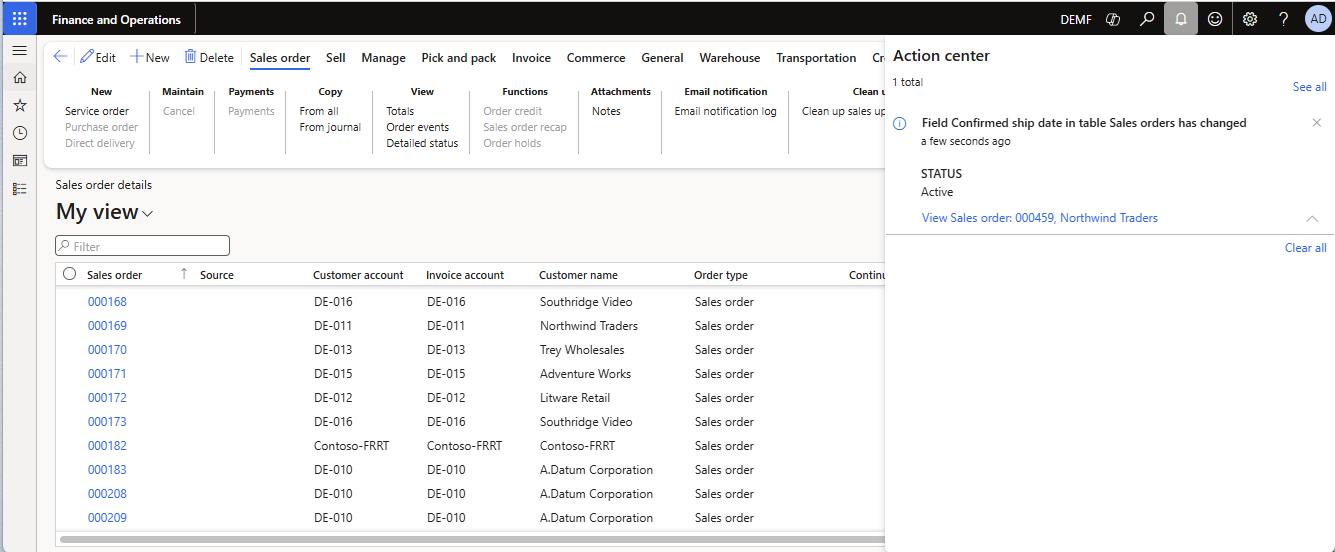
Change the confirmed ship date in the sales order. Depending on the time interval for change based alerts batch job you will get notified that the value has been changed.

Alert notification that the shipping date confirmed has been changed

Switch to the Azure Portal and go to your storage account. From the Storage Browser, select the Blob Storage and the container you created for the business events. There you should see at least one entry named as GUID.

Azure storage account with business events

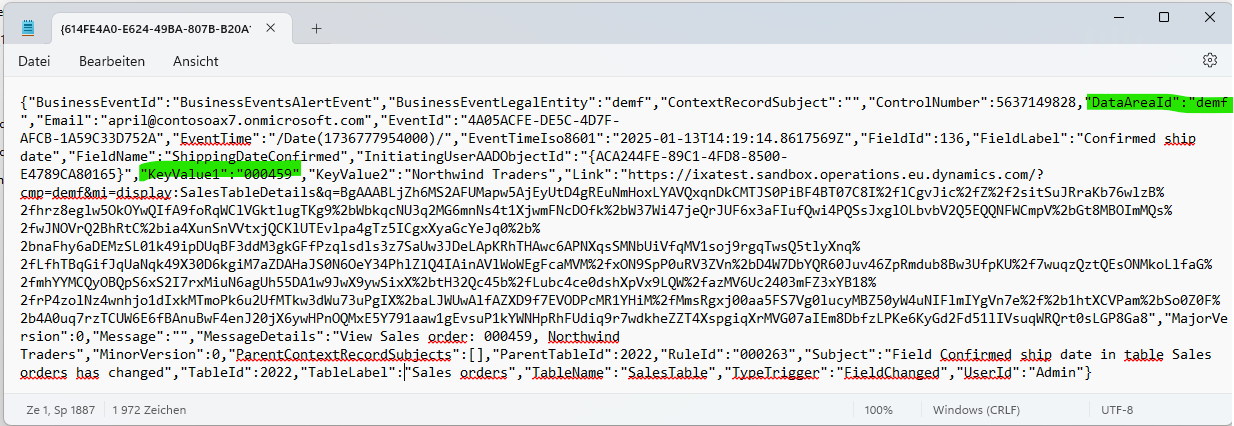
Download and open the file in a text editor. I should contain the JSON for the business event. You will find the Sales Order Number in KeyValue1 and the legal entity in the DataAreaId property. You can use this values to lookup the sales order in D365.

Business Event JSON text

Create a flow to notify the customer

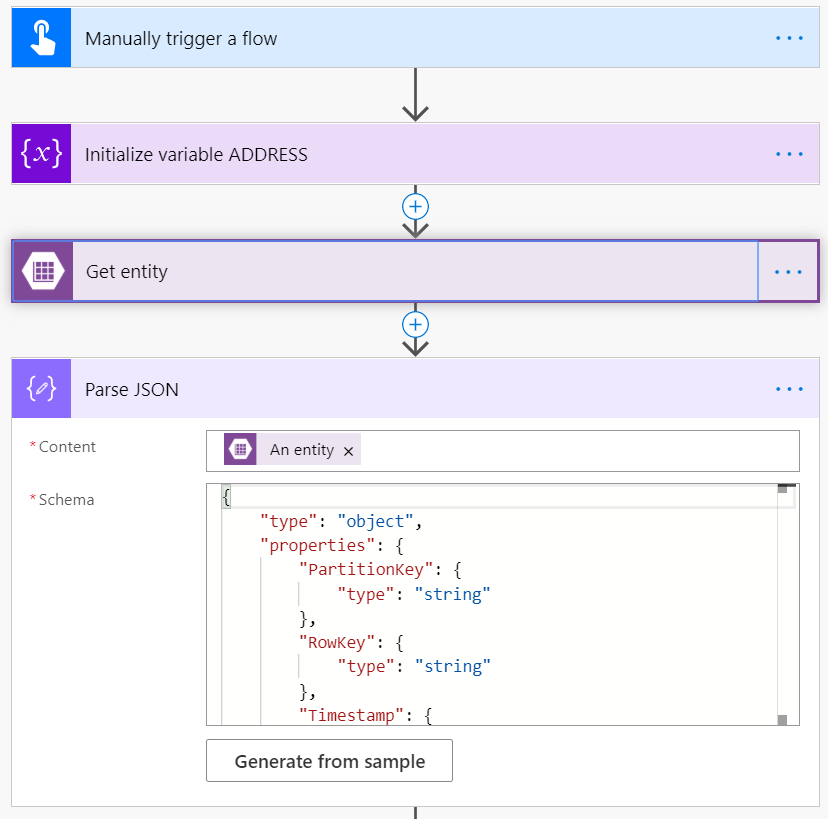
Go to Power Automate and create a new flow that triggers when a blob entry is created or modified. Check if the event was a shipping data change and send an email to the customer. The flow may look like this.

Flow in Power Automate to handle business events

The first action Get Blob Content is used to download the event file itself. The next action will parse the event JSON string. Since the blob file has no file extension, it is necessary to provide the content as string() to the Parser. The schema can be generated by example. E.g. copy the JSON string from the test file and flow will generate the schema.

Parse JSON action for Dynamics 365 Business Events

Because the blob storage account may be used by different business events in the future it is advised to add a condition to check if the alert is triggered by the shipping date.

Condition if change based alert was triggered by changing the shipping date

Next use the DataAreaId and KeyFieldValue1 to lookup the Sales Order in Dynamics 365 FSCM by combining both values seperated with a comma e.g. demf,001234

Lookup sales order in Dynamics 365 Finance and Supply Chain from flow

Add a second condition to check if there is an Email address provided in the sales header. If so use the Send Email action to notify the customer. If required you may work on the FALSE condition and lookup the customer instead to find an email address.

Send email with the updated shipping date to the customer

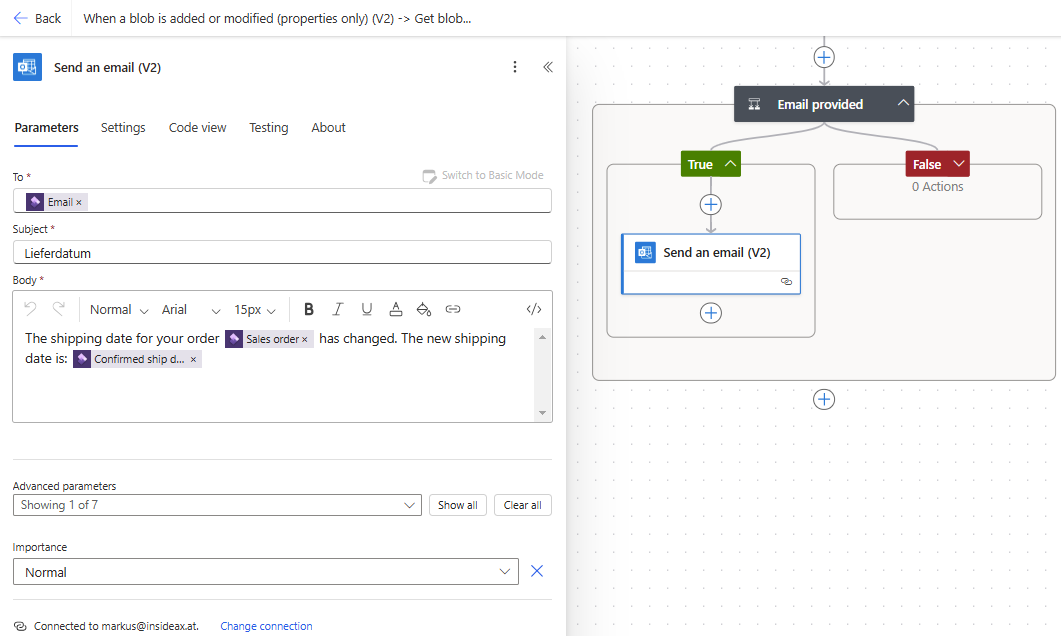
The final email may look like this

Email with the new shipping date

Filter on NoYes field in Dynamics 365 Flow Connector

The Dynamics 365 connector in Power Automate provides the basic operations to interact with your Dynamics 365 FO instance. You can create new records via flow (e.g. a new Customer), read, update and delete records (e.g. Sales Order Lines) and retrieve the list of available entities.

Dynamics 365 Finance and Supply Chain Connector in Power Automate

The connector uses OData to interact with the entities in Dynamics 365 FO. Therefore, it also supports OData syntax for filter expressions. If you want to filter on a boolean Extended Datatype like NoYes and try to use “Yes” or “1” or true it will not work. Dynamics 365 has its own Datatype that comes from the entity definition Microsoft.Dynamics.DataEntities.NoYes .

One Time Customer in Dynamics 365 Finance

For example, if you want to get all One-Time Customers from Dynamics 365 FO, use the Dynamics 365 connector and choose the action “List items in present Table”. Use the Customers entity. To filter on a NoYes field like One-Time Customer you have to use the following syntax:

  • IsOneTimeCustomer eq Microsoft.Dynamics.DataEntities.NoYes’No’
  • IsOneTimeCustomer eq Microsoft.Dynamics.DataEntities.NoYes’Yes’
Filter on NoYes field in Dynamics 365 Finance Connector

Power Automate: Deploy and Execute an Ethereum Smart Contract

Power Automate (aka. Microsoft Flow) is a great cloud-based tool to automate all possible tasks. There is a Ethereum connector (Beta) that can be used to deploy a Smart Contract to an Ethereum Blockchain network and execute functions.

Ethereum Network

You need to connect to an Ethereum network. There is a fully managed Blockchain Service in Azure. I’m running my private network with Proof-of-Authority. At the Azure management portal, go to the transaction node to get the required information to connect.

Blockchain Service in Azure
Blockchain-as-a-Service in Azure

Smart Contract

I’m using Visual Studio Code with the Ethereum Blockchain Development SDK to implement a Smart Contract in Solidity. You can find the link to the SDK at the Azure Blockchain Service portal.

Blockchain Development Kit for VS Code
VS Code with Azure Blockchain SDK

The SDK requires a lot of other software products to download and install. I found that the solidity compiler installed was newer than expected. As result the demo smart contract you get from the SDK did not compile. The simplest solution was to change the pragma of the contract

pragma solidity >= 0.5.16 <= 0.7.0;

ABI and Bytecode

In order to automate the deployment of a Smart Contract via Power Automate you need to provide the ABI and Bytecode. Both can be found in VS Code, at the build directory in the context menu.

Solidity ABI and Bytecode
Copy ABI and Bytecode directly from VS Code

Power Automate

You can directly provide the ABI and Bytecode in the Deploy Smart Contract action. However, I decided to place both in an Azure Table Storage and fetch it from there. To do so, I create a table with a column for the Bytecode, a column for the ABI and a name.

Store ABI and Bytecode in Azure Storage Account

The first step in my flow is to connect to the Azure Storage account and get the smart contract I need. The result from the storage is a JSON string which is parsed so the ABI and Bytecode is available for the next steps

Deploy Ethereum Smart Contract from Flow
Fetch the smart contract binaries from the storage account

Next the Deploy Smart Contract action is used to deploy the contract. There you need to provide the connection to your Ethereum network. In my example there are two parameters for the constructor and for testing purpose these values are hardcoded. In real life you would provide values from the calling sources. The third parameter for the connector action requires the Bytecode which is taken from the storage account. The result from the deployment is the smart contracts address which is stored in a flow variable.

Deploy a Smart Contract to a private Ethereum Blockchain Network
Deploy a smart contract

Interacting with the smart contract

After the Smart Contract has been deployed to the Ethereum Blockchain Network, use the Execute Smart Contract Function action in the flow. For each step you have to provide the address, the ABI, the name of function and the parameter as JSON string. A function without parameters has to be called with {} because the parameter property is mandatory.

Execute a Smart Contract Function via Flow
Execute a Smart Contract function via Power Automate / Flow

Here is an example for a function with some parameters. These parameters have to be provided as JSON string in Flow.

function SetupMachine(int sawLength, 
                      int waterTemp, 
                      int rpm,
                      int speed) public
    {
        if (State != StateType.Assigned)
        {
            revert('Assign to a machine first');
        }

        SawLengthMM = sawLength;
        WaterTempDgrC = waterTemp;
        ExtruderRPM = rpm;
        ExtruderSpeed = speed;

        State = StateType.Setup;
        Worker = msg.sender;
    }
Execute a Smart Contract Function via Flow
Execute a Smart Contract function with parameters

Use UI Flows in Power Automate to interact with a web site

UI Flows are new features from power platform april 2020 wave, and allow you to integrate local installed applications and web sites. I’ve made a video with UI Flow for web sites. In this demo I’ve create a flow that reads the Bitcoin / Euro rate from a web sites and sends it per Email.