Write product configuration model attributes to BOM and ProdBOM
12. February 2019 Leave a comment

https://www.youtube.com/watch?v=BaHYbDQJB_A
The product configuration model in Dynamics 365 for Finance and Operations is a great tool dynamically generate production orders including bill of materials (ProdBOM) and routes. In the product configuration model, the user is free to define attributes of different types, and use these attributes for calculations and conditions within the model. However, I had to come up with a solution to write the attribute value from the production configuration wizard to the generated ProdBOM. Here is an example code how this can be done:
Data type, table and form extensions
- Create a new string EDT and call it ERPPCStringAttribute
- Create table extensions for the BOM and ProdBOM and add a new field based on the ERPPCStringAttribute EDT
- Create a form extension for the ProdBOM and add the new field in the grid (Tab > Overview > Grid)
Extend the PCBOMLineDetails form
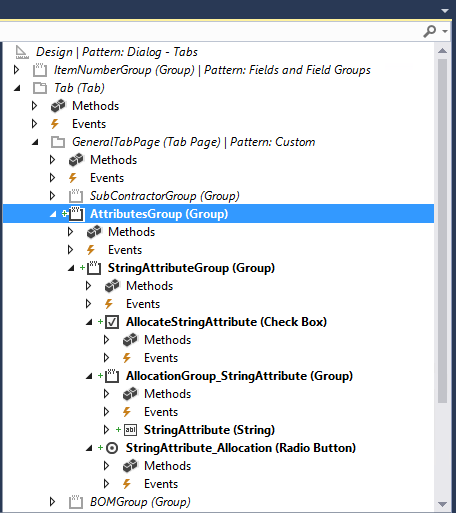
This is a tricky part. In the form for the BOM line details in the product configuration model, create a section for the attribute that looks the same like all the others. Here is a screenshot from Visual Studio:

You need to create a group, hat contains another group, with a checkbox and group with a string edit field and a radio button. Make sure to name the elements like shown in the screenshot. If you are not sure, compare it with the other existing groups e.g. the SubContractor. You will need to compare the properties of each element with the corresponding properties of an existing element to make it look similar.
Extend PCBOMLineDetails Form UI logic
You cannot overwrite methods on UI elements in form extensions e.g. clicked() . Therefore you have to implement the logic for the UI elements in a separate class. Create a new class ERPPCBomLineDetailsEventHandler and implement the following UI logic for clicked(), modified() and lookup()
class ERPPCBomLineDetailsEventHandler
{
[FormControlEventHandler(formControlStr(PCBOMLineDetails,
AllocateStringAttribute),
FormControlEventType::Clicked)]
public static void AllocateAttributeString1_OnClicked(FormControl sender,
FormControlEventArgs e)
{
FormCheckBoxControl chx = sender;FormControl allocationGroup_AttributeString1 =
sender.formRun().design().controlName(formControlStr(
PCBOMLineDetails,
allocationGroup_StringAttribute)
);
FormControl attributeString1_Allocation =
sender.formRun().design().controlName(formControlStr(
PCBOMLineDetails,
StringAttribute_Allocation)
);PCModelingLibrary::templateSetEnabledStatus(
(chx.value() == NoYes::Yes),
allocationGroup_AttributeString1,
attributeString1_Allocation
);
}[FormControlEventHandler(formControlStr(PCBOMLineDetails,
StringAttribute_Allocation),
FormControlEventType::Modified)]
public static void AttributeString1_Allocation_OnModified(
FormControl sender,
FormControlEventArgs e)
{
FormRadioControl radio = sender;
FormStringControl attributeString1 =
sender.formRun().design().controlName(formControlStr(
PCBOMLineDetails,
StringAttribute)
);str label = attributeString1.labelText();
attributeString1.text(”);
if (radio.selection() == PCAllocation::Value)
{
attributeString1.extendedDataType(
extendedTypeNum(ERPPCStringAttribute)
);
}
else
{
attributeString1.extendedDataType(
extendedTypeNum(ERPPCStringAttribute)
);
attributeString1.label(label);
}
}
[FormControlEventHandler(formControlStr(PCBOMLineDetails,
StringAttribute),
FormControlEventType::Lookup)]
public static void AttributeString1_OnLookup(FormControl sender,
FormControlEventArgs e)
{
Object PCBOMLineDetails = sender.formRun();
PCClass component = PCBOMLineDetails.component();
FormRadioControl radio =
sender.formRun().design().controlName(formControlStr(
PCBOMLineDetails,
StringAttribute_Allocation)
);if(radio.selection() == PCAllocation::Attribute)
{
PCModelingLibrary::attributeLookup(sender, component);
}
}}
Extend the PCBOMLineDetails class-behind
Like many forms in Dynamics 365 for Finance and Operations the form has a class-behind that implements the business logic. You need to extend this class in order to deal with the newly created Attribute group. Create a new class ERPPCBomLineDetails_Extension and impelement the following logic:
[ExtensionOf(formStr(PCBOMLineDetails))]
final class ERPPCBomLineDetails_Extension
{
public PCClass component()
{
return component;
}[ExtensionOf(FormMethodStr(PCBOMLineDetails,loadAllocations))]
public void loadAllocations()
{
PCTemplateAttributeBinding templateAttributeBinding;
PCTemplateAttribute fieldReference;
PCTemplateAttributeBinding findBindingByIDs(TableId _tableId,
FieldId _fieldId)
{
PCTemplateAttributeBinding binding;fieldReference =
templateFind.findTemplateAttributeByTableIdAndFieldId(
_tableId,
_fieldId
);
select firstonly binding
where binding.TemplateAttribute == fieldReference.RecId
&& binding.TemplateComponent == templateComponent.RecId;return binding;
}next loadAllocations();
templateAttributeBinding = findBindingByIDs(tableNum(BOM),
fieldNum(BOM,
ERPPCStringAttribute));
PCModelingLibrary::templateLoadStringAllocation(component,
templateAttributeBinding,
StringAttribute,
AllocateStringAttribute,
StringAttribute_Allocation,
AllocationGroup_StringAttribute);
}[ExtensionOf(FormMethodStr(PCBOMLineDetails,updateRadioControls))]
public void updateRadioControls()
{
next updateRadioControls();PCModelingLibrary::templateSetEnabledStatus(
(AllocateStringAttribute.value() == NoYes::Yes),
AllocationGroup_StringAttribute,
StringAttribute_Allocation);}
[ExtensionOf(FormMethodStr(PCBOMLineDetails,writeAllocations))]
public void writeAllocations()
{
PCTemplateAttribute fieldReference;next writeAllocations();
if ((AllocateStringAttribute.value() == NoYes::Yes))
{
fieldReference =
templateFind.findTemplateAttributeByTableIdAndFieldId(
tableNum(BOM),
fieldNum(BOM, ERPPCStringAttribute));
PCModelingLibrary::templateSaveStringAllocation(component,
templateComponent,
fieldReference,
StringAttribute,
StringAttribute_Allocation);
}
}}
Extend the product configuration model framework
Implement the following classes to extend the product configuration model framework in Dynamics 365 Finance and Operations:
PcAdaptorBOMLine class:
[ExtensionOf(classStr(PcAdaptorBOMLine))]
final class ERPPcAdaptorBOMLine_Extension
{
public ERPPCStringAttribute parmWANPCStringAttribute(
ERPPCStringAttribute _stringAttribute = bom.ERPPCStringAttribute)
{
EcoResTextValue value;value.TextValue = _stringAttribute;
this.fieldAssignment(bom.TableId,
fieldnum(BOM, ERPPCStringAttribute),
value);
bom.ERPPCStringAttribute = _stringAttribute;
return bom.ERPPCStringAttribute;
}}
PCGenerateBOMLine
[ExtensionOf(classStr(PCGenerateBOMLine))]
final class ERPPCGenerateBOMLine_Extension
{
protected void setupBOM(
BOMId _bomId,
InventDim _inventDim,
InventTable _inventTable,
boolean _isProduction
)
{
next setupBom(_bomId,_inventDim,_inventTable,_isProduction);bom.ERPPCStringAttribute = templateFind.getBindingValueAsString(
tableNum(BOM),
fieldNum(BOM,ERPPCStringAttribute));
}}
Re-Initialize the framework template records
By default the framework does not recognize to create template records for the newly added attribute field. Therefore you have to delete the existing templates and trigger the framework to reinitialize. Be aware, this might harm your existing models!
PCTemplateInitialize class:
[ExtensionOf(classStr(PcTemplateInitialize))]
final class ERPPCTemplateInitialize_Extension
{
public static void main(Args _args)
{
PCTemplate tableTemplate;
PcTemplateInitialize init = PcTemplateInitialize::construct();
delete_from tableTemplate;
init.run();
}
protected void createTemplatesForBOM()
{
next createTemplatesForBom();
PCTemplate tableTemplate;
select firstonly tableTemplate where
tableTemplate.ReferencedTableId == tableNum(BOM);
this.createFieldTemplate(tableTemplate,fieldNum(BOM,
ERPPCStringAttribute ));
}
}
Start this class from Class Runner or add a menu item to call it by hand.
Test your Implementation
- Create a new product configuration model
- Add a new attribute “notes” of type string
- Add a BOM line to the model
- Open the BOM line details and assign the notes attribute to the string attribute 1

- Save the model
- Create and approve the model version
- Create a new production order
- Use the configuration wizard to provide a text value for the notes attribute

- Create the production order
- Verify that you can see the attribute value in the ProdBOM of your production order


